
You are using an out of date browser. It may not display this or other websites correctly.
You should upgrade or use an alternative browser.
You should upgrade or use an alternative browser.
Got a Freestyle Buggy at last!
- Thread starter 250buggys
- Start date
")
250buggys
Well-known member
Another sunny Sunday, been busy with other things- dam DIY but the bathroom is looking better for it...

Anyway holes in No1 mudguard filled and sanded ready for primer...
Not sure if it was the standard thing to drill throug the arches to mount them (will have to study some pics) it certanly does not do anything for the looks to have bolt heads sticking out- also recon I can save some weight with a better design.
250buggys
Well-known member
Heard word in the week ebay were doing a 20% off up to £250, cheers ebay I had loads in my watch list (still have!), took advantage of a free £50- nice one!
Got a stainless backbox with link pipe, pipe will be introduced to my new pipe bender (design copied from Lilspeed) rather than welding angled sections- much neater, pics to follow when it arrives.
New clutch master cylinder to be installed in my newly refurbished pedal box along with my other purchase a yellow band dual circuit brake master cylinder, with level sense for IVA compliant brake test on dash switch.
Also found a battery that will fit in the tray mounted at the front of the buggy. Spec 12v 32Ah 390CCA
Length (mm) - 186
Width (mm) - 130
Total Height (mm) - 186
Terminal Type - Bolt Through (4F)
Terminal Layout - LH+
4 year warranty -£33
Can't grumble at that, wish they would do it more often...
Also ordered 10 x 2.5 x 32mm A2 grade stainless split pins and 4 x 16mm dia copper washers for the pedal box plus a new wider steering wheel which will give me more IVA room on the dash.
250buggys
Well-known member
Fuel tank arrived this week, 2.5 Gallon capacity- will measure this to be sure. That should give me an 80 mile range. Looks really good, shame that nice finish will be hidden out of sight. Comes with pre-installed fuel sender unit. Will make a mod so it has a fuel filler neck as the flush fit won't be any good. Light weight alloy so will help to keep overall weight down, did look at some steel tanks.

Clutch & brake master cyl arrived also,

Pedal box all ready to fit to buggy, floor mounts attached to pedals.

Clutch & brake master cyl arrived also,
Pedal box all ready to fit to buggy, floor mounts attached to pedals.

250buggys
Well-known member
You would never beleive it was December! 15 degrees C today - must be global warming

Got the paint cans out to spray the front wheel arches.

Couple of coats off matt, a rub down & will spray arches with lacquer rather than gloss.

Still Repairing the rear mudguards as had more damage but won't be long before they see some paint.
Got the paint cans out to spray the front wheel arches.
Couple of coats off matt, a rub down & will spray arches with lacquer rather than gloss.
Still Repairing the rear mudguards as had more damage but won't be long before they see some paint.
250buggys
Well-known member
Have been keeping the postman busy, a few parts have been delivered during the week.

Acewell 260, advertised as IVA compliant- should do everything I need for now in small form factor.

Really pleased with my braided hoses, these look awsome! can't wait to get these fitted.
Acewell 260, advertised as IVA compliant- should do everything I need for now in small form factor.
Really pleased with my braided hoses, these look awsome! can't wait to get these fitted.
250buggys
Well-known member
Out with the old, in with the new!

I am replacing the top firewall with chequer plate, this should save around 3Kg & looks better.

When I removed the passenger seat I noticed 2 holes in the firewall, not sure what they could have been for? open to suggestions..... The middle 2 were vacuum & oil pressure gauges, these will be installed onto the dash in the future.
The holes would have been a real pain to patch up, especcially being galvinised. Replacement was a good option.
I am replacing the top firewall with chequer plate, this should save around 3Kg & looks better.
When I removed the passenger seat I noticed 2 holes in the firewall, not sure what they could have been for? open to suggestions..... The middle 2 were vacuum & oil pressure gauges, these will be installed onto the dash in the future.
The holes would have been a real pain to patch up, especcially being galvinised. Replacement was a good option.
250buggys
Well-known member
A wet & miserable weekend, but productive! spent some hours stripping the freestyle for the rebuild after a motivational (kick up the arse) chat with Danny ;D

Been battling many corroded bolts! Everything is rusty on my buggy!!
The old copper brake & clutch pipes plus master cylinders are out to make way for the new braided hoses
Steering rack out for a refurb
Galv side panels looking tired (razor sharp edges), so they came off- may replace with chequer plate.
Rear bumper & fuel tank off, (rusty)

Looking a little bare

Still plenty of work to do.
Been battling many corroded bolts! Everything is rusty on my buggy!!
The old copper brake & clutch pipes plus master cylinders are out to make way for the new braided hoses
Steering rack out for a refurb
Galv side panels looking tired (razor sharp edges), so they came off- may replace with chequer plate.
Rear bumper & fuel tank off, (rusty)
Looking a little bare
Still plenty of work to do.
250buggys
Well-known member
Not sure how much longer this mild weather will last? never ever remember cutting the grass in December!
Decided to get the fibreglass kit out and make a start on the nose...

No intentions of mounting gauges there & have moved the brake & clutch master cylinders to the passenger foot well, so won't be needing the HUGE Ugly holes in the nose.

Decided to atack/remove the razor sharp steel bracket with the dremel, does't look standard or aid to the mounting of the noise, any other freestyle owner got one???.

Out!
Decided to get the fibreglass kit out and make a start on the nose...
No intentions of mounting gauges there & have moved the brake & clutch master cylinders to the passenger foot well, so won't be needing the HUGE Ugly holes in the nose.
Decided to atack/remove the razor sharp steel bracket with the dremel, does't look standard or aid to the mounting of the noise, any other freestyle owner got one???.
Out!
250buggys
Well-known member
Holes patched with some glass matt & resin, when dry will add filler and sand... soon you will never know those ugly holes were ever there....

Rain imminent so nose in the shed and off to the buggy, knew it wouldn't last...
Carried on from last weekend, removed the rest of the brake lines.

Ripped the old exhaust out...

Rain imminent so nose in the shed and off to the buggy, knew it wouldn't last...
Carried on from last weekend, removed the rest of the brake lines.
Ripped the old exhaust out...

250buggys
Well-known member
Removed the steering lock and gave the outer steering column a rub down and some paint

Never had the spray cans out in December! Rather be playing with the buggy then building a snowman...

Steering Rack had some attention too, removed the tired gaitors and old flaking paint, ready for restoration.
Never had the spray cans out in December! Rather be playing with the buggy then building a snowman...
Steering Rack had some attention too, removed the tired gaitors and old flaking paint, ready for restoration.


250buggys
Well-known member
Ordered my dash switches, had some already but they were faded, black was looking more grey,

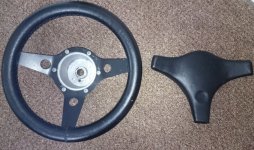
Got hold of a steering wheel centre cover for the IVA
View attachment 1
Does the job!

Got hold of a steering wheel centre cover for the IVA
View attachment 1
Does the job!
Attachments
-
 S Wheel & Cover.JPG251.3 KB · Views: 8,125


250buggys
Well-known member
A bit more adventurous this weekend, removed the engine!

Removed most of the ancillaries but the oil filter would not budge.. even with my oil filter removal tool and that has never let me down so far. Ill never know why people tighten oil filters up to an inch of their life when they only need to be nipped up! there isn't much room to get the tool on the filter and ended up putting a small hole in it!
Started removing some of the blue flaking paint and under that was a layer of red, then rust!
I need some advice on which engine paint is best? had a quick look on ebay and found 2 options...

or

My thoughts were, may get a better finish with the spray paint, but I would rather have better durability, so would the tin be best?
Removed most of the ancillaries but the oil filter would not budge.. even with my oil filter removal tool and that has never let me down so far. Ill never know why people tighten oil filters up to an inch of their life when they only need to be nipped up! there isn't much room to get the tool on the filter and ended up putting a small hole in it!
Started removing some of the blue flaking paint and under that was a layer of red, then rust!
I need some advice on which engine paint is best? had a quick look on ebay and found 2 options...
or
My thoughts were, may get a better finish with the spray paint, but I would rather have better durability, so would the tin be best?
250buggys
Well-known member
The oil filter & engine parted company today...

The screwdriver method (as a last resort) never fails!
The frame is now completely stripped... Some welds need grinding (OCD) so I can fit flush side panels, some steel brackets I am not happy with (the old overhead rad mounts) to be removed and some welds need re-strengthening, then prepping, then paint!

This is a good milestone in the project as it will all be going back together from here on!

I have refurbished a few parts as I have been going but now everything is off, it will all see some paint (hopefully soon weather permitting) and then be re-assembled. Good Job! as I have 2 sheds full of buggy bits...
The screwdriver method (as a last resort) never fails!
The frame is now completely stripped... Some welds need grinding (OCD) so I can fit flush side panels, some steel brackets I am not happy with (the old overhead rad mounts) to be removed and some welds need re-strengthening, then prepping, then paint!
This is a good milestone in the project as it will all be going back together from here on!
I have refurbished a few parts as I have been going but now everything is off, it will all see some paint (hopefully soon weather permitting) and then be re-assembled. Good Job! as I have 2 sheds full of buggy bits...