Max's Freestyle buggy build

Mini Mad Max

Active member
It all started about two years back towards the end of the summer of 2007. I had drilled it into my head that I must have a little field buggy. But my Dad replied, it would be much more fun to make one ourselves. So I had trawled the web and managed to find tonnes of build your own plans to the likes of: "Build your own buggy out of a Wine bottle cork and a piece of twineâ€
 

Mini Mad Max

Active member
Little Update :D
I got back from stoneleigh last night, and went straight to bed, after tea ofcoarse. I woke up thismorning expecting to wake up in a tent, and was REALLY disappointed that i came around in my room, to the sound of birds not exhaust notes :-\ To make me feel even less happy, the Weber 45DCOE that i was selling to fund the weekend didn't reach the reserve. So to make me feel even worse i trudged out to the garage in the drizzle to see how far away the kit is from being able to be driven. I then discussed my things to do list with my dad, and rather than just sit about talking about what i had to do, i decided to do it. Good idea :D

So what i have done today was finish of stage one of my cylinder head modifications:
1. Grind combustion chambers according to the Vizzard Bible.
2. Sand out any differences.
3. Lap in the valves where there were scuffs.
4. Finish making the Valve guid removal punch.
5. Polish up combustion chambers so they look good for the picture, and to get rid of all the grinding paste grease residue.

That was finished at 4pm, so i decided to go and get my camera.
As you can see in the pictures it is looking very shiny :D
DSCF2522.jpg

DSCF2523.jpg

DSCF2526.jpg

DSCF2529.jpg

My lovely little punch, my first peice of metal lathe work.

My next modifications are to get the valve guides out using my punch and a hydraulic press. Then grind round the ports where there are ledges and pockets that reduce flow. Then i need to put in some new bronze bullet nosed valve guides to take some new competition valves. Then i need my valve seats re-cut to be 3 angle ones, and if they are to scuffed, then have the valve size upped.
So everything above apart from grinding and pressing out the valve guides will be done by proffessionals :-\

Here are where i need to grind:
DSCF2528.jpg

DSCF2527.jpg


Then, from stoneleigh, i have a collection of bits and bobs to clean, paint and service.
1. I have a hub to paint and service and another hub to clean, paint and service.
2. A golf caliper to paint and service and another caliper to clean paint and service.
DSCF2535.jpg

3. A pair of adjustable tie bars to prepair them against corrosion, and buy a pair of rose joints.
DSCF2537.jpg

then bits i already have:
1. A pair of hub assemblies to strip down, clean, service, then paint.
2. Finish engine rebuild.
DSCF2430.jpg

3. Finish fuel tank
DSCF2429.jpg

4.General other stuff


Then i need to buy alot of things, so i can get it rolling over the summer.

Thats all for now folks!
Max :D
 

Mini Mad Max

Active member
Right Update time!
When i got back from poland, Dad said to me we have 5 weeks to do as much construction before i go back to school.
So this is what i've been up to in the last 5 days including today (the floors were done before poland).

I went out with my brother who is itching to get a car of somesort to sooth his cravings and to actually get some work done on the buggy. So we put the buggy on its side then drilled off the floor which was a rather interesting job as you will find out.

I knew the rivets were rather shoddy and not in a straight line or with regular spacing, but as we drilled rivet by rivet, it amazed us more and more. I bent my srill bit when one of the rivets went into thside of the box section. After we got one panel off it was obvious that i had a lot of scrubbing to do to get all the underseal off, horrible stuff, avoid it at all costs!!!
Enthusiastic brother:
DSCF2652.jpg

Rivets that are an optical illusion of a wave effect.
DSCF2654.jpg

Floorless buggy not flawless:
DSCF2664.jpg

Underseal before:
DSCF2667.jpg

After:
DSCF2668.jpg

Now with the cage awaiting new floors and panels (We will get the alluminium chequer panels on thursday), I have moved on to preperation of bits and left the engine be for a moment. I have focussed mainly on Suspension parts and Break parts so then i can get the buggy rolling when the floors and side panels and stuff are on.

Here is my first attempt at grit blasting On my mini Calipers:
Before
DSCF2778.jpg

After
DSCF2780.jpg

DSCF2781.jpg

Lovely and shiny!
And because we didn't have the calipers on the car to remove the piston we used our air compressor, that worked a treat ;D

Then i did all four hubs:
Crispy rust and grease
DSCF2789.jpg

To clean paintable metal  :D
DSCF2791.jpg


Then here is the wise one applying a coat of everyones favourite... Hammerite ;D
DSCF2790.jpg


Unfortunately grit blasting has it's problems if you don't contain it to a blast cabinet:
You end up looking like a pillock with grit in your scalp and somehow your bellybutton :eek:
DSCF2792.jpg


Ran out of my word allowance read on in next post,
Max :p
 

Mini Mad Max

Active member
Then on Monday i got on with more grit blasting and did these:
Before
DSCF2794.jpg

After
DSCF2797.jpg

Yesterday, i did a lot of painting and a fair bit of washing and preparation, managed to run out of grit despite recycling it using a massive polythine sheet, but it still goes everywhere. I did much cleaning like my inner CV joints which are now bagged up all nice and clean. And I also managed to do one Disk:
Before
DSCF2799.jpg

Cleaned and ready for paint
DSCF2800.jpg

Then painted
DSCF2803.jpg


I also did my driveshafts today, along with a second coat on the top of my mini calipers. Then i did cleaning of top arms and small brackets here and there.
DSCF2804.jpg

Both drive shafts have now had their second coat and are dry.
After watching the old build manual last night to clear things up about suspension, i decided to have a go at modifying my gear selector. Wonderfully simple ;D
DSCF2807.jpg

That's now been washed and is clean.

So that's what i've done in the last few days, and i also took delivery of a few of my minisport bits, waiting for the rest to come now.

List of things to do:
1.Finish cylinder head
2.Give engine another clean then rebuild
3.Rebuild gearbox and clean
4.Attach my panels
5.Build up front end and get front rolling
6.Figure out what to do next  :D

More updates on the way in the next few weeks,
Max :D
 

Mini Mad Max

Active member
Tiny update:
Last week of work went slowly as i had limited grit, cleaned and painted things i needed to and needed to get chequer plate to make panels and other bits before i did suspension.
I got the Master cylinders done with two coats:
DSCF2842.jpg

So I got the front breaks finished, both discs painted and the calipers have had their second coat all over :D
DSCF2848.jpg

Then in my new improvised blast cabinet, which works very well at containing the grit, did some more blasting, Here is basil modeling it for you:
DSCF2853.jpg

Water seems to have collected in the top, sorry for the pic being dark they were taken at Ten O'clock.
I blasted the other disk and a backplate.
Here is the backplate:
DSCF2843.jpg

Here are my two sheets of chequer plate, alot of it and it's really shiny :D
DSCF2845.jpg

It came to about £100 for two mega sheets, cheap ;D
The big one is 2.5m X 1.25
And the smaller one i can't remember, dad got it, i just have to pay him :-\
And finally basil makes checks that the buggy is safe before locking up.
DSCF2846.jpg

That's all,
More on its way at the weekend.
Max
 

Mini Mad Max

Active member
Another little update.
Due to being told to get off my behind at 2pm this afternoon by Jason, i did exactly that.
I blasted my other backplate, and my neighbour painted whilst i blasted. So the backplates are now completely finished.
Then since i have done all the cleaning and painting of the front suspension and brakes parts, i moved onto the back and got these top arms done:
DSCF2855.jpg

DSCF2856.jpg

DSCF2859.jpg

DSCF2860.jpg

Not bad for about 2 hours work.
Got a load more fixings, and cutting implements for my alluminium today.
Also some plumbing elbow for modding my clutch mc.
See next time to see what i meen about the clutch mc :D
Max
 

Mini Mad Max

Active member
Progress made!  ;D ;D ;D
After drawing up my floor yesterday, i was up like an early bird outside to do the floor of the buggy.
DSCF2867.jpg

We decided to do it as one piece which would be slightly stronger. Although, we plan to add a bar to the floor on both sides to give it strength when offroading.
Cut out the panel early thismorning then filed away the burrs.
DSCF2870.jpg

Then after clamping the buggy I foud i had measured wrong and double checked wrong. I had measured the distance across the back and then the length , and didn't take into consideration where the angle changes at the backwhere the side box section is welded to the straight back box section. So the panel was too narrow at the top and too wide at the bottom. A bit of shaving required down below. :eek:
After that a template was made to re-use the original holes as we didn't want to weaken the frame. Of course when the panel was all drilled and having a dry run, it didn't fit in a couple of holes because of i drilled it in the wrong place, bloomin polythine template. So they were enlarged. Then we cleaned the panel and cage with degreasant and meths, so my adhesive sealer would cling nicely. Dad then applied the adhesive sealer in the right amount for it to squidge nicely.
DSCF2873.jpg

Then me and Leo (Brother) lifted the panel on with two bolts in the bottom to locate it so it didn't slide and make the sealer go everywhere. We lowered it on then put in the rivets and moved it till they all lined up. Then did all the rivets and the countersunk bolts (that went along the bottom).
DSCF2874.jpg

Then Dad and I did the centre channelwith more countersunk bolts.
DSCF2875.jpg

DSCF2877.jpg

Afterwards, dad went round the panel with some sealer so no water can get in.
Now we just have to fill the holes from before that we don't want. Looks good doesn't it?! :D
Tomorrow before i go to scottishlandshire, I will try and get at least one side panel done.
They are both drawn up waiting for the chop.
Max ;D
Max :D
 

Mini Mad Max

Active member
Long time no post, this post is just to catch up although i have got a fair bit more progress than this but i haven't got the pictures... next weekend I promise to catch up on diary!
Soon after i got the floor on i got the sides on... I love this chequerplate stuff! ;D
DSCF2881.jpg


Then equally as ages ago i did the front suspension and got it rolling, unfortunately i lost a load of important pictures for this phase so you will have to make do with me telling you what i did and this pic:
DSCF3181.jpg

Well... The front suspension and brakes have no room for compramise, It's all new or refurbished and my refurbishment process is as you've all guessed now a bit OTT with grit blasting everything, painting it all in several coats of hammerite to protect against rust and then rebuilding all bearings, ball joints, calipers using copper slip on every thread and bolt... everything. So i'm pretty happy that the front shouldn't have many problems... although i did notice a rather nasty bow in the front bulkhead today, very strong though wont be pushed at all.
I don't know if you recall i had a problem with my tie bars, well that was fixed by a little modification:
DSCF3067.jpg

(missing the actual modification pics, but i have the mock ups)
DSCF3068.jpg

DSCF3071.jpg

That part of the frame is strong enough to take this as there is the tie bar mounting point and the thick steel footwell. Firstly i burnt enough plastic coat off, then marked it out, then cut a slit using the angry grinder, then hit the box section in to make a triangular box section, welded it, grit blasted it, painted it then tada! :D

Recently, I've been building up the suspension on the rear subframe so will get some more pics of that when it's built up. Then i've been re-building the gearbox, fitting my lower final drive Crownwheel and pinion, central oil pick up and magnetic oil trap. Engine is awaiting honing, balancing and a going over etc before re-build. Cylinder head has had no progress, might just use it as a surcharge item for a stage 3 one or buy a stage three one second hand which would be nicer as it would save me a fair chunk of money. Steering column had a dry fit today... needs adjusting.
I have 2 months to get it completely rolling (engine probably not in :( )as i plan to trailor it to stoneleigh to get in for free... haha cheapskate!
Things to do:
1. completely finish front end
2. build up subframe
3. Build up engine and gearbox
4. Get it mechanically working asap
5. Fueltank :eek:

I have a mountain of stuff to get through... and gritblasting is starting to tire me ::)
Max
 

Mini Mad Max

Active member
I know everyone was getting at me for being a slacker so i went out yesterday and today especially to do something that i've been putting off for a long time.

I spent about an hour yesterday afternoon cutting out and making this bracket:
DSCF3588.jpg


The idea was to move the steering column over so the driving position would be a lot more central.
Things went together quickly thismorning and in the 2 hours in the morning out in the garage i got to this stage:
DSCF3594.jpg


I then spent a LONG time looking for hammerite special metals primer to paint the bracket in because it's galavanised steel made out of my old floor panels :D So after i lost all hope after searching pretty much everywhere I put it all together to make sure there were no hitches:
DSCF3598.jpg

DSCF3599.jpg

DSCF3597.jpg

DSCF3596.jpg

It makes the driving position much more comfortable and it feels like the steering wheel is right in front of you.
When it was all tightened up there was no play, wobble or flex in it at all... SHARP! :D

Also recently, been rebuilding my gearbox:
DSCF3524.jpg

My lovely 4.3:1 final drive :)

DSCF3521.jpg

Lovely clean case and central oil pick up, mmmmm. Although, can you spot the big cock up there? No? Well i put the central oil pickup in with the gasket sealed in place with gasket sealer and bolted in too, before i put the layshaft back in... big ooops! But not to worry :D

DSCF3518.jpg

Magnetic oil trap, a cheap modification that will save your engine, especially the oil pump!
Also put new oil seels in where possible so it doesn't dribble like the A-series is renound for.

My engine bits have had a full balance and a block hone, £110.. well worth it though, the crankshaft was well out of balance!
DSCF3593.jpg

DSCF3592.jpg


Also been building up the rear subframe, top and bottom arms, cones and hi-los are now in place:
DSCF3591.jpg

Nice big progressive bump stops too :D

Last post i showed you how i modified the cage where the tie bar was on the front to prevent it from hitting the cage on full rebound, here is a finished picture:
DSCF3590.jpg

I'm going to make a rebound buffer of some sort for the front if i ever become airborn or anything, probably a tether made from some cable or something of the sort.

Hopefully proves i haven't been doing nothing, been painting up lots more things too! Although I have recently made more work for myself by shearing a bleed nipple off in the front left caliper and then snapped a special left hand die for removing things like that in the nipple. So i'm having to re-furbish a spare one... DOH! Only need a £4 seel kit though so not a tremendously costly fix, just a pain in the bottom!

Hopefully before too long you will see my engine back together and put on the gearbox along with the rear suspension completed with my hubs that are awaiting machining to take my lovely mk4 golf calipers!
Need to sort ourt a detailed plan soon so i do stuff in the right order too!
Max
 

Mini Mad Max

Active member
Warning: this topic has not been posted in for at least 120 days.
Unless you're sure you want to reply, please consider starting a new topic.
  :'(
This last weekend, I had a spate of non slacking!!!! You would not believe how close i came to some significant progress if minisport hadn't cocked up on their part several times over!
Starting out with something i did quite some time back now. After faffing about with offset woodruff keys to try and time my cam i gave in and opted for swiftune's fancey alloy adjustable one :D Absolutely chuffed to bits with the quality of their parts and service, Unlike minisport they had a batch of dodgey parts and rather than sending them out anyway, they told me they would be on the case getting some fresh ones as soon as possible and that i could expect to have them by the end of the week. Turned out i got the timing gears in no time at all! Doth of the cap to them :)
DSCF3803.jpg

DSCF3801.jpg

Then I sorted out my combustion ratio to a lovely 10.5:1 which is about right for my fast road engine spec :)
DSCF3808.jpg

I took the head and my rear hubs and golf calipers to a wonderful machine shop near where I am and as soon as i walked through the door, both guys in the reception recognised they were mini bits so i knew they were in good hands :D However when I got the head back there was a pin hole through into one of the waterways, checked head thickness to make sure that the head was machined level and it was, just wonky casting cores caused the problem! So it was back to the machine shop to have an insert made for it in the bottom right of the picture:
DSCF3910.jpg

No pictures of the golf caliper jobby yet as I'm waiting on a couple of nuts and bolts and replacement parts from minisport.

Next started building up the engine some more, head on and roller tip rockers with clearances set and gapped spark plugs for lumenition magnetronic contactless ignition in my aldon yellow dizzy :)
DSCF3912.jpg

DSCF3914.jpg

DSCF3926.jpg

Then over the weekend, tried to get the engine in.
DSCF3927.jpg

DSCF3929.jpg

However this failed as the engine wouldn't sit low enough in the subframe for the engine mount holes to line up, even with a lube up and persuasion!! Turns out the engine mounts were each about 2.5mm wider than an old in tact one :/
So engine came back out and had a couple more ancilliaries attached, and subframe drilled for lovely dural sump guard :)
So with nout to do yesterday I painted up more bits and bobs and made a ruel pump and filter housing:
DSCF3931.jpg

So quite a productive weekend on the whole, shame about the engine mounts :/
More to come soon!!
Max
 

Mini Mad Max

Active member
Hi Guys!
After a wonderful motivational session thismorning with Steve and Mary, I decided to get some impressive progress done. Well not that much impressive work done, but it's a milestone all the same!
So after Steve had left and I'd had a bite for lunch, I headed out for the second attempt at mounting the engine with new mounts that were 1.5mm thinner than the minisport ones (combined).
Masive improvement, the engine was in the subframe within half an hour. Then I attached the gearbox steadies and got the engine and subframe onto a home made meaty trolly with meaty castors, and lined it up for its approach into the buggy :)
DSCF2489.jpg

My Brother (Leo) devised a clever way of mounting the cage to the engine and subframe. He chocked the front wheels up, so then when we lifted the back up the cage didn't move. Then when the cage was raised, we rolled the engine in on it's little trolley, and gently dropped the cage on. It went like a breeze all bar my slightly too big radiator bracket, which shall be replaced by a smaller one so the rad doesn't foul on the cage.
DSCF2490.jpg

DSCF2491.jpg

DSCF2492.jpg

Engine in place :)
I would've got the hubs assemblies in place and some wheels on on top of that, but the callipers and hubs need further modification as the huge banjo fitting supplied fouls on the driveshaft gaitor :(
After monday's exam I have until friday (when my last exam is) to build up a card mock up of where other things will go during my revision breaks. Then after that it will be time to plumb in the oil cooler, add the vital juices, and get this engine ready to fire up... to say i'm excited is an understatement :D !!!
Max
 

Mini Mad Max

Active member
Hello :)
Not updated all summer, so i suddenly have a fair amount of stuff to post.
Firstly, I have built up most of the tank bulkhead now, and all that remains is the outer skin of chequer plate on the front.
Here is the bulkhead, fully fabricated and sealed before paint:
DSCF4060.jpg

Here is the tank being pressure tested for leaks before paint.
DSCF4063.jpg

Here is the painted bulkhead and tank:
DSCF4076.jpg

Here it is bolted in before paint:
DSCF4053.jpg


Also I have been working on the engine to get it finished.
This is the oil cooler i was originally going to use, but it had a leak even after we had tried to repair it.
DSCF4058.jpg

However, after bumping into a friend with a mk2 escort in town and explaining the troubles of the leaky oil cooler holding back the engine start up, He said he had a spare cooler i could have. A lovely 13 row mocal oil cooler, perfect size for my brackets, but wrong thread size, FOR FREE! Big thankyou to Dave. This gave me an excuse to get brand new hoses made up which would have a better route and a better location for the oil thermostat. It now requires a nice big air intake to get air flowing along past the cooler, and down the back of the engine to the radiator where it will get pushed through by the standard fan and an electric pull fan on the outside for more static conditions.
It now looks like this:
DSCF4074.jpg

I've also made myself a budget oil catch tank using a camping fuel bottle, with a couple bits of 12mm pipe welded onto some washers that are then glued onto the bottle with araldite.
Here it is mounted on my ultimate engine steady, where the bracket has also been welded on for that too.
DSCF4080.jpg

DSCF4077.jpg

You can also see the filter king mounted in that photo, the small mounting assembly i made for the pump and filter proved more hassle than it was worth. The pump is now located with the solenoid down behind the driver, It requires a muck shield at some point:
DSCF4079.jpg

So with a dummy wiring rig, we set about starting the engine today. Firstly we got oil pressure, and because we have not wired the alternator in, we used our Pug106 to charge the system with jump leads to the solenoid:
DSCF4066.jpg

Then after the oil pressure warning light went off. We timed the ignition to somewhere near with a strobe, and just turning it over on the starter. Then we checked for a spark, and was successful. Then came our hurdle of the day, The fuel pump worked, but the float in the carb didn't. Fuel leaked everywhere. So we took the carb off and dissmantled the float chamber, checked it worked and it did, so the cut off needle was just sticking (which is understandable for a carb that hasn't been used in a very long time). Reassembled the carb and put it back on. Fuel pump on, and it cut out when pressure was reached, so no leak :) Everything hooked up and thumbs up ready to go, so we went for it!
1st start up vid
Success!! It had a really nice throaty growl :D Quite a bit of smoke though as it cleared its throat from all the oil we had put in the bores and ports as we built up the engine.

Then thisafternoon, we fabricated a new sheppard's crook linkage as the old one was the wrong shape.
DSCF4072.jpg

Got some more to do on that though.
Also been sorting out seat mounts recently, so expect to see more from these areas shortly!
Hope that is enough to prove i haven't slacked much at all over the holidays!!
Max
 

Mini Mad Max

Active member
Approaching a year since I last posted, I think its about time i do an update. I've not been slacking, I've just been to lazy to do an update. In fact i've got more to photograph and to write about soon!!

Something i made ages ago is this lovely little filler panel. 100% IVA friendly too! It has no sharp edges with a lovely rolled bottom lip, a vented cap that doesn't stick up more than 50mm, and a tether!
DSC_0014.jpg

DSC_0015.jpg


Something else i sorted out a while ago is the sump guard. I ended up cutting the front of the sump guard off and making a new panel to go from the guard to the box section across the back of the buggy. Need to get a picture or two of how it is mounted, as i only have these pictures of it off the car.
DSC_0016.jpg

The new bit is a sandwich of two sheets of chequer plate bonded and riveted together, then bolted to the sump guard and then to the back of the buggy.
DSC_0017.jpg

Handbrake bracket in place there!

Bumper mods here, which include exhaust brackets courtesy of Steve, two extra bars which attach to the back of the sump guard and a number plate light bracket.
It needs another coat of paint in some places. I am also going to fill the gaps between the bars with stainless or aluminium expanded mesh.
DSC_0012.jpg


Exhaust in place here again, courtesy of Steve and his magical fabrication skills and thanks to Rich for all other help with it!
DSC_0018.jpg

I polished the whole system so it all looked like it was made of stainless then coated it in high temperature clear lacquer, a trick that Rich taught me! However when I started the buggy yesterday to try the new system out, the clear coat smoked horrendously and went all lovely colours!
DSC_0020.jpg

Had more luck starting the engine yesterday compared to when me and Steve had a go! Turned out I put the HT leads back on in the wrong order... Derrr!!! :p
Much much more on the way, and very soon!
Max
 

Mini Mad Max

Active member
Another Update! Lets hope i can keep them this regular!
Anywho, starting with the tank:
DSC_0015-1.jpg

A close up of one of the brackets there, the one with the earth cable attached, another IVA requirement box ticked. I had to use that length of wire with a self tapper in the bracket to get a good earth as the tank is sitting on some rubber to stop any nasty vibrations between the tank, the bulkhead and the floor, so it is not earthed through its mounts very well at all.
DSC_0017-1.jpg

I bonded some rubber roof flashing that my parent's business use to make their green roofs watertight at the seams. I figured it would make a very good seal and thus make the bulkhead leak proof. Another IVA conscious decision :p
So with the tank finally bolted in nice and tight and for good, I could finally put the front panel of the bulkhead on.
Here it is all self tapped in place.
DSC_0019-1.jpg

Plumbed in with a T-peice that will hopefully allow either side of the gear tunnel to self level when i top it up a bit. So the tank is finished! :D

Almost finished fabricating up some rear wheel arch brackets.
DSC_0021.jpg

They're nearly finished, just need some strips welding to the top for mounting the arches to. They seem pretty strong, but it took a fair bit of webbing and what not to make it as strong as the front ones. I couldn't utilise the caliper mountings because i moved them in on the hubs for the golf calipers.
DSC_0055.jpg

Wheel arches rested in place makes it look a bit more like a buggy :)
DSC_0056.jpg

Needs more body panels until it looks properly proportioned :p

Made a few adjustments to the original upper bulkhead, made it fit better around my fuel filler area and air intake panel. I also incorporated a couple piano hinges in the folds so it makes it easier to remove the panel with the seats in to gain access to the front of the engine.
DSC_0057.jpg

Got it set up for quick release, so 4 dzus fasteners is all i need to undo.
DSC_0041.jpg

If i undo the top two fasteners, I can unfold the top area to make a kind of inspection hatch:
DSC_0042.jpg

Or undo the other two lower down and lift and slide the whole thing out in a very slim space.
DSC_0043.jpg

It's just mounted on bolts at the bottom:
DSC_0045.jpg

DSC_0047.jpg


Also extended the fuel filler area to match the air intake panel so it meets flush with the upper bulkhead. Here is a shot i got of the tether whilst it was off the car:
DSC_0052.jpg

DSC_0053.jpg


This is the air intake panel which needs some alloy ram ducts and duct hose installing to direct cold air through the oil cooler and accross the engine.
DSC_0051.jpg


Also been working on front end. I've sorted out a battery clamp:
DSC_0023.jpg

I have also started sorting out mounting the lower nose cone, and have been out cutting lengths of rubber U strip to IVA proof the sharp edges:
DSC_0040.jpg

DSC_0049.jpg


Got loads more on the go and loads more planned. Lets hope i can keep up the progress!
Max
 

Mini Mad Max

Active member
Small update!
I've been chipping away at a few things recently making steady progress in between various school commitments and UCAS application :) I have an interview at Brunel University next week and i needed to get some photos of the buggy for my portfolio with its paniers that I made for one of my Design Projects, So she got all tarted up for the camera ;)

I have there abouts finished the rear bumper depending on whether i need to use it to attach reflectors or reverse and fog lights. The stainless steel weld mesh is pretty strong, so it should be able to protect my lovely exhaust system from any light knocks if i take it off road.
DSC_3401.jpg

DSC_3400.jpg

I really like how the back end looks now. That is pretty close to how it will look when it is finished! Some more weld mesh will be used on the sides and a couple big duct hoses will appear too :)

I have also spent a lot of time on seat mounting. The Driver's seat is now in place, just need to drill some holes in the floor for the seat mounts at the back of the seat. The harness fixings are also all sorted. Just need to sort out the passenger side. I'll get some close up photos of it all soon!
DSC_3398.jpg

DSC_3397.jpg

The driver's seat is higher up to allow for my huge legs. And the extended cage still leaves plenty of head room even with a helmet on. Also having the passenger lower down means there is loads more visibility in the cramped freestyle passenger compartment :)

I shall get more detail soon!
Max
 

Mini Mad Max

Active member
Update time! Always nice to remind myself i have actually been making a bit of progress!
As a result of my up and coming exams and interview I have spent very little time out in the garage. Luckily, I have an amazing Dad who enjoys working on the buggy as much as myself! I did get a couple days out there too in the end. We managed to get a fair bit done! :)

Last build update I said i would get a photo of the seat mounts that i had been working on. Well here is the driver's side finished.
DSC_00232_zps6618910d.jpg

It is quite crude and far from beautiful. However it should be plenty strong enough. The seat now sits about 100mm off the floor. High up I know, but it is quite a comfy position for my tall self.

Harness mounts had to be moved forward due to the fuel tank. So I constructed some meaty brackets that ought to do the job nicely.
DSC_00262_zps46962768.jpg

DSC_00272_zpsc38cd28d.jpg


I also finished the air intake panel before Christmas. I just need to fit it to the cage and run the duct hoses with the neat little in-line blower fans i bought that kick out about 250cfm each :)
DSC_0017-2_zpsf125c71c.jpg

Mesh sourced from a sieve and just duct taped on, and then they will be clamped on tight by the jubilee clips that hold on the duct hose.
DSC_0018-2_zps44647d7d.jpg.html

Balanced in place:
DSC_00192_zpsd2e89d2f.jpg

It looks a bit odd at the moment, because i think it looks a bit top heavy with those gaps in the cage filled in for the fuel filler panel and the intake panel. However, I have faith that it will look right once the arches and wheels are on and when it's sitting on all fours rather than up in the air on axle stands.

Then over the past week, Dad did this:
DSC_0015-2_zps92a2c327.jpg

DSC_0016-2_zps1098bd0f.jpg

At which point i decided i couldn't help myself, and so revision got a bit neglected and I went and helped him, until it ended up like this:
DSC_00292_zps12dd12d7.jpg

The motorcycle fork gaitors were inspired by (copied in other words ;) ) Alastair's Dumfries Death Trap build :)
We had two steering columns and it made more sense in terms of space and stuff to steal the top bush off one and attach it to the bottom of the other rather than using the ford steering bearing that Dave Smart made.
DSC_00282_zps37c74f60.jpg

We had to make our own U-clamp and spacer due to the limited space by the back of the ignition barrel.
DSC_00302_zpsf5c68355.jpg


The Steering Wheel now sticks out a long way and is reasonably high up. Again, It is to cater for my tall person needs. It is now a comfortable driving position tailored for myself so I'm very happy!

I will have to get my dad to hide the garage keys over the next couple of weeks so i can focus on my studies, but then it's go go go to get it done in time for Stoneleigh. Let's hope that my aim is not too ambitious!
Max
 

Mini Mad Max

Active member
Hello all!
I thought I'd do a much needed update as i try to pass the time in my "inter-semester period" at uni. It's the first time I've not really had much work on, and it feels weird :p
Anyway, I found a load of pictures from last spring with my mad rush for Stoneleigh and a bit more progress from the summer.

I used garden wire as a template for making my copper lines.
2013-04-06125640_zps662a95b4.jpg

2013-04-07121243_zpsd401e514.jpg


Here is an original compensator valve plumbed in:
2013-04-07122230_zps6b5afaf6.jpg

I know that opinions on use of these on buggies are somewhat divided and uncertain, but they work by ensuring the fronts and backs came on at the same time (floating piston between the two circuits inside). This was due to the difference in volume of fluid required between the drums and calipers. On the surface, this still applied to my setup, as i have twin pots on the front and single pot golf calipers of a different bore on the back. I certainly didn't want the back to come on before the front or I'd go through a lot of changes of underwear wherever I went! :p Furthermore, I seem to recall the valve having a pressure reducing effect on the front circuit. This again is important in my opinion, as there is not much weight up front, so i didn't want the fronts to lock up at the slightest suggestion of braking! The result of driving about at Stoneleigh was promising, but 10 minutes of driving around with fresh brake pads and fresh tires didn't really provide much of an idea of the kind of brake performance this will have.

After bleeding the brakes, I found that pressing the brake pedal made the whole of the front bulkhead flex. Worried that this would lead to fatigue around the welds that hold the pedal box on, I braced it. It also added a spongey feel to the pedal.
2013-04-07122335_zps29386c9a.jpg

2013-04-11154043_zps2a9479a7.jpg

It's safe to say that the bracing helped a lot! Also pictured above, electrical bits start going on :)

The front end started to come together nicely! You can see my lovely 115dB horns. My dad accidentally hit the horn button when sorting out the flapping tarpaulin on the buggy whilst taking it south for Stoneleigh. That sounds perfectly fine until i tell you that it was in the middle of my village at 4am. OOPS! They are loud when you want them, and seriously loud when you don't :p
2013-04-28184455_zps4c8e8d40.jpg

2013-04-28184510_zpsfdaa388b.jpg

A nice close up of wiring in progress. It ended up fairly organised with only a small essence of stereotypical kit car wiring loom (ie: CHAOS!).

Unfortunately I was building more than i was snapping photos, so i don't really have much photos of the progress made then.
A day before stoneleigh, I was at my uncle's to get the alignment done.
2013-05-04121624_zps967fe347.jpg

After that, the only sensible thing to do was to drive it!
DSC_4122_zps738d2905.jpg

And then Stoneleigh. What a great weekend! I can't wait for this year's show!
DSC_4124_zpsbe61ba07.jpg


Then came the summer. Playing with my band at the time, and going to festivals and parties took up more time than i had anticipated. This meant i didn't get as much done on the buggy as i had hoped to. However, I did manage to make at least some progress :)

I have made a start on my dashboard. Here is my dad and I creating the IVA friendly 19mm bottom lip.
2013-08-18145819_zps009f79c4.jpg

2013-08-18150313_zps275fef9d.jpg


We also made a template for dictating where the fly screen can come to without having to be made of glass to comply with windscreen regulations.
2013-08-18172430_zps143736ff.jpg

2013-08-18172421_zps22c8faec.jpg


I hope to be back for a week or so this Friday, so i should have more progress updates shortly. Otherwise my next building opportunity will be Easter! I have all of April off basically. I will try and get in touch with VOSA soon to see if i can book an IVA for half way through April. It will only leave 3 weeks until Stoneleigh to possibly retest and get it registered, but that looks like my only option.

Max
 

Mini Mad Max

Active member
Just checking in. I thought some of you might like to know that contrary to debate, I am not dead. I am also not married with kids :LOL:

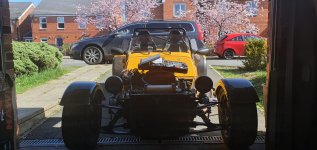
I did make a load of progress on the buggy after graduating, but then I sort of lost interest and I never had the time nor heart to do anything about parting ways with the buggy. It is in a reasonably finished state - I should go out to the garage and get some photos as I'm currently stuck at the folks' isolating thanks to omicron (or wherever we're up to in the greek alphabet).

I have someone who wants the engine from it, but otherwise the rest is up for grabs if anyone knows anyone interested.

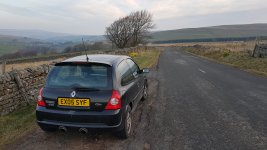
In the interim I got my spannering and driving fix from a Renault Clio Sport 182 and now a Westfield. Spannering and driving is currently on hiatus though as work has been all consuming. Hopefully I get a bit more time in 2022, though my infamy with goals concerning vehicular progress would deem that statement laughable.

20190419_065825.jpg20210404_121601.jpg

I seem to have hoarded a few too many vehicles, so in addition to the buggy, I should add the Clio 182 and a Brian James Minno Max car trailer are also for sale in case anyone is interested haha!

Max
 
Top