Ultralite Buggy Build

ChaosMS

Active member
Well not as much done as I would have liked over the last few weeks, been cleaning up and painting a lot of the parts that Ive been fabricating over the last few months, last parts to sort (in the current batch) were the exhaust parts, so here is a quick shot of the manifold after painting and then after the thermal wrap!

build_diary504_web.jpg


build_diary506_web.jpg


I need to get the manifold and the rest of the exhaust back on and run it up to temp to cure the paint so I'll do a new video when I run it up!
 

ChaosMS

Active member
Its been a while since the last update and things have moved along, not a massive amount but moved none the less!

And I have to thank Steve for taking the time on Saturday morning to come over and Tig weld the new heat shield, I have to admit it was excellent to see an expert at work!!  ;D so thanks again mate, your craftmanship is very much appreciated !!

So I have a few photos of the heat shield welded up and then fitted after polishing!! (A bit of Bling never hurt anyone)
build_diary507_web.jpg

build_diary509_web.jpg


Polished and fitted with ignition lead mounts in place and leads fitted and a nice shot of the fuel tank fitted (firewalls not done yet);
build_diary512_web.jpg

build_diary519_web.jpg

build_diary520_web.jpg


New centre tunnel for gear shift mount and handbrake;
plate cut and ready for assembly;
build_diary514_web.jpg


and tacked together ready for final welding;
build_diary515_web.jpg
 

ChaosMS

Active member
Almost finished off the new centre console with the gearstick mounting and handbrake mount, here's how it looks now;
build_diary521_web.jpg


build_diary522_web.jpg
 

ChaosMS

Active member
New big shiney round "Bits that make you stop" turned up today - and they looked so nice I took a picture! ;D
build_diary537_web.jpg
 

ChaosMS

Active member
Got some more new bits in the post today the 6 point harness's – very well made from a company called The Racers Edge – not too well known over here (apart from the shops appearance in a well known film) but the quality is top notch and the are FIA approved till 2016 !!

Here’s a quick pic of one of them draped over the seat in my office at home;
build_diary539_web.jpg
 

ChaosMS

Active member
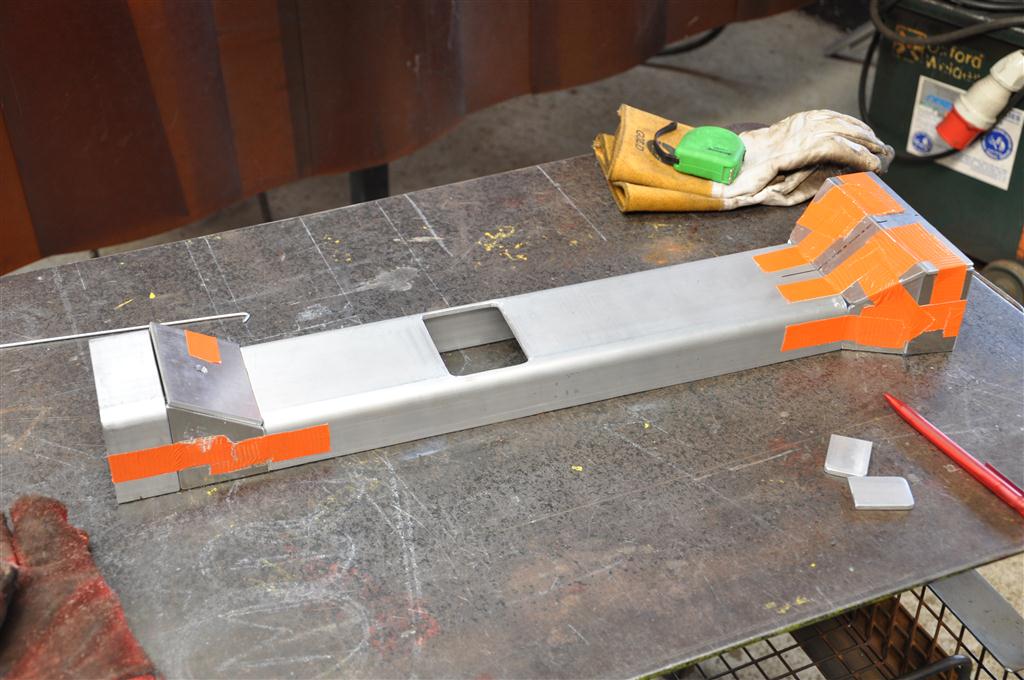
Well I thought I would post a couple of shots of my latest bit of homemade tool design!! - was looking for a Rivnut tool capable of inserting 6 / 8/ 10 mm Rivnuts ( steel stainless and alloy) looked around and the good tools are going for lots of money and they are huge! was looking for something handheld and have seen a couple of home made units that claimed to do the job - so I had a go!!

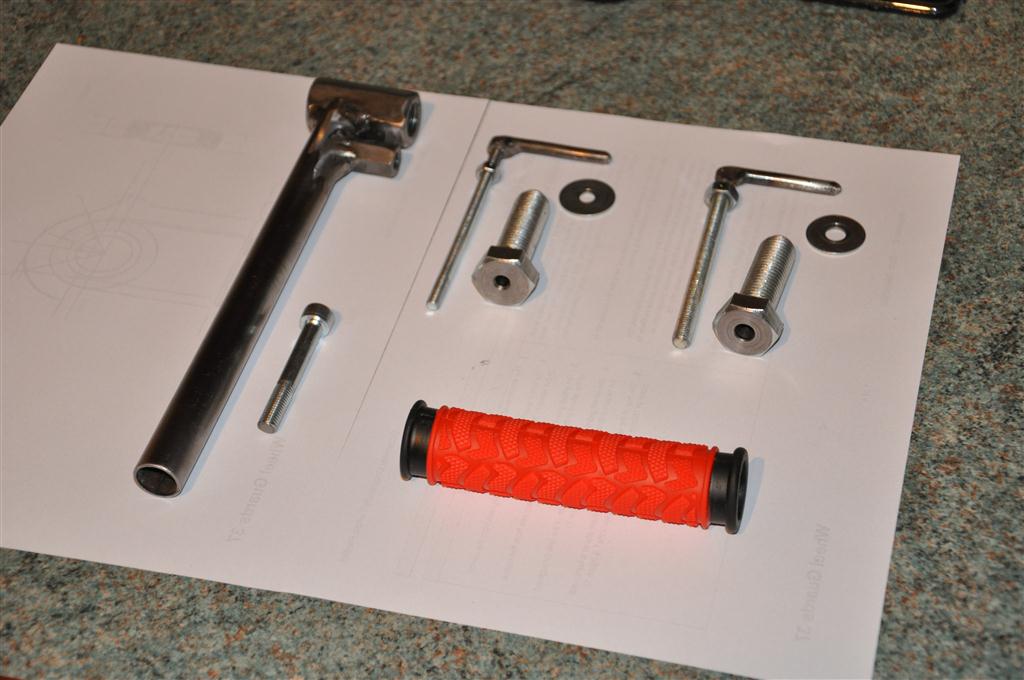
Used a small length of erw tube as the handle (approx 20mm OD)
1x 16mm threaded rod joiner
2x 16mm bolts (same length as 16mm joiner one bolt per rivnut size you need)
1x 8mm threaded rod joiner
8mm x 70mm socket head screw
2 x 8mm x 50mm steel bar
8mm and 6mm threaded bar 100mm long
8 and 6mm nuts and a couple of washers
bicycle rubber handlebar grip (the most expensive bit at £6 for a pair)

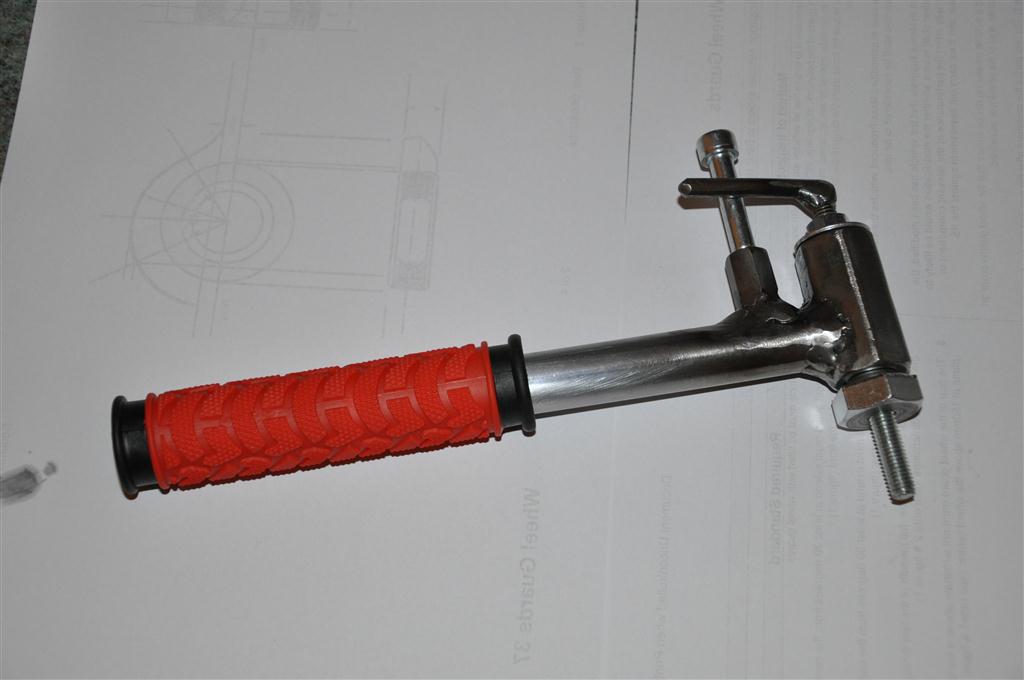
So the 16mm joiner is welded to the end of the tube the 8mm joiner is then welded on top of the tube about 25mm back from the joiner, then weld one of the 50mm long 8mm dia steel bars to the top of the threaded 100mm long bar at a right angle so it forms a "L" add a nut then a washer (washer should be the same outer diameter as the 16mm joiner) - now comes the hard bit if you dont have access to a lathe, you need to drill each of the 16mm bolts along its axis with whatever drill size you intend to use in rivnuts (8mm hole for a 8mm rivnut etc) so far i've got a friend to do a 6mm and 8mm versions, you will also need to face the head of the bolt to ensure its perfectly flat and level! - and thats it apart from a drop of paint and a bicycle grip added to the tube to finish it off!

Assembled as per the photos, the 8mm steel bar thats welded onto the threaded bar stops the threaded length from rotating in the drilled out bolt by resting on the side of the 8mm socket head screw mounted in the 8mm joiner the nut which is above the washer when rotated slowly pulls the threaded length up compressing the rivnut in the hole - and it works like a charm! - with this design one hand holds the rivnut flat whilst the use of a normal spanner compresses the rivnut.

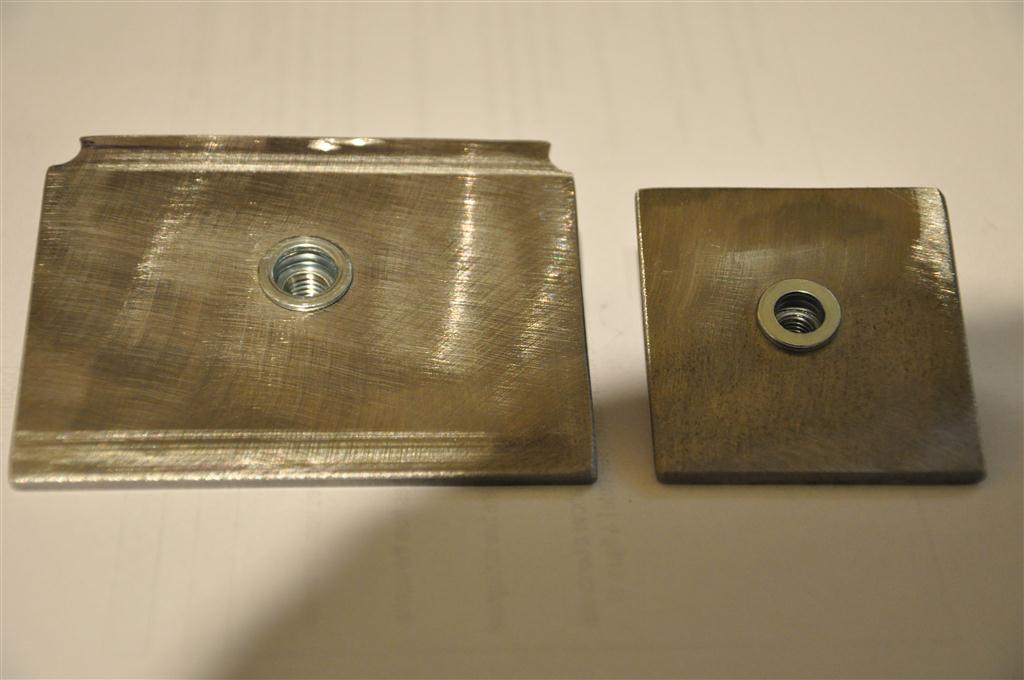
Not had chance to paint it yet but here are a few pics of it in bits and complete and also some steel rivnuts inserted into 3mm steel plate, to be honest I was not expecting the tool to work as well as it does - It will be getting a lot of use!!

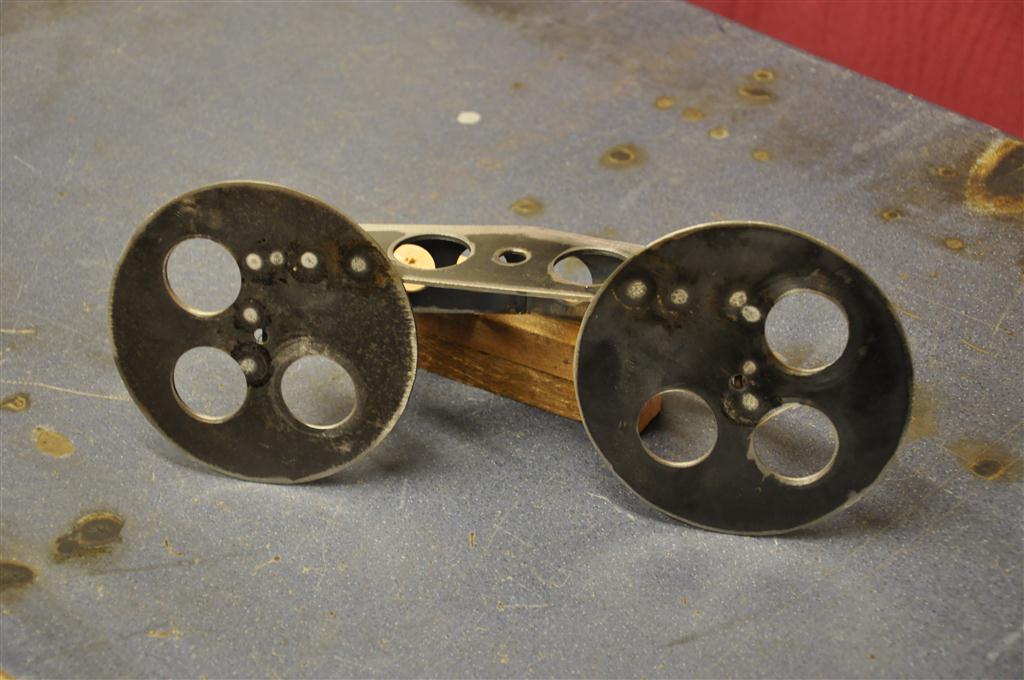
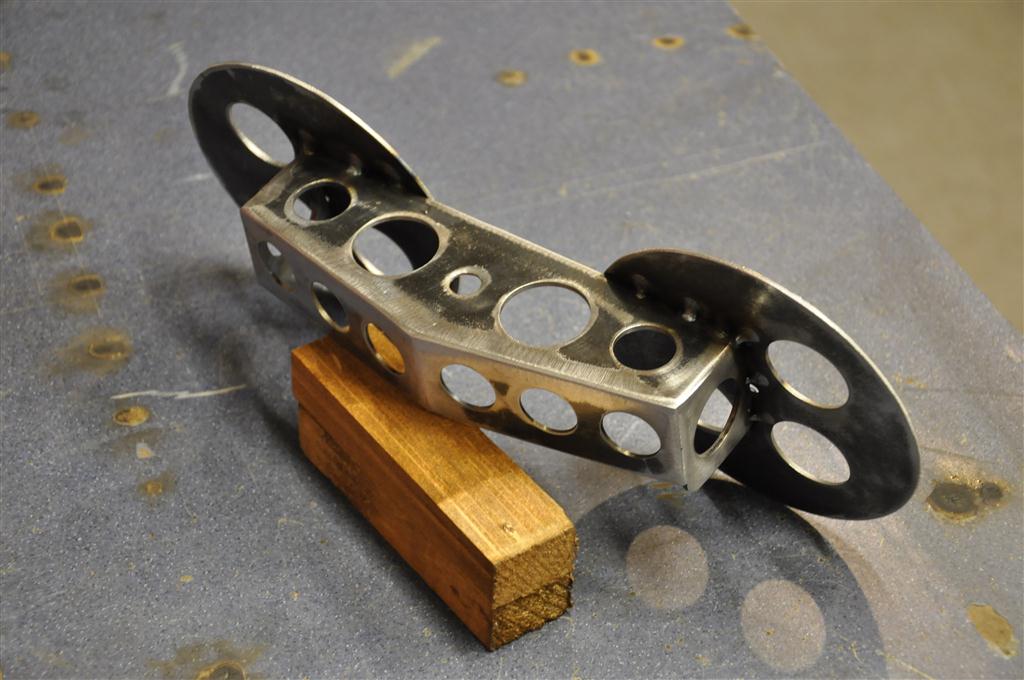
Tool parts welded up but not assembled
rivnut_tool1_web.jpg


Tool Assembled
rivnut_tool2_web.jpg


Top view of 8mm and 6mm Rivnuts inserted into two scrap bits of 3mm thick plate steel
rivnut_tool3_web.jpg


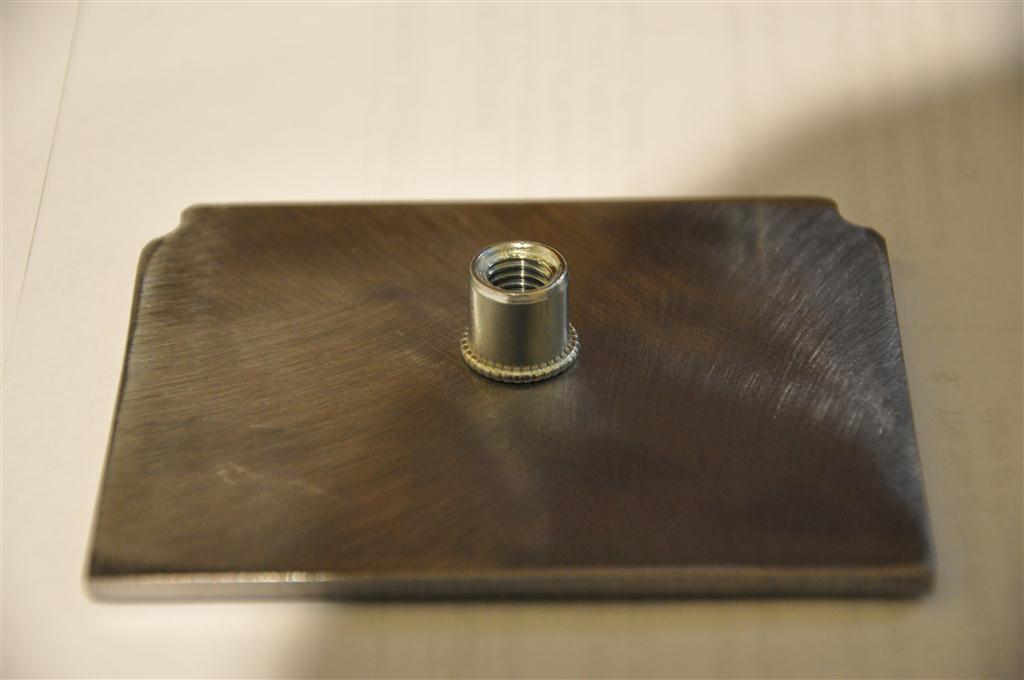
view of the underside of the 8mm rivnut showing a good even compression and solid fit.
rivnut_tool4_web.jpg
 

offroad 68

New member
If I were you I would put a small tack of weld on the top edge of them rivit nuts, A company I do work for had no end of trouble with them spinning then can not get the bolt out, they went to the hexagon rivit nuts to stop the problem, only takes a bit of dirt or a slightly bad thread, I have noticed even suzuki do this (tack weld) on the frame under the seat on a suzuki bandit.

The problem is getting drill bits that drill hexagon shaped holes, I think they are kept on the same shelf as the left handed screwdrivers, sky hooks and long stands. ;D
 

ChaosMS

Active member
Done some work on the Firewall and tank cover this weekend, this is the section of the firewall that bolts down to the main alloy firewall and this bit covers the filler hose and holds the wingtip lockable filler cap, the side facing the engine bay is a hatch so I can gain access to the filler hose fittings etc - its all just taped together at the moment awaiting the hatch area to be finished and then it will all need to be welded up!

Anyway here you go;
build_diary540_web.jpg


build_diary541_web.jpg


build_diary542_web.jpg


Rich
 

ChaosMS

Active member
Well Steve came over today and worked his magic - if only to get rid of that orange tape!!!!

And what a SHOCKING time it was, thanks to forgetting to put the clamp on the alloy panel! - It amused the hell out of Steve let me tell you ;D

Anyway have a look at his hard work- The filler neck box all welded up
build_diary543_web.jpg


build_diary544_web.jpg


build_diary547_web.jpg


build_diary543_web.jpg


And here is one of the curved fill in panels that mounts on each side of the fuel tank
build_diary550_web.jpg


Just needs a clean up and clear paint and its all sorted!
 

ChaosMS

Active member
Just been building the rear light mounts;
build_diary551_web.jpg

Parts cut out ready for welding

build_diary554_web.jpg

Parts tacked together ready for full weld

build_diary555_web.jpg

build_diary556_web.jpg

Main section finished and shroud back plates tacked in place.
 

ChaosMS

Active member
Done some work on the buggy this weekend got the rear lights fitted and im currently working on the upper mountings for the harness's

Heres a shot of the rear lights fitted - and they need to be this far out to comply with the IVA req's
build_diary564_web.jpg


And a view of the rear of one of the lamp assemblys
build_diary565_web.jpg
 

ChaosMS

Active member
Well its been a while since the last update post (No Slacker comments Steve!) it seems to take a lot longer doing the smaller bits and bobs than doing the big stuff!! Anyway here goes in order of completion to the current day, since finishing the rear lights off I’ve:-
RE-built the driveshaft’s with new boots and cv joints;
build_diary566_web.jpg


Built a front alloy bulkhead to mount the brake reservoir and pipes to and made up all the fixed solid brake pipes;
build_diary567_web.jpg


Built the rear caliper adaptors to mount VW rear calipers to Suzuki Front hubs;
build_diary571_web.jpg


Fitted the rear disks to the hubs and installed the calipers;
build_diary575_web.jpg


build_diary581_web.jpg


Serviced the front calipers (Full big red kit) then fitted the front disks and calipers;
build_diary591_web.jpg


build_diary594_web.jpg


Made all the braided flexi brake lines (and clutch line / clutch cylinder mounting plate) and fitted them;
build_diary588_web.jpg


build_diary592_web.jpg


Built the battery tray and mounted it and the alloy battery box;
build_diary598_web.jpg


build_diary599_web.jpg


And then over the last couple of evenings built up the fuel pump pre filter and some of the braided fuel lines (still more to do to finish plumbing the fuel pump;
build_diary603_web.jpg


build_diary604_web.jpg


Next job is to sort out the remainder of the fuel lines the breather valve, then tackle the front hub adaptors and lower arms to strengthen the hub adaptors and give me better KPI!!!

Rich
 

ChaosMS

Active member
Hello All!!

Been busy this weekend, and so has Steve!!! so I prepped all the parts for the alloy center tunnel forward section this weekend, here it is before Steve worked his magic!
build_diary605_web.jpg


After Steve tacked it together
build_diary606_web.jpg


Fully welded and looking fantastic - Steve did a fantastic job - welding as an art!!
build_diary608_web.jpg


So then I polished it all and fitted the battery switch
build_diary611_web.jpg


And here it is attached to the main center tunnel
build_diary612_web.jpg


And finally fitted into the buggy (seats removed) and alloy panels fitted inside the main section to keep filth out!, I still have to build the rear section which will cover all the pipes and cables (and Steve has to weld it all together ;D ;D ) shots also show the vertical section that joins up to the bottom of the dashboard module to hide all the cables to and from the dash.

build_diary615_web.jpg


build_diary616_web.jpg
 

ChaosMS

Active member
Been busy again and the buggy has been on a little trip!!!! (Thanks to Steve ;D ) for its weigh in!!
Anyway been finishing the centre section off (still needs welding)
build_diary620_web.jpg


Finished the fuel system (the push on tank fittings have now been replaced by threaded versions
build_diary621_web.jpg

build_diary643_web.jpg

build_diary622_web.jpg


Then this happened!! (As the buggy wouldnt fit on the trailer!!)
loading the buggy into the college motorsport truck ;D
build_diary623_web.jpg

Now whos that chappie then!! :eek: ::)
build_diary630_web.jpg


Arriving at the Motorsports section of the college
build_diary632_web.jpg

build_diary633_web.jpg


Inside the motorsports section (near the weigh bridge)
build_diary635_web.jpg


Setting up the corner weights
build_diary636_web.jpg


loading the buggy up
build_diary638_web.jpg

build_diary639_web.jpg


And then taking her home !!
build_diary640_web.jpg

build_diary641_web.jpg

build_diary642_web.jpg


So here are a few figures (And we cant call her Ultralite anymore)
Overall weight 646kg !!!!
front axle complete weight 262kg
rear axle complete weight 384kg

Weight difference from left to right front axle 0.5kg
weight difference from left to right rear axle 6.0kg

Doing the maths to work out the spring rates (unladen) front spring rating 240lb rear spring rating 120lb - front is higher poundage due to the mounting point of the shock on the lower arm (9 inches from pivot front 1 inch on rear)

So many many thanks to Steve and Daz for transporting the buggy and setting up the kit so we could corner weight it!!

Rich
 

ChaosMS

Active member
So been busy doing the wiring for the light circuit, fabbed up a new rear license plate bracket from a bit of 3mm steel and plate back from 5mm alloy sheet, also added some mounting tabs to the top roll cage for the high level brake light, so here is the mounting bracket

build_diary644_web.jpg

build_diary645_web.jpg


Alloy license mounting plate;
build_diary646_web.jpg

build_diary648_web.jpg


And finally with the test plate in place with the mounting bolts fitted with LED's in to fix the plate in place;
build_diary650_web.jpg

build_diary651_web.jpg


And a couple of shots of the high level rear brake light (60 LED bar ;D )
build_diary652_web.jpg

build_diary653_web.jpg


I will be back in the garage on Monday and Tuesday finishing off the wiring ready for the 10th!!

Rich
 

ChaosMS

Active member
Been busy this weekend and I've got another short video for you - sorted the wiring loom out and fixed the problem I was having with the starter (dodgy wiring) then Steve came over with a very large jump start kit (as the battery needs replacing too :( ) And we got her running!!

So here you go - She's Alive!!!!
[youtube]sX4AuP4J0hA[/youtube]

Steve has also done his usual high quality welding work on yet more alloy - which I will post photos of later

Rich
 
Top