
You are using an out of date browser. It may not display this or other websites correctly.
You should upgrade or use an alternative browser.
You should upgrade or use an alternative browser.
Blitz 2 buggie rebuild Discussion Thread
- Thread starter Phaeton
- Start date
Danny
Administrator
They don't hold me in very well when cornering hard... next year I will be looking at maybe go kart seats250buggys":12q2j5mh said:Yes my knees foul my steering wheel so will be ditching the runners and mounting the seats directly to the floor with backing plates. That will give me some extra room. I like how Danny has made his seats, clever idea that.
")
Sent from my SM-N910F using Tapatalk


The Blitz 2 brake master cylinder sits high up in front of the driver obstructing the view and is supported on a drop tube that also supports the steering column. 
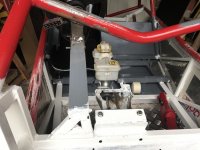
So I wanted to modify this set up similar to what the "Freestyle" buggies used on their modified set up however the Blitz 2 only has a flimsy 0.5mm fire wall up front and therefore not able to mount the "Freestyle" set up. So I come up with a modified design using the "Freestyle" principles but adapting the standard mini brake/clutch master cylinder bracket. strong support struts welded to the main frame are used to take the loading from the cantilever struts that are welded to the cut down master cylinder bracket.
So I wanted to modify this set up similar to what the "Freestyle" buggies used on their modified set up however the Blitz 2 only has a flimsy 0.5mm fire wall up front and therefore not able to mount the "Freestyle" set up. So I come up with a modified design using the "Freestyle" principles but adapting the standard mini brake/clutch master cylinder bracket.
strong support struts welded to the main frame are used to take the loading from the cantilever struts that are welded to the cut down master cylinder bracket. The yellow tag brake master cylinder complete with the Fiat fluid reservoir is a real good fit. Again this modification is taken from the "Freestyle" buggy mods made and tested in the early days by the pioneers. (Can't believe how well that works and fits, how did they find that match of different parts ?) 
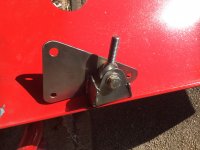
The new steering column support can be seen here with the large tubular drop support removed.
The new steering column support can be seen here with the large tubular drop support removed.
Attachments
-
 IMG_0028.JPG2.1 MB · Views: 8,559
Well done that looks really good, can't remember where the original idea came from bet there is a post somewhere about it unless it was lost from the old system. But I imagine it was somebody who still had access to an old style scrappers one where you could walk around, master cylinder in hand pulling off reservoirs on cars as you passed trying to see if they will fit, don't think it was me, think I just copied the hero.
EDIT:- It would appear that it was Jamie who sadly is no longer with us, Old Post His buggy was something special I wonder where it is now?
EDIT:- It would appear that it was Jamie who sadly is no longer with us, Old Post His buggy was something special I wonder where it is now?


