Mary's Back!!

Steves2580

New member
Ha Ha!

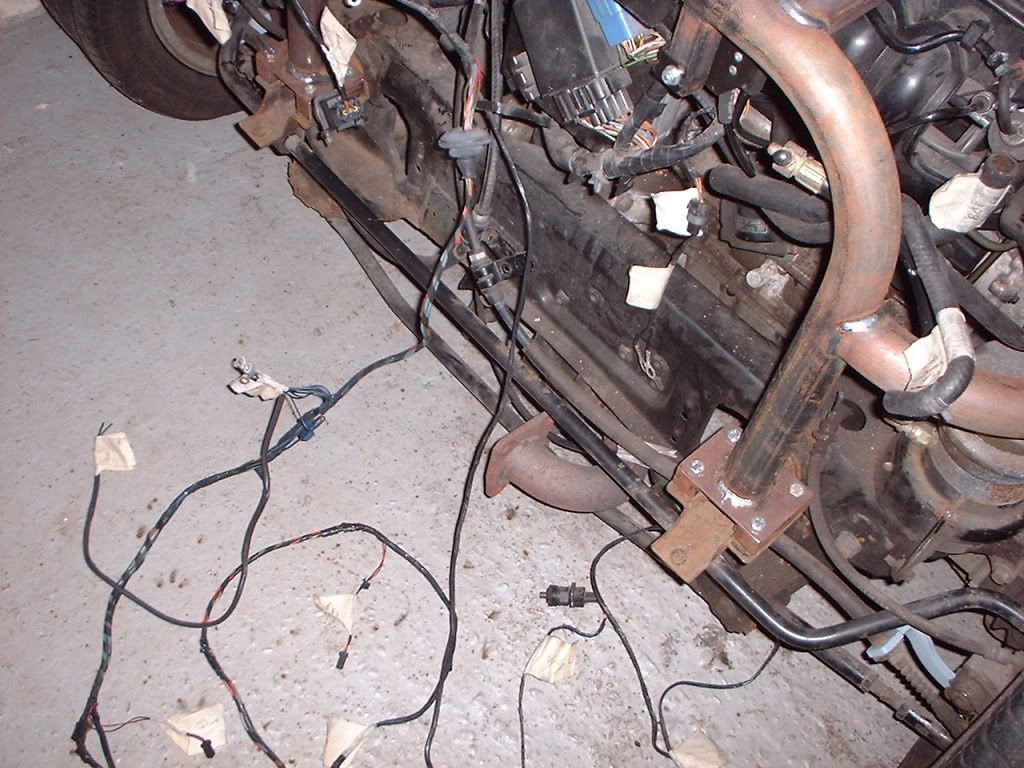
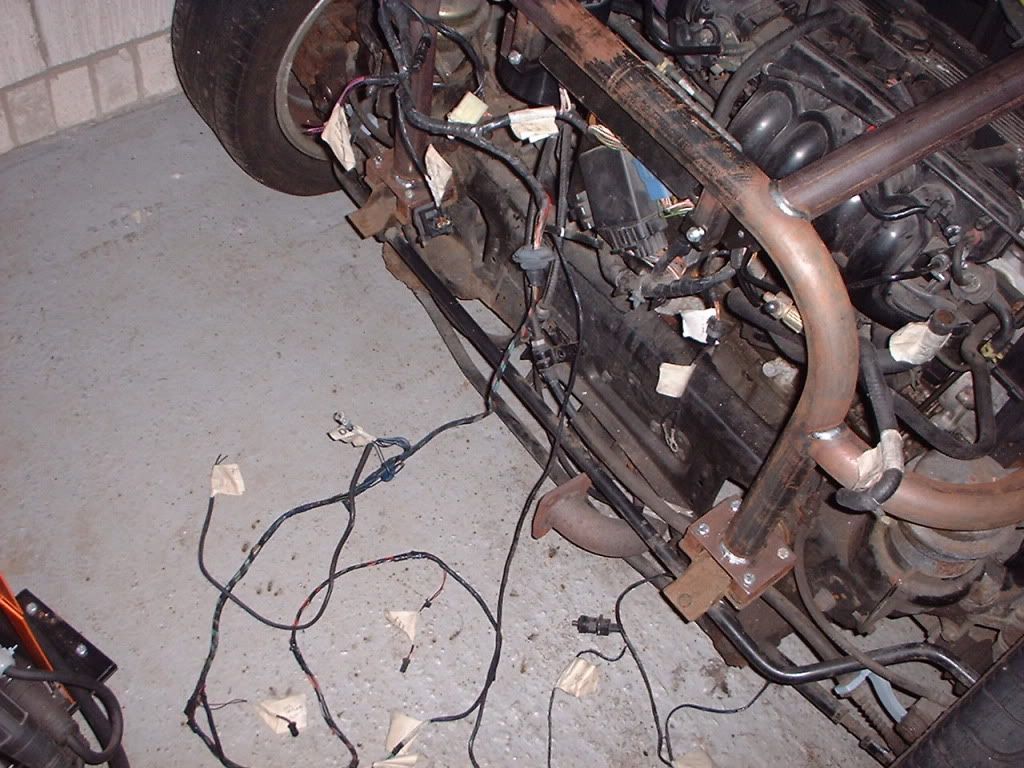
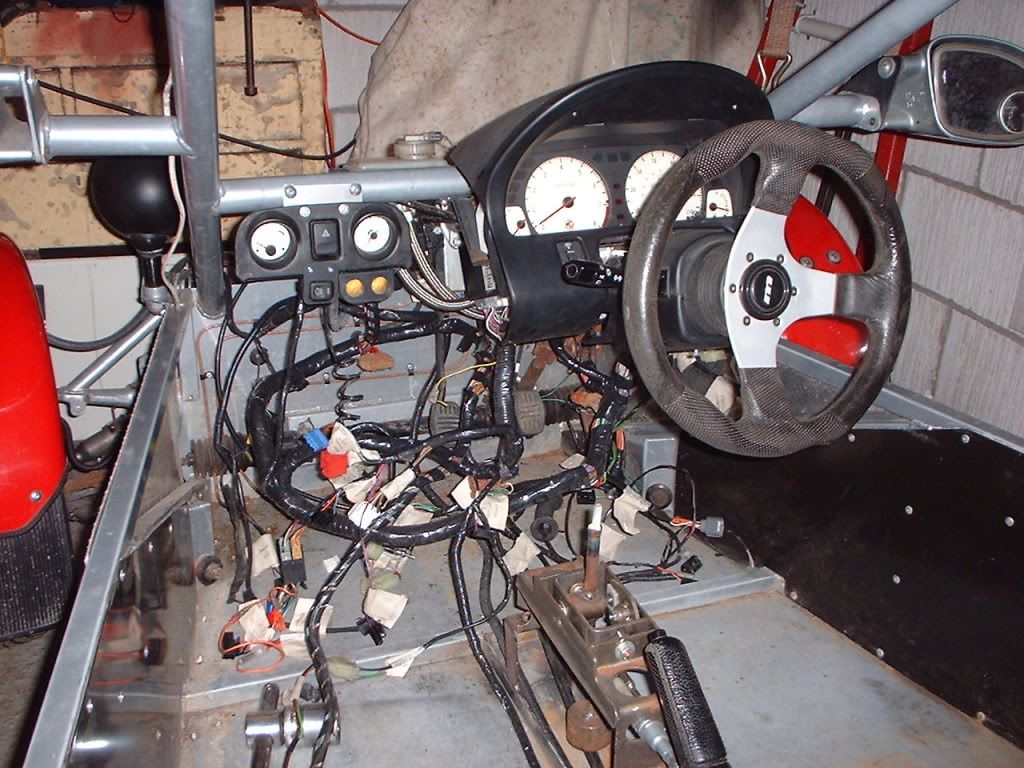
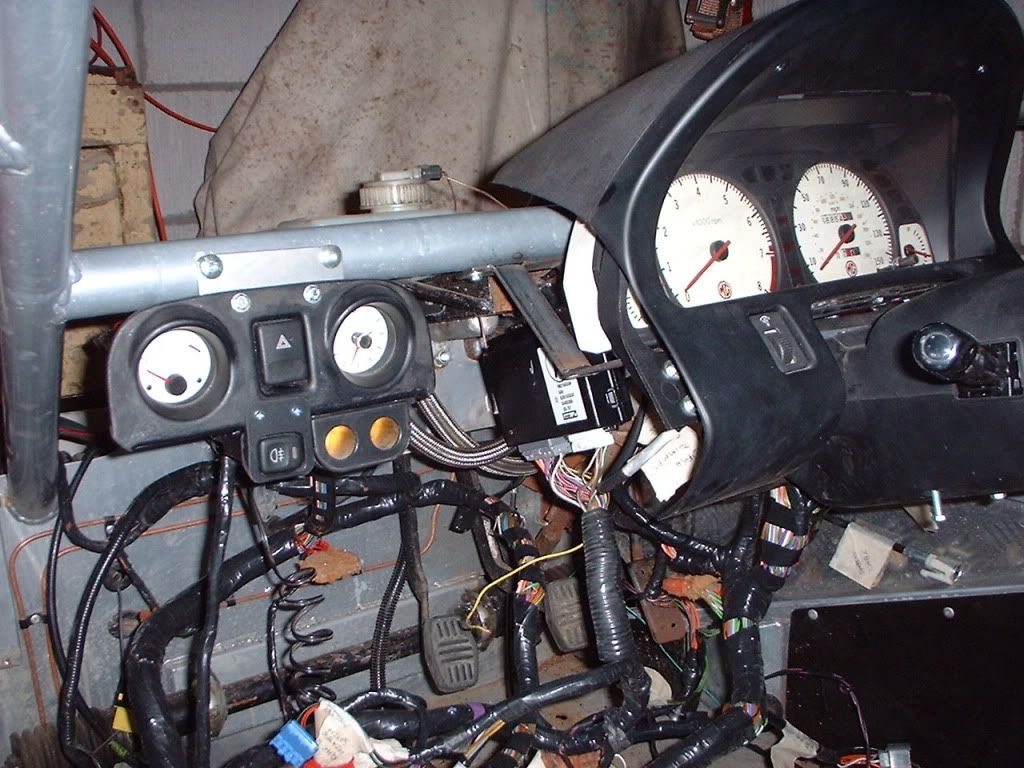
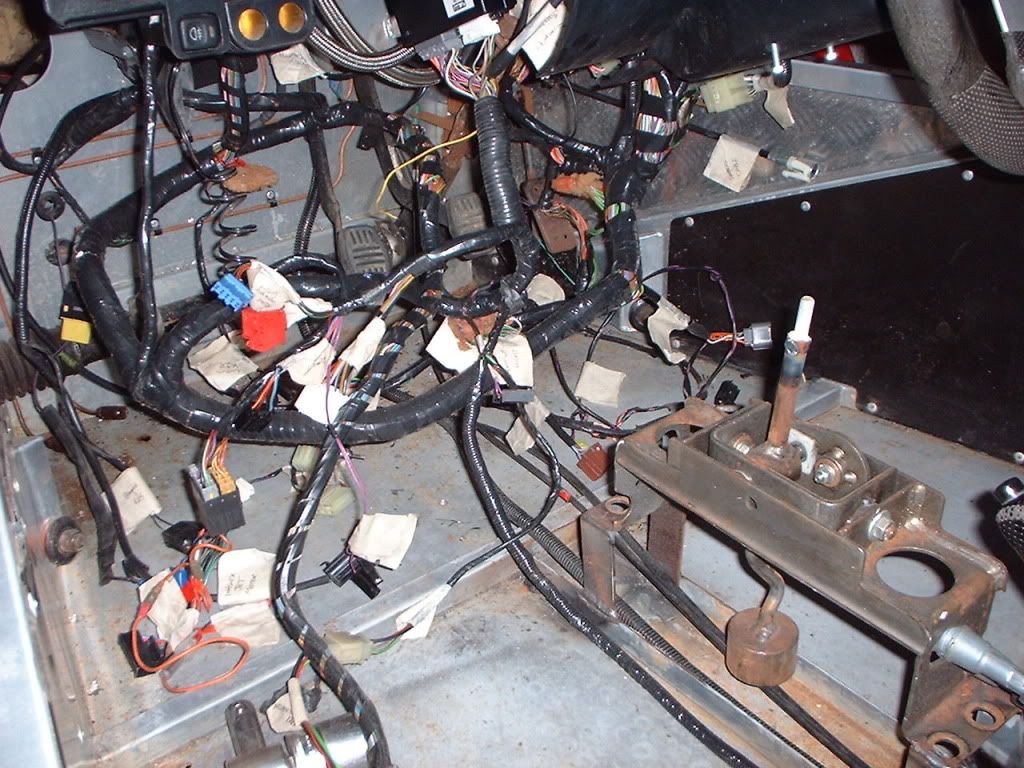
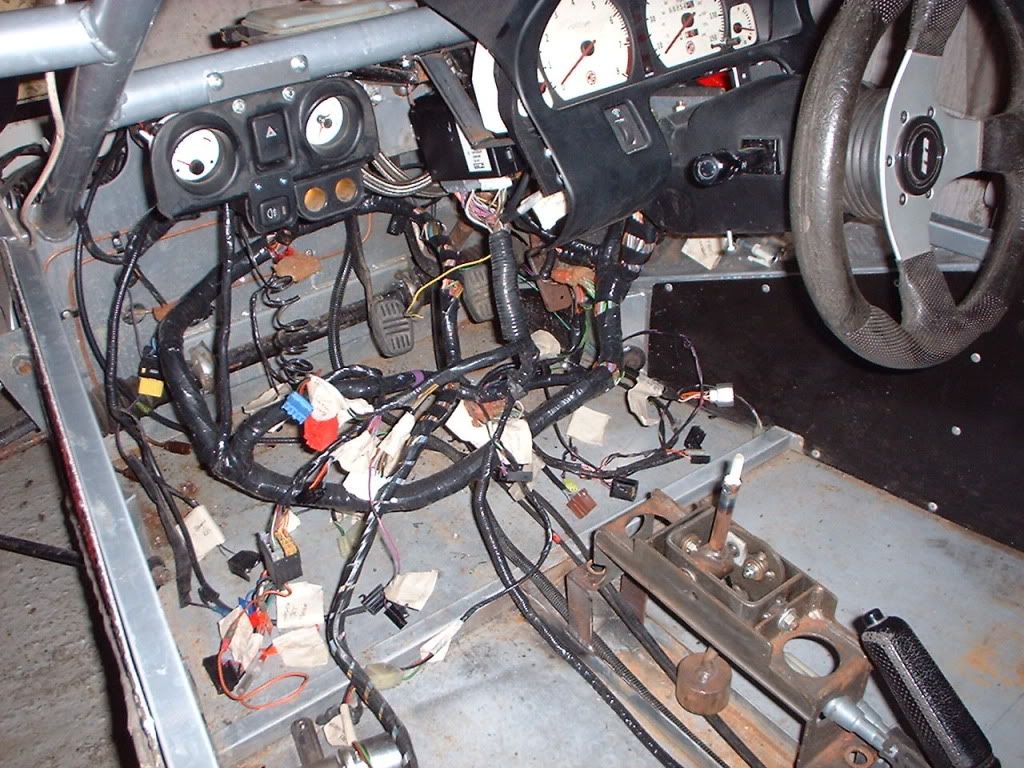
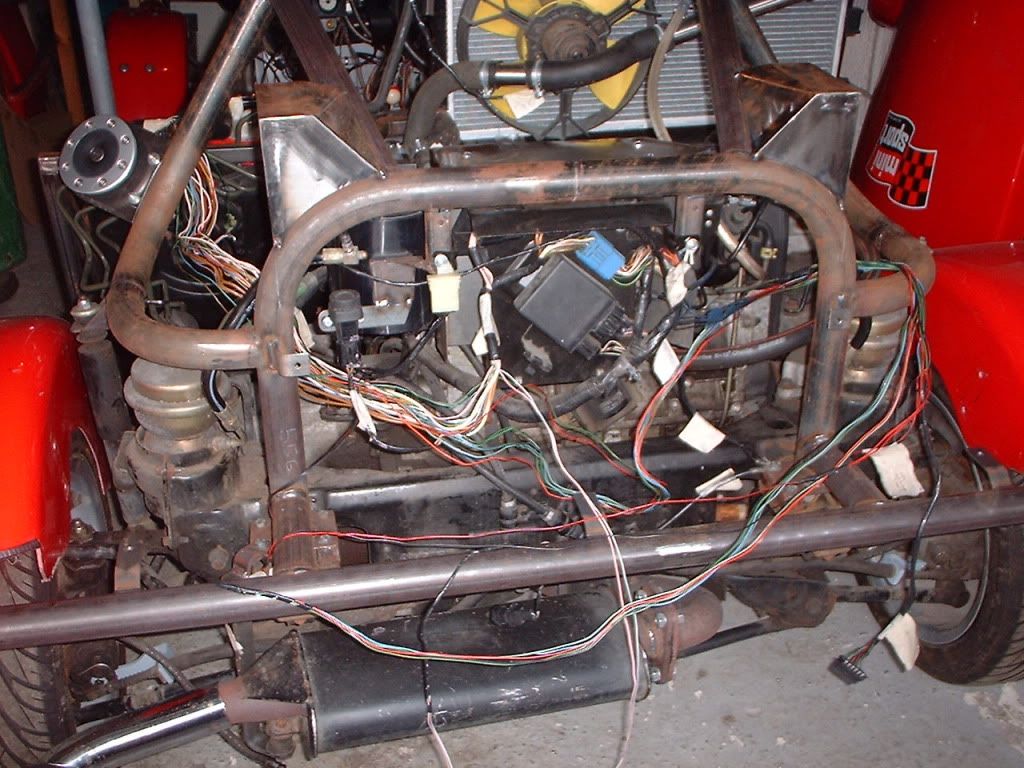
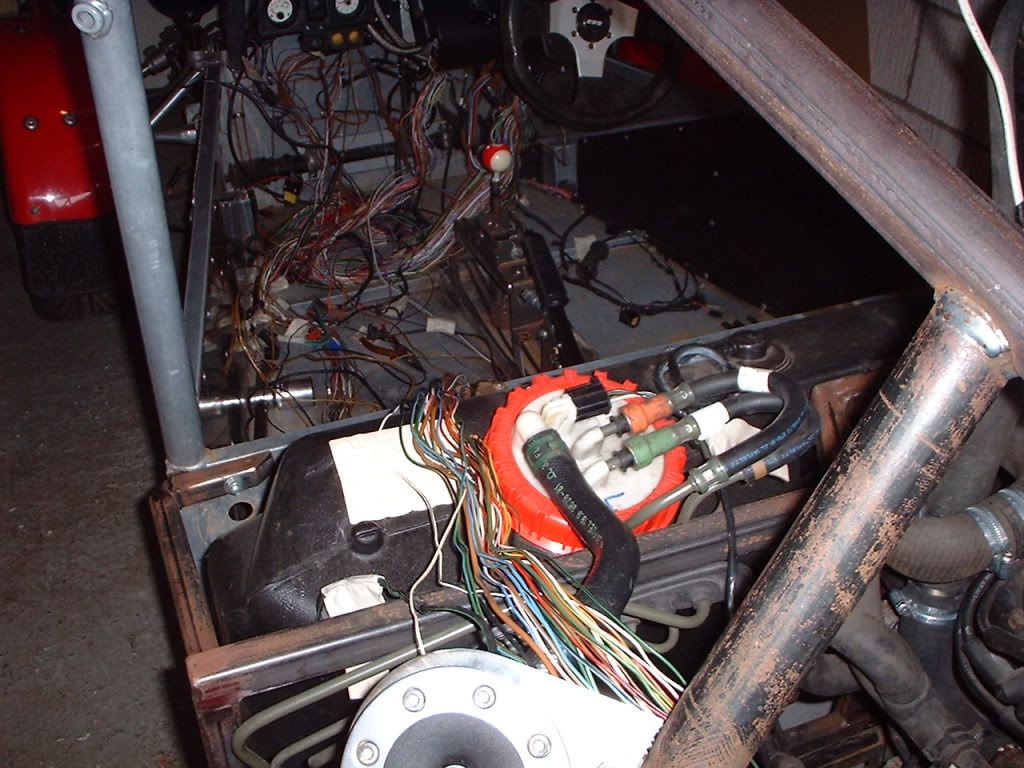
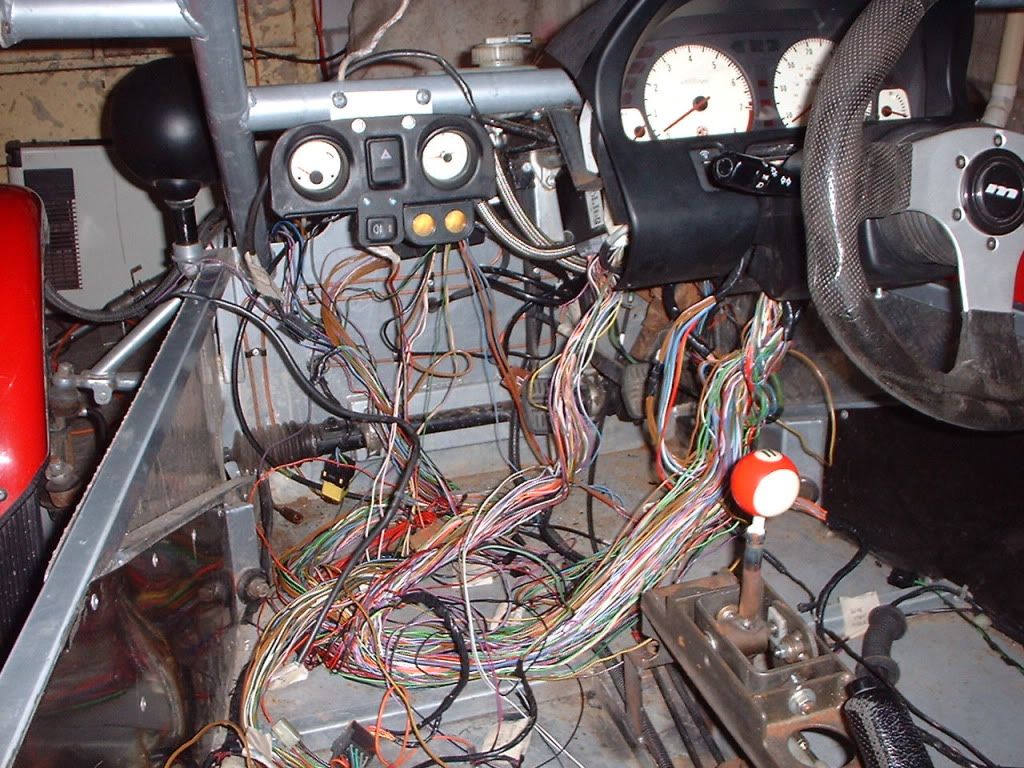
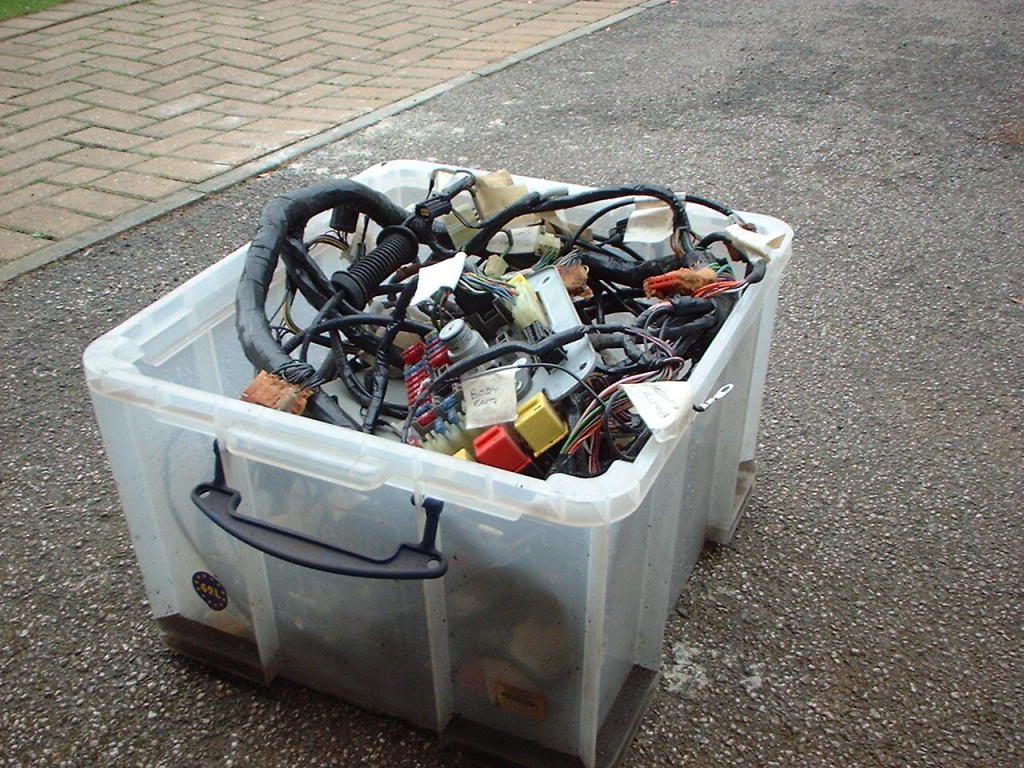
Well I got the wiring loom home, it was in a lovely plastic box (as you can see below) ;D

DSCF1142809.jpg


Got it all out on the drive, sorted the front from the back, the drivers door from the passenger door, the boot lid from the bonnet (not as I need them) ;D

DSCF1152809.jpg


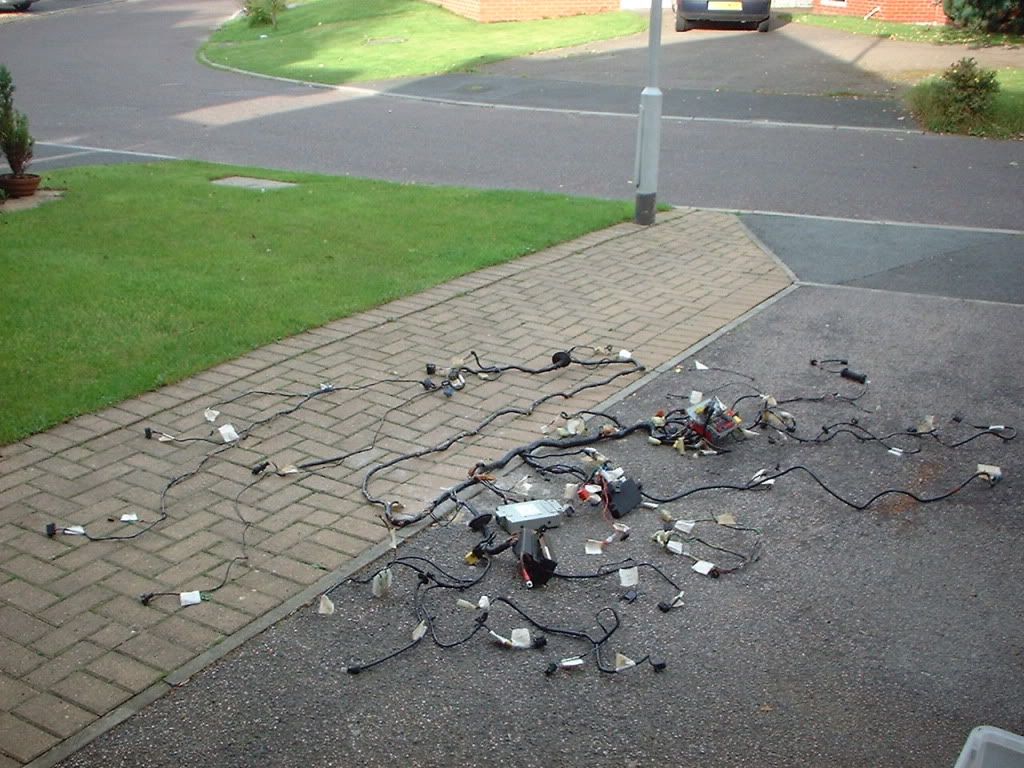
There's bloody miles of the stuff :(

So I thought "sod this, I'll go and have a cider" so it got put back in the lovely plastic box (obviously in a specific order) ready to get out again when I have more time ;D

Better luck next time ;D

Steve.
 

Steves2580

New member
Just a very small up-date :D

I had a delivery today!!!

One brand new rad, another ebay bargain!!

DSCF1160610.jpg


Couldn't hang around, it was opened in seconds ;D

DSCF1170610.jpg


What a great piece of ally and plastic!!

Can't wait to get into the garage this weekend, need to get it fitted and move on, been a bit stuck without it!!

Just got to work out how to hang it ;D

Wish me luck!

Steve ;D
 

Steves2580

New member
I have finally managed to do a little more to the conversion ;D

This is yesterdays achievements!!

First thing was to bolt on the MGF rad fan, straight forward really!!
DSCF1180611.jpg


Find the brackets I'd drilled ready for the old rad rubber mounts
DSCF1190611.jpg


Position the new rad, have a look and a measure ;)
DSCF1200611.jpg

DSCF1210611.jpg


Then a re-think, fan noise, view from rear view mirror, moved to behind drivers seat as ducting can be made to poke out and grab some wind :D
DSCF1220611.jpg

DSCF1230611.jpg


New rad brackets to be re-designed ro lower mounts
DSCF1240611.jpg


Plate bender
DSCF1250611.jpg


Brackets in, measured and ready for clamping up
DSCF1260611.jpg


Clamped up, ready for bending
DSCF1270611.jpg


Quick measure check
DSCF1280611.jpg


45 Degrees ;)
DSCF1290611.jpg

90 Degree bend, lovely!
DSCF1300611.jpg


Quick angle check, just hope the rest of the car is square ;D ;D
DSCF1320611.jpg


Marked out for drilling the bolt holes
DSCF1330611.jpg


6.5mm drill bit fitted into the chuck, for the 6mm fixing bolts
DSCF1350611.jpg


Both lower brackets drilled
DSCF1360611.jpg

De-burring with a sharp 9/16 Moores taper drill
DSCF1370611.jpg


Cut to correct length
DSCF1380611.jpg


After a quick ride on the bench grinder, the brackets are ready for the rubber mounts to be re-fitted
DSCF1390611.jpg

DSCF1400611.jpg


Then today I was meant to get the buggers fitted, but the missus had other ideas for me :(
Food shop, mend the Dyson, but a HDMI lead through a wall, mend the cover for the garden seats!!

There's always next Saturday, but I'm happy with this Saturdays work, rad should just drop into place, fingers crossed ;D ;D

Comments welcome guys!!

Steve.
 

Steves2580

New member
Small update!!

Well the rad did drop in, quite easily!!

First mount bracket fitted, just one bolt till I got it level
DSCF1411311.jpg


Second mount bolted into place
DSCF1421311.jpg


Rad offered up, looks allright, so had to get the top mounts sorted
DSCF1431311.jpg


Top rad mounting rail tacked into place and the top rad mount brackets placed just to see how the design is going to work
DSCF1441311.jpg

DSCF1451311.jpg


Top mount bracket half fabricated, just tacked up
DSCF1461311.jpg


Top mount bracket taken off for welding up
DSCF1471311.jpg


Welded up and what a sexy chuffing weld it is too! ;D
DSCF1481311.jpg


Rad mounted and looking just perfect
DSCF1491311.jpg


Header tank to be positioned next, then just got to measure up for the silicon pipework and get an order in!!!

Ha ha, loving it!!

Steve ;D
 

Steves2580

New member
Well, the header tank has been positioned ;)

Measured up for the silicone hoses :D

Then thought wiring loom!! Remember last time I looked at the loom "sod it have a cider" well not today!!!
Joined the wiring loom at the engine moved backward, looked at lights etc, then moved forward!! All the way to the battery!!
Connected battery, put the MGF steering wheel on the floor and connected up the ignition, first turn of the key/engine and away she went!!!!!!!!!!!
Yes, she started and ran like a bloody good one ;D ;D ;D ;D

Pictures to follow, just had to tell you that shes running again!!!!!!!!
 

Steves2580

New member
Pictures!!

Header tank rear bracket, one straight piece of 25x3 flat steel, cut at 22.5degrees each end, the end bits turned over and welded back on the same end I cut them off, making two nice 45degree angles, then drilled for the 6mm bolts
DSCF1502011.jpg


50x3 flt steel, welded to the front of the top rad rail, marked for cutting down, using the 1mm thick steel cutting disc in my little grinder
DSCF1512011.jpg


Header tank rear bracket tacked to the front of the 50x3, positioned to suit body panels (to be fitted later)
DSCF1522011.jpg


Front hanger for header tank welded in place, I'll just have to mind my head hehe ;D
DSCF1532011.jpg


Down on my hands and knees, looking back to see if its in the right place, don't look at the untidy garage ;)
DSCF1542011.jpg


Tank removed for rear bracket to be welded up, one of these days I'll master this welding shite ;)
DSCF1552011.jpg

DSCF1562011.jpg


Moved onto the rear wiring loom, connected it up to the engine ecu
DSCF1572011.jpg

DSCF1582011.jpg


Chucked the wiring loom into the feeestyle, no seriously chucked it in ;D
DSCF1592011.jpg

DSCF1602011.jpg


Connected up the MGF clocks, ignition even the power steering :D
DSCF1612011.jpg


Connected the battery, pressed the key fob, turned the key, injection system buzzed like it should, turned the key that next step and after half a turn the engine was running ;D ;D ;D

Turned it off straight away as there is no cooling systyem in place, sounded like Danny's, but then I haven't fabricated an exhaust yet!!!!

For some strange reason I ran round the close, jumping and shouting, like a bit of a dick!! What a buzz!!!

Keep your comments coming in, wish me luck with the loom tidying ;D

Very happy, Steve ;D
 

Steves2580

New member
Small update ;D

Well, seeing as I've been having so much fun at the rear of Mary ha ha, I thought I'd carry on with the rear and work forward ;D
So I decided to crack on with the rear bumper, after scrubbing about the garage I found a couple of off cuts of the tube used for the main rear chassis, so I had to weld them together!
DSCF1622711.jpg


After welding them together a quick run round with a grinder and ;D
DSCF1632711.jpg


Quick measure and then a cut to length
DSCF1642711.jpg

DSCF1652711.jpg


Cut a couple of blank for the ends of the bumper
DSCF1662711.jpg


Placed on the end ready for welding up
DSCF1672711.jpg


Ends welded and sanded up with a flap disc in a 4.5inch grinder
DSCF1682711.jpg


Two bumper mounts cut to length and shaped to fit the chassis to bumper application
DSCF1692711.jpg


Quick check fitting just to make sure they will fit together
DSCF1702711.jpg


Bumper hangers tacked into place
DSCF1712711.jpg

DSCF1722711.jpg


Rear bumper tacked into place, just struggling to see if it's level!!
DSCF1732711.jpg


Yep, had to roll it out into the cold weather to check the levels, so I thought I'd take a few pictures of Mary while she was playing out ;D ;D
DSCF1742711.jpg


DSCF1752711.jpg


DSCF1762711.jpg


Even got a video ;D


Hope that works!!

After that noise, it must be exhaust time (Danny!!)

Exhaust parts piled up for butchering and sticking together
DSCF1772711.jpg


After a little messing I have an exhaust bolted on, but it doesn't seem to have made a great deal of difference
DSCF1782711.jpg


And that has been my weekends work and I'm quite happy with what has been done!!

Steve ;D
 

Steves2580

New member
Hi chaps,
Thought I'd try again with my update, tried last night, wrote for an hour and photobucket locked up and I lost everything :mad:

So here goes again!

First thing on Saturday was unwrapping a parcel, my LED rear lights had arrived
DSCF1790412.jpg


Had to get them out and have a good look at them :D
DSCF1800412.jpg


Then I had to decide how to fix the rear lights to the buggy, a light pan is required, this will also hold the numberplate in the right place too! Scrap piece of material used to get the bottom fold to the right angle  :)
DSCF1810412.jpg


Quick check
DSCF1820412.jpg


After checking the angle of the fold, I had to find some material for the light pan, well look what was on the guilotine ;D
DSCF1840412.jpg


After a quick grin to myself I set my light mounts and numberplate out on the sheet steel
DSCF1850412.jpg


That sheet was perfect, so a quick measure and a cut and I have a piece 250mm x 1000mm
DSCF1860412.jpg


Marked it out, positioned it, clamped it up and checked it
DSCF1870412.jpg


Halfway bend check, see if its right with the scrap material
DSCF1880412.jpg


Bit more pressure required, to get it perfect and there it is
DSCF1890412.jpg


Had to put the light mounts and n/plate back on just to see how it looks
DSCF1900412.jpg


I was a little disappointed to find that the lights didn't contain any fitting/drilling measurements, so I used another piece of scrap material to do a mock fitting
DSCF1910412.jpg


Copied measurements over to the light pan, drilled and de-burred the holes, looking cool :D
DSCF1920412.jpg


Radius the outer corners for looks and safety, rough cropping first, then a sand up, using a flap disc in a small grinder
DSCF1940412.jpg

DSCF1950412.jpg


Next job was the exhaust mount bracket, first bend
DSCF1960412.jpg

Second bend, used the oxy propane set to heat the material and get a nice sharp bend radius
DSCF1970412.jpg


Measure its length and mark it for cutting
DSCF1980412.jpg

DSCF1990412.jpg


Well this was my weekends fabrication
DSCF2000412.jpg


Spent the rest of the weekend putting up the Christmas decc's, inside and out :(

I'd rather have been working on the buggy!

Comments welcome as always ;D

Steve.
 

Steves2580

New member
Ok, I was ready to take on the name of SLACKER!!

But this weekend I actually did something on Mary ;D ;D

After spending most of Saturday taking down the outside Christmas deccs and running through to pick up the misses's auntie, I got a little bit done!!

I was soo happy to be back in the garage, it seems like ages since I did anything constructive (Yep Slacker :D)

Well firstly I have to show you what came through the post box over the festive period ;D

DSCF2010801.jpg


These little babies are LED Number Plate lights and they look wicked, I'm well chuffed with how they look in the packet, just hope they look as good when fitted to the buggy ;)

The last thing I did before my Slacker break was construct a rear lighting plate and exhaust hanger bracket.
The first job was to get the exhaust finished, so the bracket was held in place. It was then that I realised that I didn't want a welded exhaust mount, as this would have been a weak but also the lowest part of the rear chassis (when Mary is stripped for painting, this would be proping up the full rear chassis).
The exhaust bracket had to be modified to suit its new position and fitment ;D

DSCF2020801.jpg


Just welded a new 90 degree bracket to the top of the existing bracket, this rotated it 90 degree and lowered it by 25mm

DSCF2030801.jpg


Then it was a case of fitting the rear light pan this was a bit of a challenge to fit, I had to make brackets to weld to the rear chassis, I fabricated two lower brackets, one for each end of the rear light panel (welded to rear bumper), after welding these in place I realised it was still a little on the floppy side, so another three brackets were made and welded into place! (two top and one in the middle, again onto the bumper)

DSCF2040801.jpg


DSCF2050801.jpg


After bolting the light pan into place, I fitted the number plate and new LED number plate lights, sorry about the picture below, number plate reflected back at the camera and made the picture very dark :(

DSCF2060801.jpg


Close up picture of one of the two number plate lights

DSCF2080801.jpg


And that my friends is another weekend gone and not enough done on the buggy!!

Working now for the next four weekends in a row :mad: so very little time to play on the buggy, might have to take some time off in the week while the kids are at school and the misses is at work ;D

As always, your comments are very welcome ;)

Steve  ;D
 

Steves2580

New member
One of the Slackers is back!!

Just a little progress made ;D

Before I could do much I needed to get the original alloys back on, this was an issue :(
Hub adapters required!! Priced them up £150.00 for a pair, NOT a chance!

Fabrication time ;D

A good mate of mine found me a lovely lump of steel, 300x300x25mm. Ideal for my hub adapters!
DSCF2092603.jpg


Marked out and pilot drilled
DSCF2102603.jpg


Drilled to suit M12 clearance (size of studs on MGF hubs) & tapping size for the 3/8UNF new studs
DSCF2112603.jpg


Gas axed into managable lumps
DSCF2122603.jpg


And that was last weekend!

Steve.
 

Steves2580

New member
Heres this weekends work ;D

Good job I'd kept the front subframe from the MGF at work, quick test ;)
DSCF2140204.jpg


Counter drilled to suit M12x1.25 nuts and locking washers
DSCF2150204.jpg


DSCF2160204.jpg


Flipped over to counter sink the other side
DSCF2180204.jpg


DSCF2190204.jpg


Centre hole tapped to bolt adapter to large diameter bar
DSCF2200204.jpg


Large bar, faced up, drilled and tapped ready for bolting the adapters to it
DSCF2210204.jpg


Adapter bolted to round bar
DSCF2220204.jpg


Turning in process ;D
DSCF2230204.jpg


Turned and faced, looking sweet
DSCF2240204.jpg


One half done :D
DSCF2250204.jpg


And then there was two ;D
DSCF2260204.jpg


Turned round for back drilling, then they can be reamed out to size 56.6mm internal diameter
DSCF2270304.jpg


Another test fit on the front subframe hubs
DSCF2280304.jpg


New hub bolts fitted, couldn't wait to get them home and try them out ;D
DSCF2290304.jpg


Old MGF alloy removed and ready for adapter
DSCF2300304.jpg


Adapter fitted, I'm well chuffed with how they look ;D
DSCF2310304.jpg


Alloy fitted, I had to get one on while I was messing
DSCF2320304.jpg


I was going to roll her out of the garage to get some full pictures, just got the N/S fitted and it started to rain :(

I feel like progress has been made, its brought the smile back ;D
Roll on next weekend!!

As always, your comments are welcome!

Steve
 

Steves2580

New member
Parcel arrived while I was at work today ;D

Only ordered the Hydrogas pump on Sunday evening!

Here it is
DSCF2330504.jpg


So this weekend, it's rear arches on and then a big pumping session (keep it clean boys, I ment the suspension)

Steve.
 

Steves2580

New member
This morning went well, have a look at these piccy's

First I got out the arches and recut the inside face to suit the MGF Hydrogas suspension units, one cut, one to be cut
DSCF2340904.jpg


Brackets made to bolt through the reflector and rear of the rear arch
DSCF2350904.jpg


DSCF2360904.jpg


Front mount fabbed and clamped in place
DSCF2370904.jpg


Rear bracket tacked up and arch fitted
DSCF2380904.jpg


Front bracket bolted up and arch fitted
DSCF2390904.jpg


The car was then moved over to the other side of the garage for the N/S rear arch to be fitted, when this was done it was roll out time!
I was dying to get her out into the sun and fresh air ;D
DSCF2400904.jpg


DSCF2410904.jpg


DSCF2420904.jpg


DSCF2430904.jpg


Looking a little on the low side, that will soon change ;D
DSCF2440904.jpg


I did a little hose work the other day and forgot to take any photos, but heres one
DSCF2450904.jpg


The next job was to pump up the suspension, so out came the new pump, cable tied it to a makeshift holder.
Mixed 400ml of Antifreeze with 400ml of De-ironised water and filled the pump
DSCF2460904.jpg


After about twenty mins of pumping, I'd gone from no pressure at all to 400psi, very simple process!
DSCF2470904.jpg


Quick picture of the rear before getting stuck into the other side
DSCF2480904.jpg


I got the other side pumped up to 400psi, jumped up and down on the rear bumper and checked them for pressure!
Great, both still at 400psi ;D

Missed getting a finished picture as I had the kids bikes to sort out!

Bring on tomorrow, more sunshine and more work on the buggy ;D

Steve.
 

Steves2580

New member
Well, I didn't get anything done on Sunday :(

I managed to get a couple of hours at it today :D
I had to get the ECU guarded before building up more of the rear bodywork!

Found some off cuts of 0.8mm cold rolled steel sheet, ideal for a light guard ;)
DSCF2491104.jpg


Cut and formed the pieces of the guard
DSCF2501104.jpg


Tacked up, welded and sanded up, only took twenty mins
DSCF2511104.jpg


DSCF2521104.jpg


ECU guard drilled, brackets made and fitted, that will keep the ECU safe
DSCF2531104.jpg


DSCF2541104.jpg


Rear ECU guard also made and fitted
DSCF2551104.jpg


I had a look at LED centre brake lights on the old ebay, found a local supplier.
Decided to have a ride out to have a look, the old shop was shut and the fella selling was now selling stuff from home.
I didn't know where he lives, so I thought I'd have a look at the local Car Care shop ;)

Told them what I was looking for, one of them ran off upstairs, came back I gave me this FOC ;D
DSCF2561104.jpg


Wicked ;D
DSCF2571104.jpg


I'll try to get more done tomorrow ;D

Steve.
 

Steves2580

New member
Managed to get a little bit more done on Mary today :D

I got fed up with the old fuel filler neck swinging around all over the place, so I decided that needed sorting.
I set to and made a plate that the MGF filler neck could bolt to, I was going to weld this in place, then thought that at some point I may need to get it off again, so a bolted on version was created out of the weld on plate ;)
DSCF2581404.jpg


Rolled over to see the plate that will be welded to the buggy frame
DSCF2591404.jpg


Before fitting the plate the old filler neck was cut down in length, this is how it looked after cutting down
DSCF2601404.jpg


Plate on but not welded up
DSCF2611404.jpg


Welded on with the filler cap replaced
DSCF2621404.jpg


After the fuel filler cap job was done, I had to get on with fitting that nice new spoiler (that was free  ;D)
I got a little carried away with what I was doing and before I'd taken any pictures I had two spoiler mounts fabricated and tacked on.
I must admit, it looks wicked  ;D
DSCF2631404.jpg


DSCF2641404.jpg


DSCF2651404.jpg


At this point I really wanted to roll her out and get some proper photos, but the misses came home, blocked the drive and it started to rain.
My buggy isn't ready for the rain just yet :(

As always, your comments are very welcome ;D

Steve.
 

Steves2580

New member
Done a litle bit more today!

I thought it was about time I switched the ignition barrel, steering lock and indicator stork.
Bigger job than I first thought, I managed to get a couple of photos ;)

First picture is of the old steering column, I started stripping it down before I got the camera out
DSCF2661804.jpg


As you are probably aware, the bolts that hold the steering lock/ignition barrel in place, are not removable.
Well they are with a bent piece of round bar, I just tack welded the round bolt head to the end of the round bar, quick twist and out they come.
DSCF2671804.jpg


DSCF2681804.jpg


This is just a picture of the bits removed from the MGF column, some needed, some to be sold on
DSCF2691804.jpg


Started to remove the old mini parts that are no longer required
DSCF2701804.jpg


Rebuild
DSCF2711804.jpg


Thought I'd better test the new system, one turn of the key, fuel pump buzzed, next turn she fired up ;D
DSCF2721804.jpg


DSCF2731804.jpg


Another half day gone, good job I'm not taking account of the hours spent on this conversion :D

Steve.
 

Steves2580

New member
Hi gang,

Just a little update, well thinking about it, it probably won't be a little update!

After fitting the ingition barrel and the indicator stork, I thought I'd better get on with fitting the steering column cover, slotted the ignition hole and tried it
DSCF2742104.jpg


Removed for a little dremmel work ;D
DSCF2752104.jpg


Refitted the cover I then had to turn May round, single garage and all that
DSCF2762104.jpg


While she was out, I had to take a few pictures
DSCF2772104.jpg


DSCF2782104.jpg


Now she's front in, the front is nearer the welder, I've been wanting to do this next little job for ages, I bent a couple of strap loops a few weeks ago, now I could get them welded on
DSCF2792104.jpg


One tacked on
DSCF2802104.jpg


Both welded on
DSCF2812104.jpg


Even got it painted up, so I can get the battery back on
DSCF2822104.jpg


Next job was to start fitting the MGF clocks, the brackets took some thinking about and some fabricating
DSCF2832104.jpg


DSCF2842104.jpg


DSCF2852104.jpg


O/S clock bracket fitted
DSCF2862104.jpg


Clocks offered up, so fabrication of the N/S bracket can take place
DSCF2872104.jpg


N/S bracket fabbed and welded
DSCF2882104.jpg


Both brackets bolted up and clocks fitted
DSCF2892104.jpg


I then set about fitting/adjusting a fuse box, but missed getting any more photos (thanks god, I hear you say).

I'm having another day on her tomorrow, keep your eye on what I'm doing, am I going to get her ready for Stoneleigh??

As always your comments are very welcome ;D

Steve.
 

Steves2580

New member
Another little bit done ;)

First I rolled her out on to the drive, a little bit of a look at what needs to be done (still loads then)
DSCF2902204.jpg


Position the fuse box, brackets made drilled and fitted
DSCF2912204.jpg


After looking at the battery leads I thought I should really do something with them too, cut off some of the ends and re-soldered new terminals to the ends, bit of insulting tape (it was very rude ha ha)
DSCF2922204.jpg


STRAP ON!
For the first time while I've owned Mary, she has a battery that is secured to the vehicle, I was a little shocked when I noticed
DSCF2932204.jpg


I then wanted to fit the ECU, so a bracket was fabbed and bolted to it
DSCF2942204.jpg

DSCF2952204.jpg


I must have lost the camera for a while, as I fitted the ECU, got some of the old MGF clocks and switches out, trimmed them up and fitted them, then cut down the gearstick and welded an 8mm bolt to the end for the pool ball and pushed her back into the garage!
DSCF2962204.jpg


Close up of the clocks, power sockets and the extra switches, you can just see the alarm box under the dash too
DSCF2972204.jpg


Not really looking forward to tomorrow afternoon, the loom is getting adapted ???
DSCF2982204.jpg


DSCF2992204.jpg


Richard, the ultra light buggy builder cam to see Mary today, he got some pictures and another video clip, hopefully he'll post me the link for it!

As usual guys, your comments are welcome!

Steve ;D
 

Steves2580

New member
Hi guys,
I've done a little bit more on Mary today, not a lot, only a bit ;)

It took me ages to open up all the loom, this is the rear loom
DSCF3002404.jpg


Over the fuel tank
DSCF3012404.jpg


And splat, there's the main loom
DSCF3022404.jpg


I set to, and reduced it by quite a bit, lost the power steering, lost the electric windows, lost the central locking and the interior lights ;D
Hopefully she'll be a little lighter ha ha!

Started to rebuild the front of the loom, starting to take shape
DSCF3032404.jpg


Moved back slightly and spent a little time sorting out the wires under the nose/dash area
DSCF3042404.jpg


Got a little carried away and put the ally nose back on, I knew it would have to come off again, but what the hell :D
DSCF3052404.jpg


DSCF3062404.jpg


DSCF3072404.jpg


Last picture of the day!
DSCF3082404.jpg


So I'll start next with the rear lights, then work forward and splice out what is not needed in the rest of the loom ;D

Not really a fan of wires, but it seem to be going ok :eek:

Check out the video clip on the thread (Thanks again, Richard)

Steve ;D
 

Steves2580

New member
Just had an hour or two on her today :D
I had a late start today, I was in the garage at 7.30am ;D

Not really made much headway though.

First thing I did was tidy the rear section of the wiring loom, once that was sorted fitted the rear LED lights, they are looking sweet!
DSCF3092504.jpg


From the rear loom forwards, right through to under the dash, got it tidy (just, what a pain in the arse).
DSCF3102504.jpg


Once that was all sorted I pushed her out, turned her round and put her back in the garage, chucked in the drivers seat to get a measurement for the shoulder straps of the harness, fabricated two harness lugs and tacked them into place
DSCF3112504.jpg


Sorry for the lack of photos, I'm now rushing a little bit, Stoneleigh is getting very close!!

Feel free to comment on the lack of pictures or whats been done ;)

Steve.
 
Top