Collie's 'Purple Pony'

collie

New member
1st September 2007
So it all began with the wild notion that I could restore a classic motorcycle. Having seen Mark Evans restore a Classic British Bike on the 'Is Born' series I thought "I could do that?".
Didn't last long, although having passed my motorcycle test a few years ago, I've probably spent less than 50 hours hanging on for grim death! I'd love to own a motorcycle again but in reality, I don't think it's ever gonna happen? It's more probable that I'll become a scooter owner!
Anyway, I digress...
Having searched tirelessly for a bike to restore (one that appealed to my taste) I finally gave up! Every bike I like that was in need of restoration was really expensive, it seems you can't pay enough for a classic British Motorcycle! No matter of the condition!
So with that I gave up on the idea of restoring or building anything until...
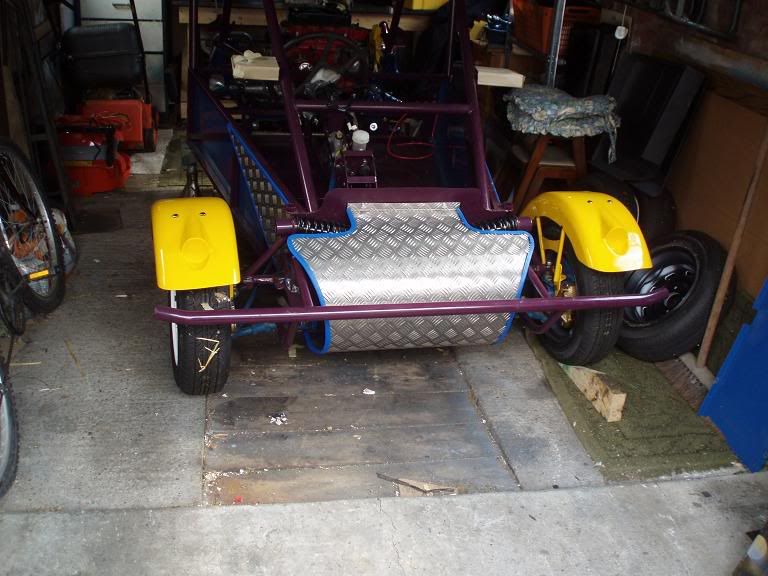
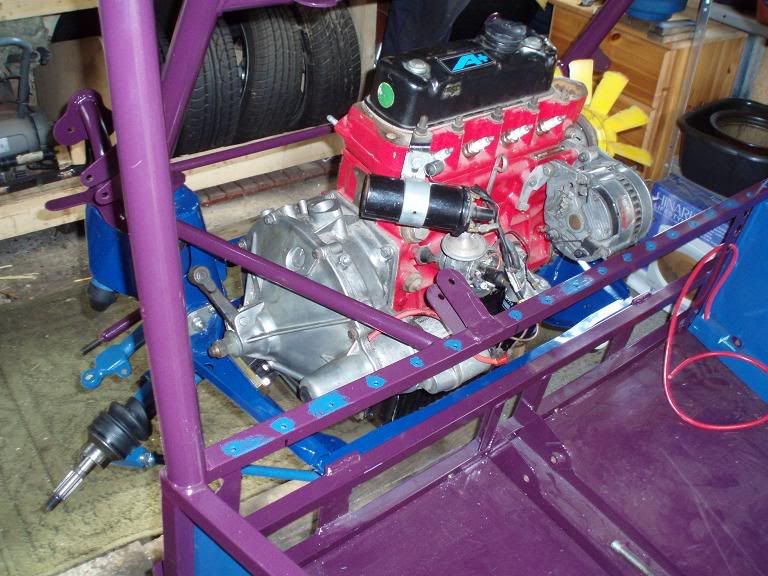
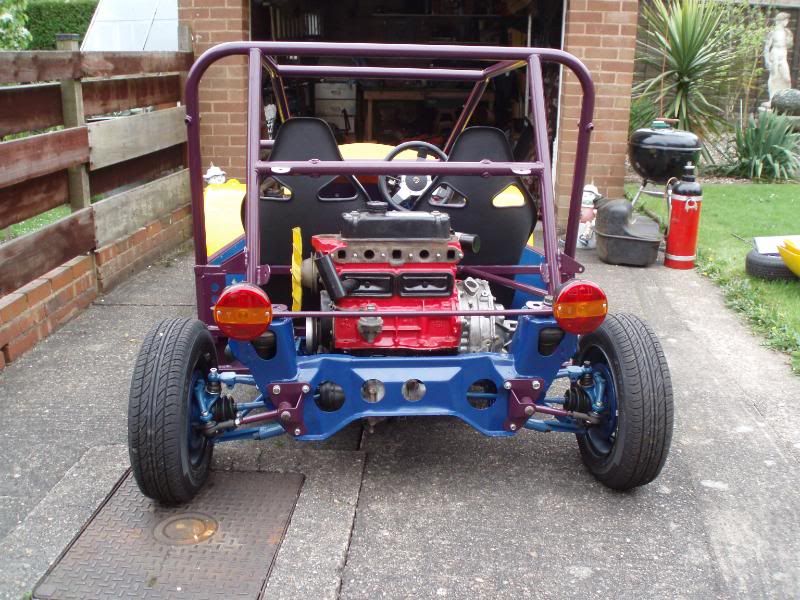
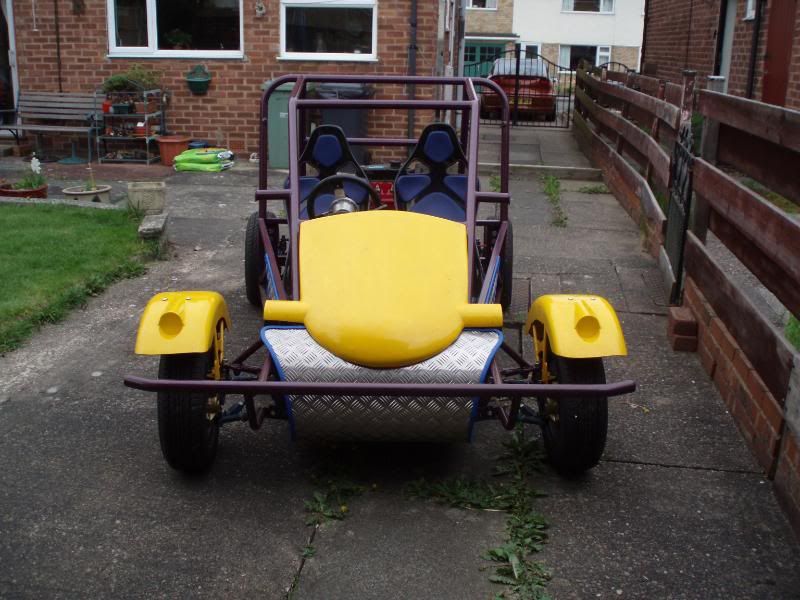
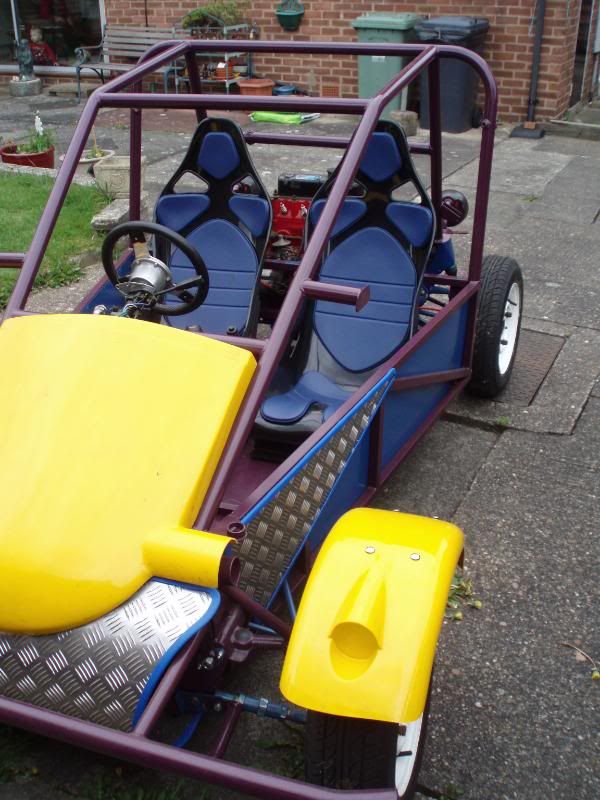
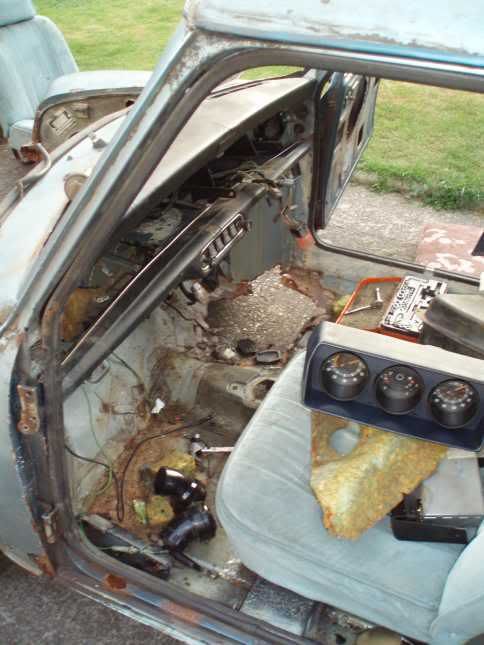
This summer, I saw a strange little contraption on the road, a very small off road vehicle that looked a little like a steel version of the modern pushchairs you see these days. Obviously a lot bigger and having a motorcycle engine in the back, it looked like a lot of fun!
I thought, let's see if I can find out about this on the internet... nothing, it was remarkable the lack of information available (or so it seemed) but the possibility of building one of these critters seemed to be a fun proposition?
So I got to wondering, 'Kit Car?' Naaa, way too expensive, easily burn a ten grand hole in my pocket for another Caterham lookalike, nope not for me!
But I remain convinced that I'm throwing too much money at 'modding' my 12/13 year old Vauxhall Tigra and sure it'll let me down one day in the near future, I'm in need of something to draw my attention away from spending too much money on a street car who's sale value will never meet what I've spent!
So I do more internet browsing for buggies, not really knowing where it would take me, but now convinced that:
a) I no longer want to restore a motorcycle
b) I don't want the fuss of 'restoring' anything!
c) I want to curb my spending on a "modded" road car
d) I quite like the idea of owning a street legal "Fun Buggy"
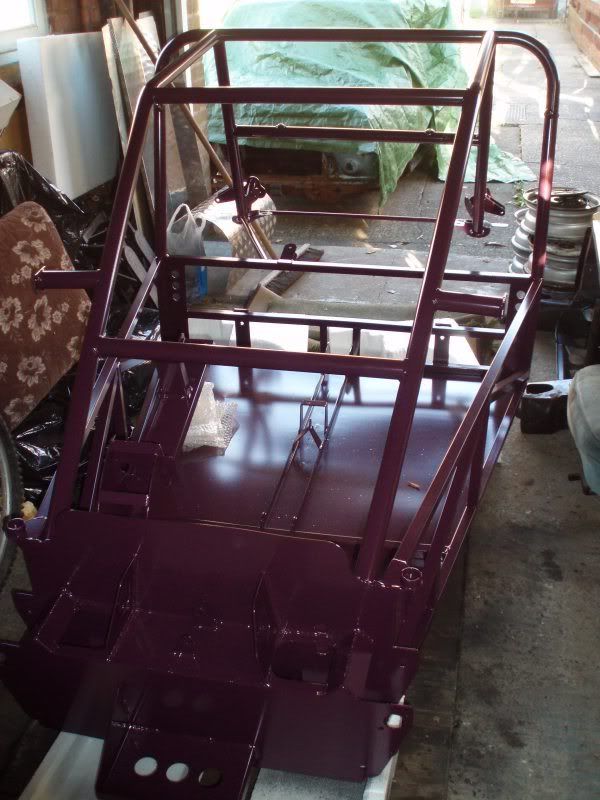
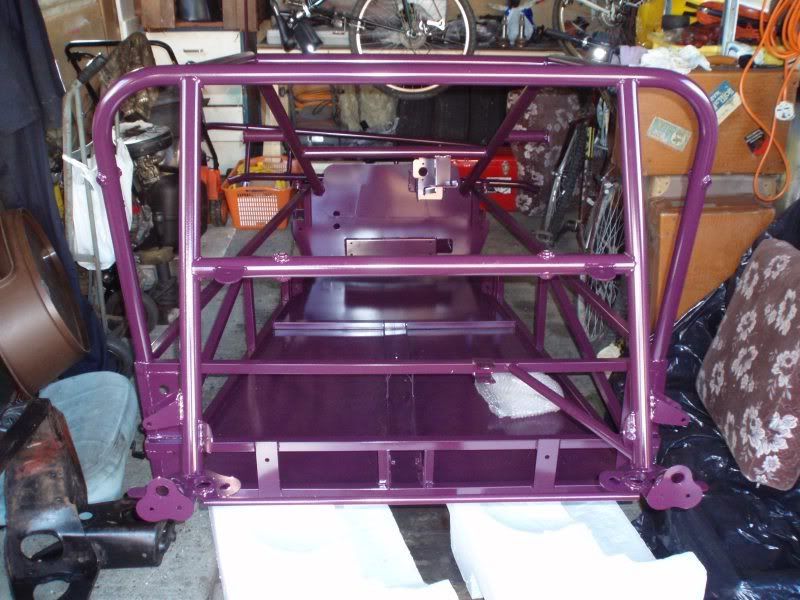
Then I stumble upon a website and a picture of an ABS Freestyle. I still have a link to this guys website but his brief posting gave me the enthusiasm I needed to seriously consider building my own!
I was now on a mission, I wanted one of those wee beasties!
 

collie

New member
September 2nd 2007
Ok, so I should've started this Blog a couple of weeks ago! Since I'm writing this a couple of weeks behind and playing catchup! anyway, read on...

So I have decided to begin building a Freestyle and whilst looking for a suitable donor, I thought it might be prudent to mention to my Grandmother that I intend storing a battered mini on her drive and building a car in her garage!

Phew! She has no problems with it!

Instead of placing my order, I decided the best way to begin would be to build a workbench!

I found some plans online, bought some wood, and I began to build one!
workbench_plan.gif

It's now sitting in the back of the Garage and has no vice and indeed, no worktop!

That was 3 weeks ago, it's still there, no worktop!
 

collie

New member
September 5th 2007 - Finding a Donor!
So, I messed about making a workbench and faffed about looking through magazines and it was finally time to bite the bullet!
I started by getting in touch with the owners club and thankfully a local member got in touch and invited me over to see his and another members buggies, it was great to meet them and see the buggies. It got me hooked!
So I seriously got looking out for a donor vehicle. Ebay was my last hope since all the usual places were showing up nothing!
I eventually found a Metro, and thought I could use that as a donor, but there was a bidding frenzy and it went for way over my maximum!
So back to square one, I gave up with Ebay and decided to get in touch with "Funbuggy Dave" the owner and manufacturer of the Freestyle buggy!
He was very nice an gave me the confidence to build a car even if it was from parts and I committed on the spot to buy the buggy space frame on the spot!
A couple of days later and a coupl eof phone calls and I was bidding on a new donor and sent off a deposit!
 

collie

New member
September 6th 2007 - Rusty old doner in pieces
So I won the doner!
Payed almost double what I expected to pay for it but hey it's worth it! 4000 miles on the Engine (need to verify that) and most parts look ok, or will clean up nicely!
Anyway, thanks to Alan (An owner and club member) offered to help me out!
353b_1.jpg

We picked up a trailer and collected the Mini!
363a_1.jpg

On the way back we managed to pick up a 2 foot steel rod in one of the rear tyres (I dunno how either!) this prompted frenzied action to get the 4x4 off the road before the tyre went flat!
That would have been an absolute nightmare!
31f5_1.jpg

My next entry will be on deconstruction and I hope to be able to throw in a few piccies too!
2ecd_1.jpg
 

collie

New member
September 27th 2007 - Stripped!
So I took a battered rusty old Mini, and full of optimism I though yes I could salvage this?
Mini_Strip014a.jpg

Ha, so i managed to salvage some bits for resale, I should be so lucky, even the chassis is in a right tangle! Glad I'm not restoring it now!
Mini_Strip017a.jpg

Out of virtually a whole mini, I have a complete set of window glass and some replacement panels, that's it! the rest is junk! (Apart from what I'm keeping of course!)
Mini_Strip016a.jpg

So Engine. Front Subframe. Electics (with some brute force). Steering wheel and pedals. All came out easy. Rear subframe, nightmare! a twisted wreck! But, I only need the rear hubs so I'm not worried. To be honest it came apart easy, just need to get rid of the body shell!
 

collie

New member
September 28th 2007 - Colouring the Freestyle Chassis
The Freestyle Chassis is officially being constructed as we speak!
I decided to have it powdercoated, and my ten year old step-daughter (bless) chose me the colour scheme. Yes you guessed it, all shades of Purple!

One interesting dvelopment was the powder coated didn't have the colour I originally requested, but they had a much darker colour which I think will add some... er... um... ok it's just a nice colour... well ok it's PURPLE!!!
It'll be different is all I can say! Anyway, I'm looking forward to picking it up on the 7th October!!
 

collie

New member
October 13th 2007 - It all went horribly wrong!
October 7th...
We never made it! Dave couldn't get the subframe manufactured in time because he had a near death experience! So anyway, he promised to deliver it on October 12th!

October 12th...
Another deadline missed! The Chassis is made, but the powdercoater has let him down!

October 13th...
A new date for collection set as October 28th, I'm keeping my fingers crossed for this one! maybe it's a case of 3rd time lucky?
 

collie

New member
October 30th 2007 - One Purple Chassis

27th October...
A big rush and panic on Friday to hire a van ensued when the Kit builder called to tell me that he had other commitments and I couldn't pick up the kit on Sunday. My mate had offered to take me down on Sunday with his Van, but he couldn't drive me down any other day! Shame really but thankfully a local rental place came to the rescue and I picked up the Van that Afternoon!
Freestyle001a.jpg

We had an eventful day on Saturday, got up early in the morning to run down to the Kit Builder to pick up the Chassis and parts, I hired a long wheelbase van to ensure I could bring back the goods! It was a long 4 hour journey, but as a bonus my Dad (who came along to help) and I stopped for a Bacon Sarnie!
We loaded the Van and had a cup of Tea while a couple of parts were modified, the Kit Builder Dave is a really good bloke but with some odd welding techniques, but that's another story! Had a look around the other Freestyles littered around and picked up a few ideas of how to build mine up!
It took even longer to get back, but the traffic was really heavy, so we left in the dark and got home in the dark!
28th October...
Being rather late and being rather tired we left all the bits in the Van overnight and unloaded on Sunday morning! It seemed to take forever to unload, but finally, here's a couple of pics of my lovely PURPLE chassis!
Freestyle006a.jpg

Freestyle004a.jpg
 

collie

New member
November 24th 2007 - Progress Report!
Well, I have had my ups and downs, so here goes, bare with me whilst I tell the tale!

I tried to strip the mini front subframe using degreaser but it was taking forever, so I decided to take it away for media blasting and powder-coating. I thought while I was at it I'd have the steelies blasted and the backplates for the rear wheel drums.
Freestyle009a.jpg

After promising the parts would be ready by the next weekend I agreed a price and left, upon return, they'd not been done so I reluctantly left and hoped they'd be ready soon? I spent two weeks working abroad and after my Dad tried twice in two weeks and I tried the week after, and only after a bit of verbal did the parts finally get sorted. And of course to cap it off, they loaded an odd wheel from another car into my boot, which I had to take back and exchange! I'll not be going back there again even though they did a good job!

So, in the meantime, I started spraying panels...
1st - Primer, then topcoat (with a couple of disasters along the way! But we'll not go into that!)
Freestyle011a.jpg

Freestyle013a.jpg

After my success with spraying these panels, I went on to paint the steering column, steering rack and various other bits and pieces. I'd decided on Smoothrite, dunno why, seemed like a good idea at the time?
Freestyle025a.jpg

Having let the paint dry, I went on to fit my pedals, and loosely fit the steering rack. After which I decided to spend an awful lot of money on a rather large rivet gut that also did rivnuts but the rivnut escapade was rather unsuccessful (I won't go into it now) and the riveting resulted in me making a bit of a mess of the panels, so some touching up to do! Dissatisfied with the state of my panels I thought best to walk away and work on something else and come back to it when I'd calmed down. Onto my wheels...

I'd decided to spray the insides of the steelies black and the outside in silver, except, oops, I'd bought white! Rather than take it back, I decided to risk painting the wheels white, I think they look okay?
Freestyle016a.jpg

The final step in this episode, and my greatest achievement so far in the build is to fit the steering column, almost looks like a cockpit for a car now! Oh alright it doesn't but it's a significant step in my mind!
Freestyle026a.jpg
 

collie

New member
December 3rd 2007 - Master Cylinders & Trunking
For some time now, I've been looking out for a Brake and Clutch Master Cylinder. The ones from the doner were not in tip top condition and I wasn't happy with using them.
I easily found a replacement clutch master cylinder, since nearly all kit car suppliers sell the type that will fit on my buggy, just waiting for clevis & pin to arrive.
Finding a Brake master cylinder was a bit trickier since the buggy uses the dual line type. I could have used the one from the mini donor, but I wasn't happy with having a remote reservoir or it's condition.
I'd read on a club members blog that I could use a Sierra master cylinder, and saw some fitting instructions. However I'd have to do some refabrication to allow it to fit... Ultimately, it wasn't something I was willing to do, since I'd already had the frame powder coated and didn't want to chop into it.
Having scoured the web and eBay, I eventually found the perfect fit. A dual line brake master cylinder originally intended for a Triumph Spitfire.
Freestyle034a.jpg

I redrilled new holes and test mounted the brake master cylinder and also mounted the clutch master cylinder.
Also been thinking a little about protecting the electic cables and clutch/brake pipes, so I bought some electical trunking and test fitted it, seems to look ok so far.
Freestyle028a.jpg
 

collie

New member
December 10th 2007 - Battery & Paint
An odd combination, I'll be first to admit!
However I bought a battery, assuming the Freestyle would be designed in mind to take a "Normal" or "Average" car battery, atleast that's what I thought! Not on your nelly! It only takes the mini battery which my local motor factor graciously ordered for me.
Freestyle041a.jpg

Finally though I got round to ordering the front suspension components. I'd decided after a lot of deliberation, I wanted everything adjustable, two reasons, first being that the tie rods & track rod ends were either bent of knackered! The second is that I'm fitting standard mini wheels for now and have not planned anything in the future, so if I'm going to install bigger wheels or go 'Off-roading' in it, I'd like to know that I can compensate for the conditions and/ride etc etc. I'll be doing the same for the rear too!
Freestyle042a.jpg

I stripped the front hubs, thankfully the bearings look & feel in good condition and a little extra grease, they should be good as gold. Can't say the same for the front swivel hub ball joints, one upper and one lower were a combination of rust & grease and therefore extremely pitted. The others looked okay upon inspection, but one was pitted and the others spring had been completely compressed.
Off I went to my local Unipart dealer, who was non plussed to actually have a customer and maybe do some work! (miserable git) After claiming they didn't sell a balljoint repair kit and me insisting they do, he actually checked the computer and said "Oh, we do have them in stock!" (Duh!) Two repair kits later, I now need to dig out the grease gun which is in the bottom of my Uncles garage so I can permanently fit them!
Back to my new bits... They all arrived safely today and I set to and painted all the new and old front suspension and steering components, except the dampers which arrived looking lovely.
Freestyle039a.jpg

Freestyle040a.jpg

I like the idea of adjustable dampers, should be interesting adjusting them to find an ideal ride comfort for on-road and off-road! I Still need to aquire some new front calipers but I'm in no rush for those yet since I don't have any tires for my wheels as yet! Hopefully by the end of the week I'll have the complete front suspension fitted?
 

collie

New member
February 6th 2008 - Update
So, it's been a difficult period in my building process.
I'm still waiting for Dave to furnish me with a bracket I'm sure I requested back in December, but hey ho, easy come easy go.
Freestyle046.jpg

Motivation has not been high on my agenda hense the slow progress, but I have been chipping away at things.
Most importantly, the front end is almost completely assembled!
Just brake calipers and brake pipes to source and sort!
I also managed to fit the triangular chequerplate panels with the edging which is essential to preventing SVA failure, good colour too!
Freestyle045.jpg

Freestyle048.jpg

Finally I fitted the first of the two sections of trunking that'll hide the cables & pipes! Rubbed down and sprayed up in blue it looks quite good, a bit of spongey rubber stuff for anti-vibration and Bobs your uncle, ok maybe not your Uncle, but he must be somebodies Uncle? Oh just look at the piccies will you!?
Freestyle043.jpg

Freestyle044.jpg

So drifting back from the most recent additions, I waited ages for bushes for my bottom arms, apparantly lost in the post? But most importantly I had to remove the original bottom arms and get another set that I modified to allow me to achieve the correct camber.
I Just need to get some tyres for my white wheels and then I can use the buggy as a wheelbarrow! lol
 

collie

New member
Feb 7th 2008 to Feb 7th 2009

I laughed my arse off when I read the title of this post, because looking at my buggy now, it seems like I did bugger all for a year!  :eek: I promise I didn’t, anyway, here’s what I remember:

Dave’s bracket arrived, I had it welded and fitted it, but the Triumph master cylinder and Clutch master cylinder I had fouled the housing.
Is seems most master cylinders have a longer throw than the mini, anyway, gave up on that idea and threw it out. Still need to sell the Triumph master cylinder! Lol

Shortly after this debarkle I fitted the accelerator pedal, hopefully it’s in a natural position for my right foot!?

In April I won on an eBay auction a pair of hub assemblies from a Riley Elf, perfect to strip down and pop on my buggy.
Dash001.jpg


Also won a reconditioned pair of calipers:
Dash003a.jpg


Look very nice assembled on the buggy don’t you think?
Dash005a.jpg


I then drew my attention to the engine. We knew we could turn it over from the crank and that it had good compression but were doubtful as to the previous owners claims it had only done 4000 miles.
We removed the bell housing to find a clutch pad almost completely worn out and the housing thick with dust and oil! Yes the clutch oil seal had most definitely gone!
Clutch011a.jpg


We’re now into May and remember those hubs I bought, well, they eventually got stripped and painted and assembled of course (by the end of the summer)
{Hub}
Now between May and December we have a period of ultra slow progress where it felt like I was having constant problems with my Tigra which all started when my loom decided to ignite itself!

Anyway, just before Christmas a pair of seats were ordered:
DSC00458.jpg

Then after Christmas, in-between the snow and icy cold conditions I managed to assemble the subframe ready for the engine to sit in.
{Sub}
 

collie

New member
February 8th 2009 - Lack of Fundage

Having a serious lack of fundage and icy cold weather didn't deter me this weekend.
Spent Saturday afternoon and Sunday day in the garage.
Saturday
Test fitted the old master cylinder having marked up and drilled fresh holes to mount.
Fitted the brackets I'd previously manufactured so I could remove the front bumper with ease. (Thanks to Alan for the inspiration!)
DSC00470.jpg

DSC00472.jpg

Fitted the front mudguard brackets, had a nightmare on the offside, had to enlarge the holes on the bracket so it would fit over the brake caliper.
DSC00466.jpg

Sunday
The near side was worse! Had to enlarge all holes and lengthen those on the top of the bracketry.  :mad:
DSC00467.jpg

Has everyone else had problems with these not fitting?
Cut down and fitted the bumper bar.
DSC00475.jpg

DSC00477.jpg

Started to cut off lugs on brake and clutch pedals and broke the angle grinder! :eek: Must have popped a baring as it vibrated the wheel off! Problem is, it's not mine! My Bro is none too happy!  :D
Jacked up the front end and fitted the nose, found the instructions didn't help and ended up fitting the bottom before the top, but I think good progress has been made.  :p
DSC00480.jpg
 

collie

New member
30th May - Milestone
Not really a great deal to report except one wheel arch is fitted only to find that neither front wheel arch match each other, which I find bizarre!!
Today (30th) I knuckled down in the cool shade of the Garage.
As a result, the manual gearboxed engine is now fitted to my automatic subframe with special mounts.
Pictures to come later  :-[

As promised, pics of mounts, showing TONS of extra room!
aPony007.jpg

aPony009.jpg
 

collie

New member
14th June...
Started the day by fitting the other front wheel arch, I now have a matching(ish) pair:
aPony002.jpg

aPony004.jpg

I got a bit carried away with it all and actually managed to install the engine and subframe onto the chassis:
aPony005.jpg

Believe you me, this is a major milestone for me and a great booster to my motivation.
With that, I managed to fit the driveshafts too!
aPony017.jpg


15th june...
Being off work this week has left me with plenty opportunities and having a sympathetic partner has helped a great deal (being urged to "go work on your buggy"), so I spent part of monday Afternoon in a thunderstorm, fitting the rear hubs!
aPony018.jpg

I think my castor is WAY off since I found it extremely difficult to fit thrack rod end  :-[

All in all a good few days work.  If I can get in the garage once more this week, I hope to post up some pics of a rolling Chassis!  :eek: ;D
 

collie

New member
16th August 2009
Found a little free time today so...
Fitted my nice little 12" Mountney Steering Wheel.
Made up a template for the brake & clutch pedals replacement lug (since the one Dave welded on for me was in the totally wrong position!) and marked up the steel piece I have in readiness for cutting. Going to bolt it on rather than weld it, I hope it'll give me the option of some adjustment if required!?
Started to work out what I need for the gear selector rod, and found the coupler, for which my dear old Dad is going to find me some rollpins!
I think that'll be my lot for another 2 weeks, sorry, no photoes as yet, my camera seems to have grown legs, no doubt it's hiding somewhere safe!  :D
 

collie

New member
Ooer, got the following warning!

Warning: this topic has not been posted in for at least 120 days.
Unless you're sure you want to reply, please consider starting a new topic.

Anyway, I rolled my buggy out of the garage to have a look and take some pictures, I'm 50/50 about selling, don't want to sell but have to consider it with spending so little time on it and having zero money.
Anyway, here's what she looks like today:
P1010144.jpg

P1010145.jpg

P1010146.jpg

P1010147.jpg

P1010148.jpg


Purchases and aquisitions (thanks Alan):
BW082gBWkKGrHgoH-EQEjlLlbinfBKb2Fbj.jpg

P1010149.jpg


The reason for my lack of buildage:
34002_468955754898_769574898_643203.jpg
 

collie

New member
So I decided not to sell afterall, though the lack of building is showing concern!
I've purchased the following item:
bracket.jpg

Not just because it's purple but I actually need one!
I've also found a £20 voucher from last Xmas from my dearly beloved, it's for Mini Sport and it's burning a hole in my pocket!
Maybe you'll see some build effort soon? I hope so!  :-[
 

collie

New member
Just taken delivery of some new bits, courtesy of a nice Minisport voucher  8) :

Uprated Top Engine Steady Bush Kit
Freestyle001.jpg


Gearbox Stabiliser Kit - RH - inc Rubber Bushes
Freestyle003.jpg


Gearbox Stabiliser Kit - LH - inc Rubber Bushes
Freestyle004.jpg


I even wangled a free keyring!
Freestyle002.jpg


Now, where's those keys to the garage!  ???
 
Top