Got a Freestyle Buggy at last!

250buggys

Well-known member
My rev counter gave up after not much use, annoyingly it wasn't that cheap or nasty.

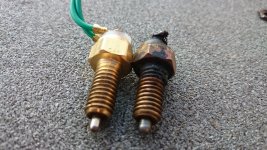
So to cheer me up I ordered a new digital unit and had to get the matching water temp gauge to go with it.

DSC_1879.JPG

When off they are just smoked and no need to wire a seperate poz for illumination, so win win but I will have to get another LED for the oil pressure light.

Still wiring!
 

250buggys

Well-known member
Fitted the two relays for the lights in the distribution enclosure and wired them up.

DSC_1890.JPG

Wired up the rear lights,. My kit came with non matching hamburger lights, it is quite evident that one of the lenses is much better than the other. Not too bothered, it is e marked and I won't spend too much time looking at them from the driver's seat.

DSC_1885.JPG

Rear fog wired up too.

DSC_1886.JPG

That is brighter than a bright thing.
 

250buggys

Well-known member
Oil pressure warning and alternator lamp wired in as are rear indicators, the only thing I have left on the rear to connect up Is the reverse light.

DSC_1854.JPG

New temp gauge working now, had to wait for my 5/8UNF to 1/8NPT adapter to turn up before I could fit.

DSC_1849.JPG

Fitted a couple of reflectors to the rear arches, may well put a couple more on the engine cover also.

DSC_1851.JPG
 

250buggys

Well-known member
Wired up the front indicators and side repeaters. Then had a look at fitting the terratrip for the speedo. Was thinking that I might just fit a magnet on a bracket to the drive shaft and mount the pick up in a suitable place but looking back at some forum posts it looks like fitting the terratrip elevates erratic speedo readings which will certainly help with IVA testing. It does mean however running the extra wire in the loom for the switched live supply for the terratrip.

Here is my mounting bracket. I had a look but could not find an off the shelf version.

DSC_1856.JPG

Measured and made a careful incision in the speedo cable

DSC_1857.JPG

Also measured and cut the inner part.

DSC_1858.JPG
 

250buggys

Well-known member
Terratrip wired up this evening and tested, working with the Acewell, another thing ticked off. Will test it with a tomtom to see if it is reading somewhere where it needs to be.

DSC_1864.JPG
 

Phaeton

Moderator
Staff member
On one of my builds it was slightly out when I took it for the test they allowed me to modify it on the rollers, just make sure it over reads, 32 at 30, can't be 29.5 at 30
 

Danny

Administrator
250buggys":27yc54gh said:
Terratrip wired up this evening and tested, working with the Acewell, another thing ticked off. Will test it with a tomtom to see if it is reading somewhere where it needs to be.


not long now :D
 

250buggys

Well-known member
Been busy tidying up the wiring, got a new camera so the images should seem sharper.

DSC_1879.JPG

Need to get some spiral wrap to hide it all then clip it up. Still a couple of connections to make but all the switch gear is done, tested and working.
 

250buggys

Well-known member
Remembered to add my DOT4 sticky thing, just need to put one on the indicator stalk for the indicators and one on the dash for the noisy button.

DSC_1882.JPG

I couldn't use the horn button on the end of the stalk as it shorted all my dials out, probably what killed off the last rev counter.

I added in this to sound the horn.

DSC_1883.JPG

I can't get my reverse light to work which is a bit of a pig, I ordered a new switch but still no worky. Will have a fumble around tomorrow and see if I can sort this out.

Soon be ready to add some miles to the clock now it is connected.
 

250buggys

Well-known member
Phaeton":35qzy95q said:
Have you turned your selector around?

Yes that is done, when I say I can't get the reverse light to work, it does work just not when in reverse.

I bought a new switch as the wires had come off, tried to repair it by soldering new wires on but that wasn't very successful. when I lift the stick and push over to the right the reverse light comes on but when it goes into gear it then goes out. No amount of adjustment in or out allows the reverse light to come on.

When I compared the new switch to the old, the plunger nipple is significantly smaller on the new switch. I measured the new plunger nipple and it is 3mm diameter and the old is 4mm.

Could this be what is causing my problem?
 

Attachments

  • DSC_1893.JPG
    DSC_1893.JPG
    3.6 MB · Views: 8,037

Phaeton

Moderator
Staff member
Is the switch on the drivers or passenger side?

Also with your horn you can get it to work you just need to use another relay, the Mini is push to earth for horn the CBS unit is push to live
 

250buggys

Well-known member
Phaeton":dfiat0tc said:
Is the switch on the drivers or passenger side?

Also with your horn you can get it to work you just need to use another relay, the Mini is push to earth for horn the CBS unit is push to live

The switch is on the Driver side

Thanks, horn all working now.
 

250buggys

Well-known member
Drilled some holes and make a bracket, now the engine cover is fitted. This should keep Mr IVAs balls of any sharp bits.

DSC_1916.JPG

I mounted the fuel filter on the side of the sub -frame, not really sure there was a better place. I will swap the plastic cable ties out for stainless to make it a little more pro.

DSC_1906.JPG

The accelerator cable is proving an issue, at the moment it has a nice path to the carb but every time I introduce a clip it adds more resistance. IVA indicates that clipping should be done at least every 30cms. I am going to have to have a play about with this.
 

Phaeton

Moderator
Staff member
I can see from page 1 you've swapped the gear selector round so it should work. Couple of questions, if you manually push the switch on do your reversing lights come on? Is the engine running & can you select reverse?
 

250buggys

Well-known member
Danny":1vv2okpn said:
Photos are now perfect :)

Good work :)

Sent from my SM-N950F using Tapatalk

Thanks, just got the last few jobs to tick off and I'll start to get my paperwork in order. :)
 

250buggys

Well-known member
Phaeton":3u8vf2pf said:
I can see from page 1 you've swapped the gear selector round so it should work. Couple of questions, if you manually push the switch on do your reversing lights come on? Is the engine running & can you select reverse?

Hi Alan, the reverse light works, has 12v but switch not connected in yet as you have to twist it, so need to get it in right position before I wire it in.

To test the reverse switch I have got it connected to my meter on continuity bell.

DSC_1918.JPG

Just can't get it to work right, if I wind it in it only beeps with the stick up for reverse and hard over right. As soon as it clonks into gear where lever goes back the buzzer goes off.

Even when it is screwed right in it won't make the switch in reverse. It fouls the mechanism and locks it in reverse gear if you wind it in too far.

I heard back from the supplier and apparently the size of the nipple being smaller than the original should not make any difference. I am dubious and might try and find a 2nd hand switch if I can to test.

I had a spin about last week and all the gears select really well, the linkage works well.

I am just waiting on another fuel line but to answer your question I haven't tested it with the engine running, do you think it would make a difference?

Centre console comming off tomorrow to investigate further. Thanks for your help with this.
 

250buggys

Well-known member
Phaeton":22zghufe said:
On one of my builds it was slightly out when I took it for the test they allowed me to modify it on the rollers, just make sure it over reads, 32 at 30, can't be 29.5 at 30

Good tip thanks Alan, it's nice to see they let you have some tinker time at the test centre, especially as they have the right kit. I think someone said that the IVA guy let them set up their head light beam on the day. It's definitely worth not having an MOT before hand and having 3 years grace for a new build.

I was flicking through the manual after your post and came across this.

Screenshot_2018-07-08-07-37-39.png

Just need to get this right, so.

Acewell needs circumference of tyre, a 175/50/13 = 1588mm

The acewell notes say if using a cable drive speed sensor (terratrip) then divide the c value by the number of turns of the cable drive for each revolution of the wheel.

1 turn of the terratrip = 1.5 wheel turns

1/1.5 = 0.6666

1588 / 0.6666 = 2382

C value for acewell = 2382

does this look about right? to get my percentage error do I need to increase or decrease this figure?

Thanks for your help with this Alan, when it comes to buggy building you are very handy as you have done all the hard work before.
 
Top