Freestyle GT Build

jason_l

New member
*** Small Update ***

Well i have been paid this week and the parts will start rolling back in again :D

Got some alloy turn up this week and have made the top for the fuel cell. Has the cutouts for the filler cap and for the fuel sender. Just need to order the remaining stock and cut it to size, then comes the fun of welding it up ^_^
Then got a 2.5' billet of alloy arrive as i need to make a alloy reducer for the intercooler pipework.
DSC01323.jpg


I have started drilling the thing and its all mounted up in the lathe for when i get back to work on monday morning. Going to waste a load of it but i just can't seem to find a 1-2.5' alloy reducer. So means a custom made one from scratch, like the rest of the buggy.

Want to say a big thankyou to Luke from UKSC for the vinyl's he sent me, they are great and i really can't wait to get them on the thing. Just can't yet :(

DSC01325.jpg


I picked the RHD and Pedo bear up from Modified Live last weekend.

Then after seeing this picture get posted up i have decided to make one of these as well.........
DSC04138%20copy.jpg


Going to make something similar but use it to mount on the rear of the buggy and it will be used as a spare wheel mount. Just going to build it as and when i can't do parts on the buggy and i already have a seat from a old chair i can butcher up. Its not going to be on the Buggy most of the time but will just fix it on the back for shows etc.

Monday i am going round a mates house to begin machining the hubs to accept the new uprated brake calipers i have and the rest of the week i will be cracking on with it as i usually do :D

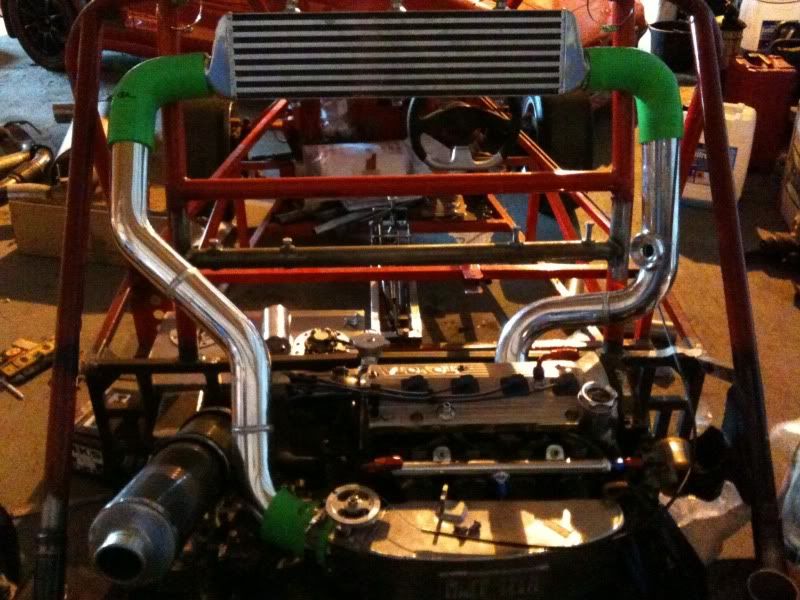
Oh, and forgot to mention the engine is currently going into the Buggy! Will get pictures next weekend but expect work to really move forward soon :D

Jason :)
 

jason_l

New member
*** Update ***

Well, what a difference a week makes :D Been working a bit more on it this week and im sure the pictures will help to show that.

Monday and tuesday i spent the evening round my mates house machining the hubs to accept the new sexy callipers. Took ages as i didn't want to feck them up so spent a while machining a little and testing them, then a bit more and so on. Second calliper was a bit easier as it was then setup to machine the correct amount. Tomorrow i will be going into work to weld the holes up and redrill them in the correct position, then hopefully get them reskimmed during the week.

Here's how they currently look.........
DSC01340.jpg


While i was at my mates i remembered about a turbo that he has lying about in his workshop, was thinking about fitting it to the buggy but i think it may be a little small? What do you guys think? LOL

DSC01328.jpg

DSC01329.jpg


my mate......
DSC01331.jpg


Tiny intake......
DSC01332.jpg


next to my size 10........
DSC01333.jpg


WIN!!!!!!!
DSC01334.jpg


My nice HKS (fake) SSQV arrived on Tuesday as well, looks pretty good, has a few marks on it but will look good on the pipework. Already started filling down the adaptor to be welded to the pipework as i don't want to use a silicone adaptor.
DSC01338.jpg


Then spent my lunch breaks throughout the week machining the 1-2.5 inch adaptor from the solid piece of billet, took flippin ages as i could only work on it a little at a time but came out just perfect.

Just finished.........
DSC01344.jpg


on the turbo flange.........
DSC01347.jpg


with pipework.........
DSC01348.jpg


and after a quick 5 minute polish...........
DSC01354.jpg


Looks 100 times better than some of the intercooler pipework i have seen on the market.

Then today i got up to TGT to spend the day doing a little bit and measuring up for more custom parts i will be making over the next few weeks. When i finally got round to getting out of bed and getting to the workshop i was greeted by this.............. :D :D

DSC01357.jpg


HELL YES!!!!!! The engine is in!!!!! Im so happy its really starting to look like a buggy now, not just a pile of parts and some scafolding.

Bomb proof engine mount..........
DSC01359.jpg


Then spent the whole day adding parts so that routing can be worked out. Inlet manifold will come back off later when the frame goes to paint so i can polish it up, and rocker cover is not on as its currently being polished. It looks so much better with a few parts added and that inlet manfold looks amazing on show at the rear of the buggy. Exhaust was just placed on the back but will be at a lower angle when its fixed in place.

DSC01364.jpg

DSC01365.jpg


starting to route the coolant pipes........
DSC01366.jpg


With fuel rail added.......
DSC01368.jpg


Going to spend next week making all the new parts that i have measured up for and i will update next weekend as i usually do. I have loads more material now so i can finish the fuel cell and it will be getting welded up next month. Also bracket for induction kit, exhaust and fuel pressure regulator.

comments welcome as always :D

Jason :D
 

jason_l

New member
*** Update ***


I know i didn't update last week but have been continuing with the brake/hub modifications and finally got them finished and installed today:D

Welded the original holes in the mini hubs.....
DSC01373.jpg


and ground off......
DSC01374.jpg


Took flippin ages to drill the holes as the hub work hardened after being welded and cooled down, but i got there....
DSC01383.jpg

DSC01387.jpg


More new parts, new CV's......
DSC01386.jpg


New top/bottom joints and Wheel bearings.......
DSC01376.jpg


Roughly put together.....
DSC01387.jpg


Then got up to TGT today to swap over the old setup with the new sexyness.

Old drum setup......
DSC01393.jpg


starting to come off.....
DSC01394.jpg


Here are the parts Kev, let me know if you want them? One of the brake lines was buggered so i have removed it.

and finally all off.....
DSC01395.jpg

DSC01396.jpg

DSC01397.jpg


All the parts where as good as new and never really used but the new setup is so much nicer.

Sexy new setup installed......
DSC01402.jpg

DSC01403.jpg


Looks so much nicer and hopefully will help it stop quicker also, they are a single floating piston type but the have willwood pads so should be good. Just need to sort a handbrake cable now and get some braided brake lines made. The old setup was alot wider than the new setup but that not an issue as the back was flippin wide anyway, its still 150mm wider on either side at the rear.

Also knocked up a exhaust mounting bracket....
DSC01375.jpg


fitted on the gearbox.....
DSC01398.jpg


and with the exhaust in place.....
DSC01400.jpg

DSC01401.jpg


Im busy now with other things for the next 4 weeks so won't be able to get up to TGT to continue the work for a while. Rather than leave it for this long im taking Friday 6th off work to do some more :) Need to finish off the fuel cell parts before then and the plan is to spend 1-2 days welding the fuel cell, catch tank and making the 2 exhaust systems. Will also have the intercooler by then so if there is time we will do the pipework and get the intercooler mounted. May even get the seat rails fitted if there is time.

Comments always welcome people :D

Jason :D
 

jason_l

New member
Another little update :D

Not going to be working on the buggy this weekend as spending time with the other half so will do a little update now.

Been working on getting the fuel cell panels made up this week. Got them all roughly cut out and have started cleaning the edges up ready for the weld fest next friday. Roughly put it together, Currently looks like this.......

DSC01405.jpg


Going to mirror polish the top part as thats the only part of the fuel cell on show. Checked a volume calculator online and its 6.3 Gallons (28.7 litres) so not too bad to be honest. I just need to order a couple of pieces of ally to make the baffles for in the tank then its pretty much done.

Its pay day tomorrow and i have warned the postman already LOL. He always moans (joking) when he delivers all the parts at work. Going to be ordering the intercooler tomorrow and the silicone jioners and mikalor clamps. Im going for a smaller intercooler now so that rear view is not comprimised. Its 140mm high but it is good for 350bhp so will be fine.

I had a little bit of money in paypoo so i have already ordered a 255lph Tuning Developments uprated fuel pump and should also have that shortly :D

Really looking forward to next friday when the fun really begins................

Jason :D
 

jason_l

New member
*** Update Time ***

Got a few things delivered this week as its been pay day and i have got a few parts done to the buggy.

Firstly i got my 255lph uprated fuel pump from Tuning Developments arive on saturday, can't recomend them enough, excelent service from the outset!

40032_10150258180545473_587840472_14081377_7079946_n.jpg


Then Tuesday my intercooler arived from Toyosports, again fantastic service from the start. Went for a slightly smaller cooler but it will do the job and is getting mounted just under the top bar at the back so should get plenty of air.

39004_10150258180760473_587840472_14081383_2792966_n.jpg

2.5' core and 2.5' inlet/outlet so the pipework is now ALL the same diameter!

Then thursday my intercooler silicone parts arived from SFS. SFS are brilliant!!!!!! I will be dealing with these guys again as they are one of the best companies i have had the pleasure to deal with. I phoned them on wednesday morning at 9am and the guy i spoke to was a legend! He said that my hoses where currently being made and promised i would have them the following day as i needed them for fitting on friday. They arrived the next day at 8:30am and i LOVE them.

39004_10150258180765473_587840472_14081384_3868429_n.jpg


and on the cooler........
39004_10150258180775473_587840472_14081386_3087461_n.jpg


colour match next to the Porshe viper green, its close, think its closer to kawasaki green...
40279_10150258188875473_587840472_14081659_7612037_n.jpg


Then managed to get the 2 fuel tank baffles knocked up throughout the week, from 3mm ally.
39004_10150258180770473_587840472_14081385_5861014_n.jpg


Then took yesterday off work to get up to TGT and begin the weld fest!

I spent the day working out placement of parts and even got a few bits fitted and helped James with the fuel tank where i could. James is a flippin legend and i had one of the best days working on the buggy in a long time. He managed to get the fuel cell complete and its just awsome, i don't know what else to say but knowing that he is doing the fabrication parts i can't do myself makes me know i have taken the buggy to the right place. I could not build this without his help, FACT!!!!

first parts tacked.......
40279_10150258188880473_587840472_14081660_3390_n.jpg


box............

40279_10150258188885473_587840472_14081661_6859039_n.jpg


with baffles........
39085_10150258192700473_587840472_14081804_1939461_n.jpg


flattening the top piece in place with a small hammer.........
39085_10150258192715473_587840472_14081806_1012926_n.jpg


Just finished, welding is awsome..........

39085_10150258192720473_587840472_14081807_8341400_n.jpg


and in its new home, will look even better when i mirror polish it up...........
39085_10150258192725473_587840472_14081808_5581835_n.jpg

40439_10150258194500473_587840472_14081923_4632776_n.jpg

40439_10150258194505473_587840472_14081924_2054076_n.jpg


Got the new uprated pump fitted also and all the in tank connectors finished, apart from the fuel pump wires that just need a few crimps.

Also just chucked the rocker cover back on to work out the placement of the catch can etc. Will be coming back off again soon to be polished up more.............

39085_10150258192710473_587840472_14081805_2349636_n.jpg


Unfortunately i didn't have the time to get up there today to get on with it but yesterday i paid James to get the intercooler mounted and all the pipework to be welded and fitted and the HKS ssqv adaptor welded on also. I haven't spoken to him yet but im hoping he got most of it knocked out and hopefully have some pics soon.......

Thats it for now............. :D

Jason :D
 

jason_l

New member
*** Mid week update ***

Well last night i was ent this picture by James.

1b15b1ca.jpg


I only spoke to him on monday saying if he had time could he do a little more intercooler pipework routing. Looks like he has out done himself again and its all finished. Makes the intercooler look quite small but my god it looks sexual. Will be up there next saturday with a proper SLR camera getting some really good pics, rather than just phone pics.

Thats it for this month now as im pretty broke. Will be doing small bits though, like making a induction kit housing and working on mounting the front arch's.

Jason :D
 

jason_l

New member
*** Small update but lots of pics ***

Well its been one of those weeks really. Been waiting for some material to arrive so i can get on it but nothing has arrived yet.  Oh well, still had a chance to do a few things.

Started looking at the thottle pedal and how im going to do that. I have a Starlet pedal left over so decided to basterdise that and try and work something out. I think i can get it to work and will be loads better than what i have already. The starlet pedal has a proper bracket and spring so its a nice setup and i just need to work out cable attachment and some sort of rubber bump stop and should be well away.

started modifying it, cut down and piece added......
DSC01454.jpg


The bracket is a nice simple way to mount it to the frame and will work out perfectly.....
DSC01455.jpg

DSC01456.jpg


Found a small sheet of scrap steel and decided to make the rear numberplate brackets, decided on a shape for these ages ago so just knocked them out quickly. Will now be able to get these welded on the car with my old lexus plate so people will see it and actually realise that its going to be road legal!

DSC01457.jpg


Then today i got over to TGT and rolled the Demon outside for a mini photoshoot and to have a look at the welding on the intercooler system. James is a LEGEND!!!!!! The welding on the intercooler pipework is nothing short of epic, really want this done now. Rolling the thing outside was a good chance to look at it better and talk through a few things. Im really happy with how it looks but there is something i don't like about the rear??? If you look at the side on pics it don't look right and the rear pics look a bit strange? Almost like it needs some sort of HUGE rear wing or something? Maybe as it comes together more it will look better, if anyone fancies doing a photoshop with a rear wing/changes then please feel free as any idea's will help and give a good example of what i can do.

anyway, enough chat here are the pics................ :D

Sexual intercooler pipework.......
DSC01467.jpg

DSC01469.jpg


BUGGY.............
DSC01464.jpg

DSC01465.jpg

DSC01466.jpg

DSC01470.jpg

DSC01471.jpg

DSC01472.jpg

DSC01479.jpg

DSC01481.jpg

DSC01487.jpg

DSC01482.jpg


Comments welcome as always :D

Jason :D
 

jason_l

New member
*** Update ***

Well work has been very slow on this recently as i have been help brake my bro's MR2 for parts as he needs the money and is now living in Japan for good. Been a manic couple of weeks really working on this and trying to get some of the buggy done also.......but don't worry i have managed to do a few things. :D

Tuesday i took the day off work to spend the whole day just to remove parts from my bro's car and take pictures, what a day that was. Literally spend the whole day removing parts and taking pics of parts. However, my bro gave me a TRD white duracon gear knob that has already gone onto the buggy. Lightest gearknob known to man so will fit right in on the buggy. He also said that if i can be arsed to remove the alarm system then its mine! Could i be arsed? HELL YES!!!! So i now have a Clifford G5 650 concept free of charge, has imobiliser, key code engine start, tilt sensors, proximity sensors, bonnet/boot sensors and engine start from key fob  Will be taken to a specialist i know and fitted with a certificate when the buggy is done. Saved me £££'s getting that.

Then today i went up to TGT to measure up for the gear cables. I have found a company that make made to measure gear cables that are mega flexible (they claim you can tie them in a knot and they will still work fine) and they are reasonably priced, about £65 for a 2 metre cable. Got all this done and they will be getting ordered up in the next few weeks or so.

Also while i was there i put James to work on the exhaust system, he is a legend. Couple of hours later and it was done! Its a work of art and is so strong! I nedd to make a new bracket for it as the one i made up before was slightly off but everytime he does some more work on the buggy im always amazed at what he does.

Here's the outcome......
DSC01580.jpg

DSC01581.jpg

DSC01582.jpg

DSC01583.jpg


Turbo end.......
DSC01584.jpg


DSC01585.jpg

DSC01586.jpg


Just misses intercooler pipework..........
DSC01587.jpg


I love it, its got to be one of the shortest systems i have seen.

Next job on the list is the fuel system, i have given James the go ahead to order the braided fuel line and -6 fittings and get it all plumbed up and the fuel lab FPR mounted and plumbed also.

Its slowly all getting connected up now. Work will be slower over the next few months as i have so much on and money is pretty tight, but don't worry i haven't forgotten about this :D

Jason :D
 

jason_l

New member
*** Small Update ***

Just got back from JAE (Japanese Auto Extravaganza) a few hours ago and although im completely shattered i have already started sorting out parts for the buggy. Im going to try and do more to this each week now as i need this done so bad. JAE just made me realise how insane this is going to be and how close its starting to get now.

Had a talk with a rep from Hel (company that make custom brake/clutch lines) and im going to get them to make up all the lines for the buggy as his prices didn't seem too bad and they seemed a better choice than the copper lines as they can easily get damaged/crimped and the stainless braided ones should be easier to run and mantain.

While i was there i had a little look around the trade stands and i must say they where pretty rubbish, even though i still managed to get some green bits :lol:

Picked up a tow eye for the back and some stainless/green anodised washers. Look awsome and should really help with the green/black theme.

DSC01601.jpg


Also Alan was there on the next club stand so had a little chat with him, which is always good  ;D Great to see you again mate, the TB Development guys are, um, whats that word,........INTERESTING!!!!!  :D

NEED THIS BUILT!!!!!!!!!

Jason :D
 

jason_l

New member
*** Update ***

Well got up to TGT yesterday and the plan was to start the wiring for the passenger compartment. However when i got there i changed my mind and decided to just get the drivers seat fitted. Was a bit of a work up as i had to keep roughly putting the rails in and checking they where going to work then move them etc.

Anyway, after a little while i got the new seat bars welded to the chassis....
DSC01614.jpg


There are some metal bars under the seat that run front to back and these just simple weld to the above bars. I was going to do the seat adjustable but im not tall and i have the seat fully back so didn't think it would be worth having it move.

Then got the seat tacked into place.....
DSC01615.jpg


Then started to look at the wiring, got the fuse and relay box fitted to the front and started by identifying what wires where what from the ignition/indicator stalk connectors.
DSC01616.jpg


James has also ordered up the sexy braided fuel line and AN6 earls fitting that im using for the fuel system. Came to £200 with a large discount as well  These things aint cheap but should look awsome when thats all done, hopefully next few weeks he should have that finished.

Had a chat with James and we have agreed that he will do a couple more jobs and i will be moving the Buggy to my work's workshop. He will be finishing off the fuel system, welding the rear coilover mounts and wire up the engine to start. We where in agreement from the start that i would get him to do all the jobs that i couldn't do and i would do what i could to keep the costs down. Its almost at the point where i can do the majority of parts myself, and having it closer to home means i can work on it a LOT more. Its currently a 40 mile journey to TGT and i can only work on the buggy every other saturday. Moving it means i will be able to do before work/lunch break/saturday/sunday and bank holidays :D Won't be for a few months yet but when it moves expect the progress to pick up a little. The Buggy will then go back to TGT for the final setup/tweaks/mapping just before the IVA test.

James has been a complete legend with regards to this project and i can't thank him enough.

Jason :D
 

jason_l

New member
*** Update ***

Well i got back from Devon yesterday and was completely shattered and after a terrible nights sleep i woke up this morning feeling a bit poo! Despite this i dragged my ass out of bed at 7am and got over to do some work on the buggy.

I got up there after a quick stop at B&Q for another piece of steel bar and started. James and Lee @ JDModified regretably couldn't finish my fuel system as there was a problem with my Race Tech fuel rail  basically the fixing tabs are slightly in the wrong position and this means that the injectors sit at a funny angle and not square like they should. This means that the fuel will either leak around the seal or dribble into the block rather than a clean spray
The quick fix would be to elongate the holes and hope i can bodge the bracket to fit with the bolts but im not happy doing this. We have decided that the best option is to remove the fuel rail and remove the brackets and then remake them in the correct place. Also while we are at it we are going to rotate the fuel rail round 180' so that the centre return is coming up rather than down as it fouls on the inlet manifold when thats fitted.

Here are the pictures of the almost finished fuel system.........

with the inlet manifold removed, you can see the centre fuel return here and i think it will work better coming off the top as it will have a clearer path.
DSC01643.jpg


DSC01637.jpg


you can't really see it here but the injectors sit at a weird angle...........
DSC01644.jpg


FPR fitted to the frame.........
DSC01638.jpg


From the fuel cell........
DSC01639.jpg


Fuel system needs a little more work but its almost there and won't be long before its done :D

While i was there i got the passenger seat rails cut to size and welded to the frame and the seat fitted into place. All needs more welding but the whole frame needs going over when its broken down for paint so i will do it then when its back in pieces.

DSC01640.jpg

DSC01641.jpg

DSC01642.jpg


Looks so much better with 2 seats in there.

I also managed to start adding a few waterproof wiring connectors but then ran out of time :(
DSC01645.jpg


Doesn't look like i did much but im really happy i got done what i did even though i felt like poo.

I have given James the go ahead to finish the fuel system and start with the rear coilover setup which hopefully should get done this month. With the engine being wired up next month and in theory it could be started up, if it had a cooling system lol

Will update again when i have news, hopefully have the gear cables in production this coming month........ hell yes!

Jason :D
 

jason_l

New member
*** Update ***

Well its only a small update in terms of pictures but a few items are currently under development and will soon be in production.

Thought i would finish off the fuel system with the final piece to the puzzle. Tuesday the Glycerine Filled fuel pressure gauge arrived. Should look really nice in the engine bay with the rest of the shiney parts :D

Thread is on the back so mounts directly to the Regulator.......
DSC01652.jpg


front...........
DSC01653.jpg


Then wednesday some more green arrived :) Been looking at these for ages on ebay but decided to just buy them! They are for a mr2 and although i think they would look a bit strange in one they should look great in the buggy with all the other green bits.

I just feel sorry for the Lime green cow that had to die for these.........

Gear and handbrake gaitor.......
DSC01655.jpg


Here is the colour match next to the 'Viper Green' im using for the main body pieces, not a million miles off......
DSC01657.jpg


I have drawn up the cad files for the gear change cables and they have been packaged up with the original MR2 cables and are getting sent out tomorrow morning to have the new cables made up. Im hoping these cables get there early next week and the company should hopefully have them back to me by the beginning of next week if im lucky. These are highyly flexible and should easily be able to bend around the engine and still work just like they should.

I have also emailed Hel who make custom braided clutch/brake lines and hopefully should have a custom braided clutch line being made shortly. Will go straight from the master cylinder straight down the centre of the buggy to the gearbox without any junctions or T pieces, oh and it will hopefully be Lime green in colour also. Not that much of it will be seen but may as well keep the bright green theme going.

I have also been up to JDModified and have gone through the suspension system on the back and will hopefully see this get done at some point this month. James wasn't really well and it looked like he has a LOAD of work on so im not going to pressure him about it and i know he will do it justice.

Plan next month is to take 2-3 days off work and help with getting the engine side of things wired in, meaning in theory the key could be turned and the engine started. Although there won't be a cooling system installed, hence why i said in theory it could be started :)

Jason :D
 

jason_l

New member
About time i guess.

*** Update Time ***

Seems like i haven't done much on this for a while now but trust me, i have been doing things here and there.

Monday morning i was on the phone to Hel Performance after not recieving a reply from the guy i was originally talking to i thought 'lets cut the crap and go straight to the manufacturer' and all i can say is i highly recommend these guys!!!! FANTASTIC SERVICE!!!!!! Spoke to a guy on monday morning explaining what i was after, clutch cable @ 2.5m long and stainless end fittings. I had no idea what threads where on the strabo slave cylinder or the land rover master cylinder but they assured me they knew. I was told that my cable was going to get made on wednesday and sent to me for friday. Price as well, £27 delivered!!!! i was expecting a lot more.

Well it arrived wednesday morning! it looks awsome and fits perfectly to the buggy. Perfect length and fittings are spot on! and of course its green

DSC01674.jpg


and fitted.........
DSC01680.jpg

DSC01681.jpg


Now i wish i can say the same about the gear change company! Been emailing and calling for nearly 2 weeks now and finally got through to them on Thursday. I sent them the mr2 gear cables and a drawing of what im after and they never got back to me. Spent ages chassing them up just to be told that the gear cables will be £205 delivered and they are going to butcher the existing cables to make them! Oh and they don't come with a warrenty because they are using my cables as parts! Not happy with that so after a chat with the rep dealing with my job they are now going to make cables from scratch and i will get a warrenty! Now i need to wait again for them to get back to me, Fingers crossed..........

Now with the wiring being one of the next jobs to do i have started ordering parts for that. After looking at different loom coverings i have decided that i will use the normal split plastic covering stuff that comes with most looms but for the smaller bundles of wire i have found some really nice UV green braided covering. Looks so flippin bright its unreal and will make all the little wires look nice and neat.

35 metres of different stuff, shame the largest size is only 10mm, but stretch's to double that.
DSC01676.jpg

DSC01677.jpg


and i had a little time today so fitted a few bits to see what its like, looks great :D
DSC01693.jpg


Now i have been talking with Lee @ JDM for a bit about the wiring and today we decided that with all the cutting/adapting that needs doing with the engine loom that we will remake the loom to fit the buggy. This means it will look loads neater and im going to do a wire tuck with the bulky parts to keep it looking smooth. This means the wiring needs alot more work but worth it in the end. I started by cleaning up the loom so we can reuse certain parts and connectors.

Standard loom.............
DSC01689.jpg


crap that was removed.........
DSC01690.jpg


and the bare wires ready to be cut up and adapted for the new custom loom.......
DSC01691.jpg


Plan is to take a few days off in november and do the engine side of the wiring, Lee has given me a shopping list of everything i need so just need to buy the remaining parts and then book the work in with JDM.

As you can see i went up to JDM today to do a little work. James got the fuel rail adapted and it now fits like it should and properly seals against the block. As he needed to remove the original brackets i told him to rotate the fuel rail 180 so that the return line comes up rather than down like it did before, this gives it more room, now i just have to repolish the rail again.

DSC01685.jpg

DSC01683.jpg


Also got my thottle cable pieces i ordered fitted and it looks like they will work.
DSC01682.jpg


I will be up there next weekend working on it again and will be bugging James to get the rear coilovers done.

Watch this space :D

Jason :D
 

jason_l

New member
*** Update ***

Been getting my ass in gear :D Yep thats right the gear cables have arrived! Finally!!!!!!!!

Had a call from them on Thursday to say that the gear cables are made and ready for shipping. This has taken them about 4 weeks to get to this point. I have dealt with some stupid companies before but these guys really took the piss! Their ebay add states 'Quick turnaround, shipped within 24 hours'. yeah right! When i spoke to them over the phone they said that they where really sorry for the delay and hopefully next time they will be quicker, to which i replied with 'Hopefully there won't be a next time!'. The price also hadn't changed and was still £205.85 for the 2 cables. I expressed my anger but they said thats the price! Anyway, the good news is that they used a decent courier and by 8:00am the following day i had the cables. They do look rather good and the fittings they have used are good quality as well. They couldn't match the existing cables exactly so i knew there would be some modifying involved.

The cables are fully adjustable which is great, so even if my measurements where out i can still get them too work.

The cables..........
DSC01707.jpg


Shifter end......
DSC01705.jpg


Gearbox end.......
DSC01706.jpg


I had a little look around the workshop and managed to find some large washers that could be adapted and will work out. I have drilled 2 holes in each one so that the bracket bolts to the washer flat. The washers will then get welded to the housing on the back off the shifter and on the gearbox, and the cables will simply bolt in place.

modified washers.......
DSC01708.jpg

DSC01709.jpg


I have put a slot into the gearbox ones so the cable can easily be removed if needed.

Then today i got up to JDM and got the cables test fitted.........

Shifter side, you can see where the washers need to be welded to.......
DSC01710.jpg


Gearbox side, same again, the washers get welded to the bracket.....
DSC01711.jpg


bending around the engine.....
DSC01712.jpg

next to fuel cell....
DSC01713.jpg


I had a little test with the gearchange cables and it looks like they will work ok, just need to align them properly and weld the brackets.

I didn't really do much else while i was up there today, im just not in the right frame of mind at the moment and need to just chill out a bit. Have had alot of sideline projects on the go at the moment and i need to get them sorted before i can really crack down on this. I did however book the final parts of the work in with James. The rear suspension is booked in for the 8th November and the engine wiring is getting sorted on the 18 and 19th of November. The Demon will then get moved to my work on Saturday 20th November and i can crack on with the work! Getting all this work done this month means i am going to be pretty broke for a while but i need to get this thing moved so i can crack on!

On another side note i bought a few other things these last few weeks. Got some helmet tint films that can be cut to size and simple clip inside your helmet to help on those really sunny days. I bought them as im going to a fancy dress party (no theme) tonight and they are part of my costume but they look really good and aparently are road legal so may leave them in. They work really well, and although nobody can see into the helmet the visability out is really good.

Now who can guess who i am going as to this party?

DSC01694.jpg

DSC01696.jpg


Thats it for now, no real updates now for a few weeks but then its all go...........whoop whoop.

Jason :D
 

jason_l

New member
*** Little Update ***


Right well its been a relatively slow week in terms of actual work on the buggy. I haven't realy done much to be honest but i have managed to source a few parts.

Im working at sourcing the last few parts that i need for the electrical system thats getting done on the 18/19th of this month. This will see the engine able to start via the key and the engine loom should all be built. Won't be fully wrapped though as i still need to sort the wiring for the lights, indicators etc which will be done after it gets moved. I will be up there next weekend to begin the wiring and get a few things mounted ready for the hard graft a few days later.

This arrived this week though, loads of heatshrink (some of it glue lined) and relay/fuse holders. These are brilliant liitle things. I need a few relays and fuses for the engine loom so rather than buy a large relay/fuse box these can be used. Each one has space for a single relay and 3 fuses and they simply clip together, so 3 of them clipped together gives 3 relays and 9 fuses. This will all be mounted alongside the ECU and mounted inside a watertight compartment at the rear.
DSC01734.jpg


Thats pretty much everything i need now, just a few more wires, connectors and i should be ready :D

After sitting at the workshop computer looking at a few things on ebay i happened to glance up and look out the window and noticed one of the staff arrive on a scooter thing. Now i don't like scooters but my god it had some nice indicators. I had a quick chat with the guy and got the model/reg etc and got down to the dealer to order some indicators up for the buggy. They are taken off of a 'sym' scooter, found a local dealer to me and got the parts on order. I have been looking at front indicators for ages and wanted something that wasn't too small but looked pretty decent. Aiming to fix these to the front nosecone when i get round to making it. They where not cheap, but they will go really well with the small headlights im planning on getting as they are similar design.

DSC01731.jpg


just need some silver/orange bulbs to finish them off, job to do later me thinks......
DSC01733.jpg


Well thats been it for this week, not really much of an update i know but like to keep this thread regular.

The Buggy is now booked in on monday all day to have the suspension done and fingers crossed should see this finished :D

More updates next weekend.........

Jason :D
 

jason_l

New member
*** Update ***

Well yesterday i got up to JDModified and got on with a little, mainly just cleaning the thing up for the wiring on thursday/friday. Got everything sorted and boxed up as i will be moving the buggy next saturday. Its going to be a long week but should mean i can crack on with this next week more.

James managed to get the rear coilovers all fitted and welded up on monday/tuesday and they just need a little cleaning up now.

Coilovers will be rotated round so the adjusters are on the outside but here's what they look like.
DSC01748.jpg

DSC01749.jpg


She now sits on all 4 wheels at about the correct height, camber is still all over the place though. lol

while i was there i also picked up a set of pallet truck rollers from a mate. I can't thank him enough for these they are perfect for a wheelie bar  They are like skateboard wheels but only larger.

DSC01750.jpg


Thats it for now, everything is now ready for thursday and friday and with any luck i will be posting up a video next weekend of the engine running  and will be moved to its new home!

Jason :D
 

jason_l

New member
*** Update ***

Well the last few days are finally over and i can sit down for 5 minutes and write this update. Well things didn't go exactly to plan and im afraid to say that the engine didn't get started up :( We where so close but came across a problem that was just out of our hands and meant that the engine loom couldn't be finished like we had planned!

Thursday me and Lee @ JDModified spent all day cutting and chopping the engine loom and routing it around the rear chassis to the area we had decided to place the ECU. Thursday went really well and we where in a good position to finish it off on Friday. The amount of original loom that Lee managed to cut out and disscard was amazing and he knew exactly where every plug and harness needed to go. I could not of done the wiring without Lee and he is a wiring legend.

Engine loom being routed....
DSC01752.jpg


ECU area in rear compartment.......
DSC01753.jpg


Then Friday we where straight back on it and again all was looking good. Lee soon had the relays wired in and we where testing them off of the ignition. Everything worked perfectly and they where all doing there thing and switching on first turn, second turn and the third turn on the key. Then we tested the fuel pump and that worked fine.

Then the problems started, we hooked up the ECU and began testing that and something just wasn't right! The power feed for the fuel pump goes through the ECU so if there is ever a crash the ECU will cut the feed to the fuel pump and stop the fuel continuing to be pumped. We connected a light to the error code output on the ecu and it was lighting up! Lee checked the wiring again and again and all was looking good, the only thing that can be faulty is the ECU. This meant we couldn't finish the wiring off and i was pretty upset, Lee was actually more upset than me!

Then today i got the buggy moved to its new home for the next few months while i crack on with it myself. Didn't really want to move it as the wiring isn't complete but it had to be done so that i can get on with it further. This however means that when i do the rest of the wiring for the rest of the buggy i can get Lee to check that over when it goes back to him to have the engine loom finished.

Here are the pics from today......

Picking up from JDModified..........

You can't see it in this picture but its a real art getting it onto the trailor, the rear wheels are so much wider that the front that it almost falls off the ramps when the front goes up but is fine on the rear. The Buggy is so wide that it almost touch's both sides of my trailor...........haha
DSC01756.jpg


DSC01760.jpg


DSC01759.jpg


Random arty shot.........lol
DSC01758.jpg


and dropping off at its new home.........
DSC01762.jpg


DSC01761.jpg


and in its little corner of the workshop...........
DSC01763.jpg


Now i can really crack on with progress as its near to me. Was awsome having it at JDM but it was 40 miles away so couldn't work on it when i wanted.

Oh and yesterday this arrived, big thanks to Riko for sorting these out, its been well worth the long wait as they look awsome, almost like glass, will get it fitted this week hopefully, along with more progress

Clear polycarbonate cam cover..........
DSC01754.jpg

DSC01755.jpg


Well thats it for the moment, shame it didn't get started but will get there in the end, just need to put it out of my mind and crack on with the rest of it!

Jason :D
 

jason_l

New member
*** Its that time again ***

Well since the Demon was moved it has meant that i can spend a few hours here and there when i have the time actually doing some productive work, and this week i have managed to get a little more done!

I spent quite a few hours going through the huge amount of box's i have and actually sorting stuff out. When ever i get time to work on the buggy i spend most of my time actually looking for the parts as they are all over the place. I now have some large box's that have all the stuff neatly packed in them and on the top of each box there is a list of what is contained within. That way i know whats in each box and saves me hunting about all the time and when its removed from the box its simple crossed off the list. works in theory........lol

Monday my stealth black AN6 fittings arrived for the catch can so got them sorted, bit of an arse fitting the braided line into the fittings but got there in the end and they look awsome! Dremel makes light work of cutting the braided lines.

Lines made up with catch can......
DSC01764.jpg


and fitted in place, just need to secure the catch can on its own mount........
DSC01765.jpg

DSC01766.jpg


Then going through my bro's box of old parts i came across some heat protective sleeving so im having that as it won't need it now his car has been broken for spares....
DSC01769.jpg


I ended up staying late on wednesday and wanted to get some welding done but the flippin welder started playing up so the whole evening was a complete waste. Need to look at whats up with the thing but think its about time we got a new one! Wanted to get the rear plate bracket and tow eye on the back but it wasn't playing nice :(

This is what it should of looked like.......

DSC01771.jpg


Hopefully get that sorted soon.........

Also on wednesday my O2 sensor take off arrived for the exhaust so had to remove the exhaust and get that modded ready for the extra bit of welding required. I managed to quickly pop up to James' yesterday and he welded it up for me, as well as modified my catch can.

O2 take off and bung (bung not needed).......
DSC01772.jpg


Exhaust removed and work started.......
DSC01773.jpg


Hammered into place, was such a tight fit that it almost didn't need welding.......
DSC01774.jpg


and all welded up..........
DSC01777.jpg


Hopefully this week i will get the exhaust wrapped and fitted back onto the buggy. I don't really want to cover up the awsome welding on the exhaust but its quite close to the fuel tank and clutch slave so want to protect them from the heat.

catch can with added piece for the breather filter.........
DSC01776.jpg


Hopefully this week coming should see more progress on the buggy. Going to look at connecting up the gear cables and thottle cable next and maybe modifying the brake/clutch pedals to work. Also hopefully get someone to test my ECU in their GT so i can confirm that it is/isn't mullered!

Although i have alot of other projects on the go as well, why am i always so busy..............lol

Jason :D
 

jason_l

New member
*** Small Update ***

Well been slowed up this week by the Snow, work was closed on thursday/friday and i couldn't get there to actually work on the buggy anyway.

However i managed to get a few things sorted.

Firstly i got the exhaust all wrapped up and fitted back onto the buggy. Was a shame to cover up all the welding on the exhaust but its done now. Im still unsure if wrapping the exhaust is the best thing to do! Its close to the fuel tank so in theory should help protect it from the heat. I will be adding a firewall in between the tank and exhaust anyway but the wrap should help deflect a bit of heat.

DSC01783.jpg

Back on the buggy........
DSC01789.jpg


I just need to redo the mounting bracket for the carbon can and thats another thing to tick off the list. :)

I have started welding up the gear cable bracket from the gearbox and after having problems with the welder last week i have managed to get it working again. Didn't get as much done as i wanted to do as i spent a little time sorting the welder but it will get finished this week.

not a great pic but you get the idea, the modified washers get welded to the main bracket to accept the new cables.....
DSC01791.jpg


Last week i also sent my ECU off to a member of UK Starlet Club as he kindly offered to test fit it into his car and see if it would start. After doing this he has confirmed that my ECU is dead! Thats great news as now i can confirm 100% it was the ECU and look at getting a replacement and moving on with the build.

I know its not much of an update but its progress :D

Jason :D
 

jason_l

New member
*** Update Time ***
Right after getting the gearbox bracket welded up i finally got it fitted and started looking at the gear cables.
DSC01805.jpg


Then got the bracket on the shifter side welded up ready for the cables.
DSC01848.jpg


Then after fitting for a few hours with the cables they where finally in. These where a nightmare to fit as they could only really go in one way and i was fighting them the whole time. They still need some extra fittings added around the engine to hold them off of the alternator and keep them secure.

shifter side.......
DSC01853.jpg

DSC01855.jpg


gearbox side........
DSC01854.jpg


Sat in the Buggy for a bit and i have all 5 gears plus reverse. :D The gears are very nothchy, precise and you really have to be exact when changing. Bit weird but im sure i will get used to it.

Then started looking at the pedal arrangement, alot of faffing about as nothing you buy is a direct fit and needs modifying in some way!

First got the mini clutch and brake pedals and started working on them.

Cut the original lugs off so they could be moved to their new position.
DSC01808.jpg


and in there new position.
DSC01823.jpg


I also wasn't happy with the original welding on the back of the pedals, not something i want to be repairing at a later date when it snaps so i added more weld now. Going to get the pedals powdercoated green when the rest of the parts get sent off.

went from this, original welding.......
DSC01819.jpg


to this, should last now.........
DSC01820.jpg


Also bought a new clutch pedal clevis but again this needed modding to fit but got there in the end. I also had to re-position the clutch pedal lug as the pedal was not level with the brake :(

clevis parts........
DSC01828.jpg


fitted in the pedal box........
DSC01831.jpg


Also managed to get the brake light switch fitted in position so when i press the pedal down i will get brake lights, and finally got the pedal spring fitted so the pedals return to their original location when i lift off them.
 
Top