You are using an out of date browser. It may not display this or other websites correctly.
You should upgrade or use an alternative browser.
You should upgrade or use an alternative browser.
Sylva Mojo build
- Thread starter Danny
- Start date
Danny
Administrator
Right so the out of line engine annoyed me soooo much that I decided to adjust it...
The reason why it is out of line is that when I made the mounts I used blocks of wood the same thickness as the rubber cotton reel mounts but did not account for the fact that the engine is heavy and the rubber squishes....
So, I had to move one hole 5mm and suddenly everything lines up perfect!!! Also before I moved the mount I was having to pull top of the engine over and hold the bottom of the engine to get it sitting right, where as now the engine is sitting right naturally which is perfect.
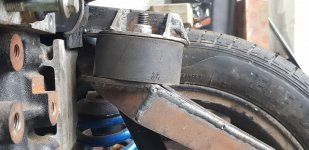
Once I moved the mount it also meant it was not sitting on the plate enough for my liking and after confirming with alan I had to modify it a bit
I decided to add a thin round bit of steel under the mount to sit on and this worked a treat... it also gave me back the 3mm compression I lost.
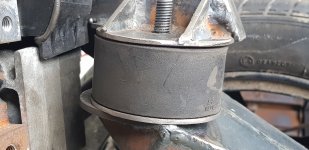
Once this was fitted I was happy with the way the engine sat and all is well in the world again.
I have 2 mounts left to make and so I decided to go with an easy one first.
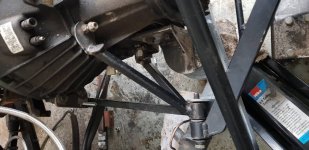
This mount is going on the rear of the car and connects from the gearbox to the cross bar box section. I mocked it up and then got to the stage that i could really do with a poly bush in it...
I decided to try and use the mig welder to weld this up as I could not be bothered to go and get more gas for the tig so off I trotted.
Splatter is a problem but the more I use the mig teh better I get and I know the welds are strong so for now that pleases me.
I decided to have a quick tidy up and come home so I could make my first Poly bush. I got on the laser and cut 2 disks out of plastic with a the right size hole through the middle so that I could put the disk either side of the mount so I know that the center tube is central and also upright.
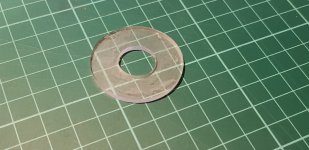
I taped the first one on the bottom then mixed up the poly urethane poured it in and put the second one on the top and let it set for an hour.
after an hour I peeled off the plastic and this is what i was left with....
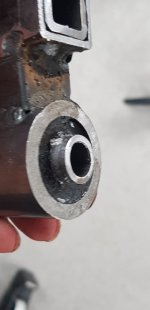
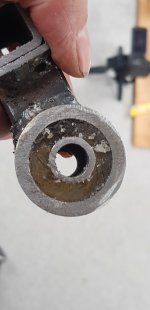
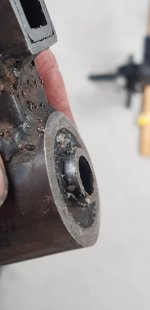
After the hour the Poly Urethane had cured enough but was not completely set. after 3 hours it is pretty much set and it is a tough mount for sure...
there is just enough movement to hopefully stop too many vibrations and looks like it is going to be strong enough.
I have a few more bits to weld to the mount but that should not cause too many problems
My next day in the garage is friday so should have that mount made and fitted then I have one more to make at the rear of the engine to stop the top of the engine moving too much so there should be another poly bush mount to make up which I am quite looking forward to
The reason why it is out of line is that when I made the mounts I used blocks of wood the same thickness as the rubber cotton reel mounts but did not account for the fact that the engine is heavy and the rubber squishes....
So, I had to move one hole 5mm and suddenly everything lines up perfect!!! Also before I moved the mount I was having to pull top of the engine over and hold the bottom of the engine to get it sitting right, where as now the engine is sitting right naturally which is perfect.

Once I moved the mount it also meant it was not sitting on the plate enough for my liking and after confirming with alan I had to modify it a bit
I decided to add a thin round bit of steel under the mount to sit on and this worked a treat... it also gave me back the 3mm compression I lost.

Once this was fitted I was happy with the way the engine sat and all is well in the world again.
I have 2 mounts left to make and so I decided to go with an easy one first.
This mount is going on the rear of the car and connects from the gearbox to the cross bar box section. I mocked it up and then got to the stage that i could really do with a poly bush in it...
I decided to try and use the mig welder to weld this up as I could not be bothered to go and get more gas for the tig so off I trotted.
Splatter is a problem but the more I use the mig teh better I get and I know the welds are strong so for now that pleases me.
I decided to have a quick tidy up and come home so I could make my first Poly bush. I got on the laser and cut 2 disks out of plastic with a the right size hole through the middle so that I could put the disk either side of the mount so I know that the center tube is central and also upright.

I taped the first one on the bottom then mixed up the poly urethane poured it in and put the second one on the top and let it set for an hour.
after an hour I peeled off the plastic and this is what i was left with....


After the hour the Poly Urethane had cured enough but was not completely set. after 3 hours it is pretty much set and it is a tough mount for sure...
there is just enough movement to hopefully stop too many vibrations and looks like it is going to be strong enough.
I have a few more bits to weld to the mount but that should not cause too many problems
My next day in the garage is friday so should have that mount made and fitted then I have one more to make at the rear of the engine to stop the top of the engine moving too much so there should be another poly bush mount to make up which I am quite looking forward to
Danny
Administrator
The engine is finally in and sitting where I want it...
The lat mount was a bit of a pig to do but it is in and doing what I wanted. I need to tidy it up a little but it is ok.
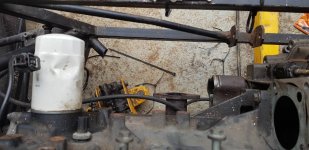
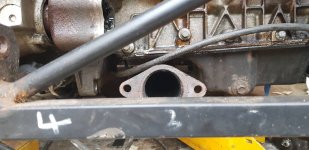
Once the engine was in I decided to look at the exhaust situation and I was hoping to use the original manifold but that does not fit and then so I mounted the cat which sets up the exhaust so I can see where the pipe will run under the car...
It sits nicely but need to work out how to get the exhaust passed a cross bar. I am looking at using a flexible tube but my question is do I also need to add a flexi pipe in to absorb vibration as well....
I ordered a new manifold and hopefully it fits if not it will be an expensive day....


Sent from my SM-N950F using Tapatalk
The lat mount was a bit of a pig to do but it is in and doing what I wanted. I need to tidy it up a little but it is ok.
Once the engine was in I decided to look at the exhaust situation and I was hoping to use the original manifold but that does not fit and then so I mounted the cat which sets up the exhaust so I can see where the pipe will run under the car...
It sits nicely but need to work out how to get the exhaust passed a cross bar. I am looking at using a flexible tube but my question is do I also need to add a flexi pipe in to absorb vibration as well....
I ordered a new manifold and hopefully it fits if not it will be an expensive day....


Sent from my SM-N950F using Tapatalk
Danny
Administrator
Today i managed to get a few hours in the garage so I thought I would see if my new exhaust would fit.
Itsnblooming tight but it is in.
I also decided to make a start on the final engine mount which will go from the top of the gear box to the lower chassis rail near the bulkhead.
However a friend popped round to see how was doing and asked if the drive shafts line up.... Erm....
Crap
Well I have had to raise the engine 10mm a side and to be fair I needed to do that anyway ad the sump was quite exposed...
I just now need to tweak a couple of the other mounts and at last it will all be fine


Sent from my SM-N950F using Tapatalk
Itsnblooming tight but it is in.
I also decided to make a start on the final engine mount which will go from the top of the gear box to the lower chassis rail near the bulkhead.
However a friend popped round to see how was doing and asked if the drive shafts line up.... Erm....
Crap
Well I have had to raise the engine 10mm a side and to be fair I needed to do that anyway ad the sump was quite exposed...
I just now need to tweak a couple of the other mounts and at last it will all be fine


Sent from my SM-N950F using Tapatalk
Danny
Administrator
As you can see from my previous posts my exhaust situation has me puzzled...
I am thinking from the underside of the engine to the chassis using something like this....
https://rover.ebay.com/rover/0/0/0?mpre ... 2161026223
That would get me exactly where I need to be and make it easier to get a silencer on....
But one question is do you reckon that this will be good enough to sustain vibration? as I do not think I can get a normal flexi pipe in between the manifold and chassis....
Sent from my SM-N950F using Tapatalk
Danny
Administrator
Well I got another day in the garage on Friday and I started off my fitting my freshly cut 5mm discs to the engine mounts to raise it my 15mm a side. I did not realise how much difference this will make but it certainly has.
I then decided it was time time to look at the inlet manifold situation and originally it was looking like I was going to have to cut the bar and move it a little. But because I have raised the engine by 15mm the inlet manifold just fitted.
Just fitting is not enough though as any engine movement would cause issues...
I was looking at cutting the bottom of the inlet off and remembered I had a spare inlet in the shed so off I went to see if i could find it and have a practice run first.
I found the manifold and noticed it had 1.8/2.0 written on the manifold and looked a bit smaller so I offered it up and it fitted great. So the next thing was to try and see what was different between the two other than the size and so I started to switch the parts over.
The air flow meter was the only thing that was not the same but I soon realised on the the manifold that came off the focus that it had a 90 degree adapter plate so once I removed that all was well with the world.
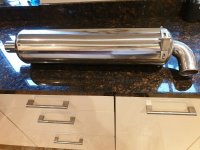
The next job is to suss out my exhaust so I think I am going to look for a round silencer and with an inlet on the ends as I think I could make that work....


Sent from my SM-N950F using Tapatalk
I then decided it was time time to look at the inlet manifold situation and originally it was looking like I was going to have to cut the bar and move it a little. But because I have raised the engine by 15mm the inlet manifold just fitted.
Just fitting is not enough though as any engine movement would cause issues...
I was looking at cutting the bottom of the inlet off and remembered I had a spare inlet in the shed so off I went to see if i could find it and have a practice run first.
I found the manifold and noticed it had 1.8/2.0 written on the manifold and looked a bit smaller so I offered it up and it fitted great. So the next thing was to try and see what was different between the two other than the size and so I started to switch the parts over.
The air flow meter was the only thing that was not the same but I soon realised on the the manifold that came off the focus that it had a 90 degree adapter plate so once I removed that all was well with the world.
The next job is to suss out my exhaust so I think I am going to look for a round silencer and with an inlet on the ends as I think I could make that work....


Sent from my SM-N950F using Tapatalk
Danny
Administrator
I got to the Mojo today and although I was there all day I was distracted massively by the fact teh builders had started to replace the staircase on my building... I have been waiting for nearly a year for this to happen so to say I was distracted was an understatement 
I did however make a swaging tool and it worked good enough... I have split a few parts of the tube in the practice run but I have it sussed now...
Other than that I am a little lost as to where to go to next...
I looked at fitting an expansion tank but the one I had was too small and the one from the focus is like a swimming pool so gave up on that. I then thought I may as well start stripping out the the coolant hoses so I can get the ends swaged but even that I could not do as they are in there too well... The engine needs to come out as well first!!
so I think the next port of call is get an expansion bottle fitted and also get the exhaust sorted then I can repair the paintwork in the chassis and start putting stuff back together finally...
I also need to work out where my fuseboard is going as well....
Danny
Administrator
I have not done much on the mojo really as I have been sorting the garden out and getting my bees ready for the summer 
I have also ran out of money so need to sell some bits before I can carry on spending
Gor most things sorted now though so once I get some funds in I will be flying
Sent from my SM-N950F using Tapatalk
I have also ran out of money so need to sell some bits before I can carry on spending
Gor most things sorted now though so once I get some funds in I will be flying
Sent from my SM-N950F using Tapatalk
Danny
Administrator
I picked up a windscreen now for the mojo so I dont have to butcher the bodywork 
and to add insult to injury to my purse strings I have almost completed on another rental property so I am skinter than skint now... all for the greater good apparently.
so this mojo build may take a little longer than the no plan
and to add insult to injury to my purse strings I have almost completed on another rental property so I am skinter than skint now... all for the greater good apparently.
so this mojo build may take a little longer than the no plan
Danny
Administrator
wagon_1.0":nbdej7t5 said:how you enjoying your MIG? I used mine instead of my tig for teh first time in ages. So much quicker and easier
erm.... its good.... I am not good with it... The welds are strong but not pretty yet... I am certainly a better tig welder now
Danny
Administrator
It has been a while since I really did anything on the mojo and to be honest that is because I have not had the spare cash to throw at it.
I have been looking at the exhaust situation and that has been a bit of a challenge but I have now found a possible solution so instead of trying to explain how I am going route it I am just going to show you when I have done it.
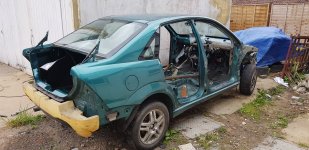
The other thing is the Donor car has been in my yard for a while now and frankly parts are not selling off it so I am going to strip out what I think will sell then then I am going to get it scrapped asap as I am fed up of seeing it.
I started removing the loom out the other day and that was easy till I go to the ECU and fords being ford they put a plate over the ecu to stop it being taken out so I had to get the grinder out.
Once the loom is out and the car is stripped then I will be get it removed and from there I can really start doing a bit more. As you can see I am in no major rush to get anything done quickly ?
Danny
Administrator
wagon_1.0":1ik8w3z4 said:Wow frighteningly solid for a Ford!
yeah only done 30K miles one lady owner as well
Unfortunately it was the other 3 male owners who treated it like a hire carDanny":3i2cbuhp said:yeah only done 30K miles one lady owner as well
Danny
Administrator
I have been pottering about with the mojo just the odd hour here and there. I refitted all the fibreglass the other day so i could see how well the exhaust will fit. I have started to make up mounts for the silencer and got it sitting somewhere near.
I then need to tack up the exhaust as well which by the looks of it won't be too much of an issue and I think I have enough bends and what not laying about to do it.
Once the exhaust is on and done then I really need to look at how to mount the alternator as this is now going behind the engine...
I then need to tack up the exhaust as well which by the looks of it won't be too much of an issue and I think I have enough bends and what not laying about to do it.
Once the exhaust is on and done then I really need to look at how to mount the alternator as this is now going behind the engine...

