Got a Freestyle Buggy at last!

250buggys

Well-known member
Phaeton":6ctyh6ox said:
file.php


That looks a bit of a steep angle you may want to pull your steering column back a bit & allow the rack to rote in the clamps a little

Will do thanks Alan :) , I haven't tightened the bolts up yet as I really liked wagon's idea of covering the universal joint with a long gaiter. That should be here next week so will have another look at the whole setup then.
 

Phaeton

Moderator
Staff member
What are you doing for fuel tank/tanks, just thinking before you commit with the welder on your seat mounts, if you're going with behind the seat fitting you may need to come forward very slightly.
 

250buggys

Well-known member
Phaeton":sjism491 said:
What are you doing for fuel tank/tanks, just thinking before you commit with the welder on your seat mounts, if you're going with behind the seat fitting you may need to come forward very slightly.

The fuel tank I have spent lots of time thinking about, umm ing and arr ing.

It would be really good to have a behind the seats tank but it is a trade off in leg room. If I had short legs there would be no issue.

What I plan to do is fit a small tank and fire wall cover behind the passenger seat in order to satisfy IVA requirements then probably swap to a helium tank for better capacity.
 

Phaeton

Moderator
Staff member
Coming along nicely, whilst you have the space you might want to consider spinning the gear selector round the other way. It makes for a better change & the reverse light switch works correctly.
 

250buggys

Well-known member
ChaosMS":1pm90fr4 said:
hmmmm, I would just say that when I took mine for its test recently they were VERY interested in how the seats were mounted but even more so about how the harness's were mounted.

Could you not weld in a cross bar into the frame and then mount to that? I tend to over engineer things quite a lot - but alloy spreader plates, not sure how the inspectors would see that, unless it was a high grade and quite hard? would you also bolt the plate in each corner through the floor?

Rich

Hi Rich, I took your advice and beefed up my seat mountings, I have just updated my build thread with pics, I see what you mean now with bolting each corner of the backing plate in through the floor as well as the central seat bolt. I can do this if there would defiantly be more added strength, 32 more bolts, nuts and washers would add extra weight and cost. I may have a chat to one of the mechanical engineers at work and see what he thinks, also open to ideas from any other forum members.

I am going to use the donor car's seat belts, so the buggy's frame will take the loading rather than a harness.

Thanks
Chris
 

250buggys

Well-known member
Phaeton":1j9n5cas said:
Coming along nicely, whilst you have the space you might want to consider spinning the gear selector round the other way. It makes for a better change & the reverse light switch works correctly.

Thanks for that Alan, that is defiantly on my to do list, spend some time on the gear selector and getting the stick in the right position/height, getting the reverse light S/W working.

Now the seats are in position I should have more time to start knocking off some of the smaller jobs and getting on with some progress.

I hadn't planned on beefing up the seat mountings, I wouldn't have painted the floor panels otherwise, I am glad that it is done now though :)

Have you got any more plans/upgrades for Mr Bumble that you are working on?
 

Phaeton

Moderator
Staff member
250buggys":315guinq said:
Have you got any more plans/upgrades for Mr Bumble that you are working on?
Unfortunately at the moment we have the house for sale, so I'm banned from working on the buggy, not allowed to make a mess on the drive.
 

Danny

Administrator
Phaeton":2ds8mxt6 said:
250buggys":2ds8mxt6 said:
Have you got any more plans/upgrades for Mr Bumble that you are working on?
Unfortunately at the moment we have the house for sale, so I'm banned from working on the buggy, not allowed to make a mess on the drive.
Hopefully that goes well :)

Sent from my SM-N910F using Tapatalk
 

250buggys

Well-known member
Danny":10y2rjxx said:
Phaeton":10y2rjxx said:
250buggys":10y2rjxx said:
Have you got any more plans/upgrades for Mr Bumble that you are working on?
Unfortunately at the moment we have the house for sale, so I'm banned from working on the buggy, not allowed to make a mess on the drive.
Hopefully that goes well :)

Sent from my SM-N910F using Tapatalk

Moving house is a real pain.

I bet you have been told not to buy any more boys toys as well.

Double garage must be on the tick list for the new place.
 

Phaeton

Moderator
Staff member
It's already got 2 single garages but there is also space to put a triple undercover work area where the 2 post lift was supposed to go, but I suspect it'll never happened it's been 3 months & as we haven't sold they've put it back on the market

Sent from my SM-G900F using Tapatalk
 

Danny

Administrator
Phaeton":n5ked906 said:
It's already got 2 single garages but there is also space to put a triple undercover work area where the 2 post lift was supposed to go, but I suspect it'll never happened it's been 3 months & as we haven't sold they've put it back on the market

Sent from my SM-G900F using Tapatalk
Man that sucks.

I am looking for something like that down our way

Sent from my SM-N910F using Tapatalk
 

Lilspeed

Member
Looks like it's coming together well Chris! :)

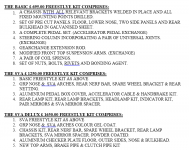
I didn't know the aluminium treadplate was an option. Now I think about it I have seen one with flat sheet panels before, but I assumed they were homemade.
 

Phaeton

Moderator
Staff member
You can go further than that & make it better & more precise

file.php


Where is gets fat it's a rubber vulcanised bush use an angry grinder with a slotting blade & remove all that completely.

So that you end up with

2010-04-03171310.jpg


Think we've had the conversation about spinning the gear selector round


250buggys

Well-known member
Lilspeed":38q1dm1c said:
Looks like it's coming together well Chris! :)

I didn't know the aluminium treadplate was an option. Now I think about it I have seen one with flat sheet panels before, but I assumed they were homemade.

Thanks Justin, its good to get the jobs ticked off and the shed emptied.

I took this snippet from the build manual

BM.PNG

I think there were a lot more of the SVA delux kits sold, I'm just glad I've got all the parts with mine compared to some of the kits that turn up on ebay that have plenty of bits missing.
 

250buggys

Well-known member
Phaeton":3d9kweul said:
You can go further than that & make it better & more precise

file.php


Where is gets fat it's a rubber vulcanised bush use an angry grinder with a slotting blade & remove all that completely.

So that you end up with

2010-04-03171310.jpg


Think we've had the conversation about spinning the gear selector round


Thanks for the tips Alan, I thought it was better to leave the vulcanised rubber part attached to stop the vibrations (think that was the point of it?) but you recon it's best to get rid of it then?

I have got some work to do on the gear linkage, it would only get half the gears and inspection of the sheppards crook shows the weld has fractured.
 

Danny

Administrator
I made my gear knob as short as I could... vibrations are the least of your problems in a freestyle :D
 

Phaeton

Moderator
Staff member
250buggys":3m1vflo8 said:
I have got some work to do on the gear linkage, it would only get half the gears and inspection of the sheppards crook shows the weld has fractured.
Yeah it's worth spending a little time getting this right, make sure you have new roll pins in the gearbox end & whilst there replace the oil seal another favourite A series leaking point. I used to put a wire the roll pin as they find a way of working loose & falling out, or you could replace with bolt & lock nut. I always bolted my selector shaft to shepherd's crook that way you had adjustment, welding it means you get it wrong you're stuffed.
 
Top