
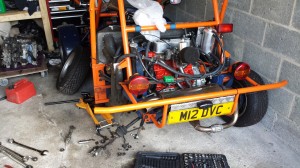
It's that time of the year again when you start thinking about the first kit car show of the season, and that is Stoneleigh kit car show. I thought this year would have been an easy year to get my road legal buggy ready for the kit car season, but it's been a long task. I have not had a great deal to do but everything I have had to do on the road buggy has taken ten times longer than it should have done and that job you start just explodes into … [Read more...]
Road Buggy Stainless Exhaust System
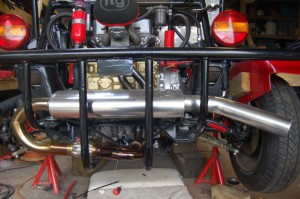
My road legal buggy is coming up for 10 years old this year. I have enjoyed every single second of owning my freestyle kit car, and although there be some frustrating and stressful times most of them being when I’ve been sat on the side of the road in the rain waiting for a breakdown recovery truck. With the 10 years of ownership I’ve only ever had the exhaust system that was on the car when it was first built. So every year the last 10 years, … [Read more...]
Danny’s Re-Build Diary Page 2
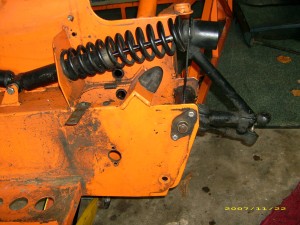
Hello and welcome to my Re Build Diary Page 2, 26 December 2007 Today I removed the front hubs steering rack and colomn and started removing paint from the floor and main chassis. I am looking at doing the adjustable front suspension conversion on the rebuild so I am going to go away and have a think about what extra modifications to the chassis I am going to need to do. 29th December 2007 Today I decided that I am going to … [Read more...]
Danny’s Re-Build Diary Page 3
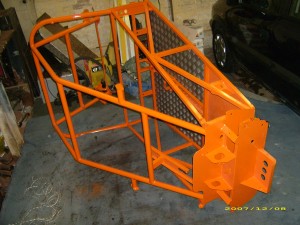
Hello and welcome to my Re Build Diary Page 3, Saturday 5th January, Today I was up early to finish getting the buggy ready for the painters so after doing a bit and freezing my bits off the buggy was about ready, then tragedy my brilliant welding failed I snapped one of the wing mirror brackets off, this was the first bit of welding I have ever done and did not use enough power but after I ground the old weld off and re welded it was strong … [Read more...]
Danny’s Road Buggy Re-Build Diary Page 4
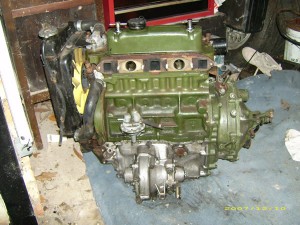
13th January 2008 Today after recovering from small hangover I made my way back from Twickenham and thankfully the traffic was not too bad! Yesterday we drove to Dorset to pick up my 1380cc engine from Harris Motorsport. Myself and my friend Ben went to the garage where the buggy is stored and we dropped a bag of plaster on the ground just in front of the back of the van so that if the engine did drop unexpectedly it would not do any damage. … [Read more...]
Danny’s Re-Build Diary Page 5
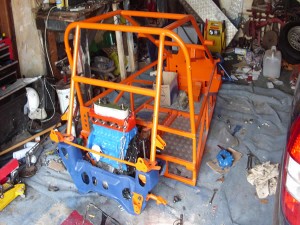
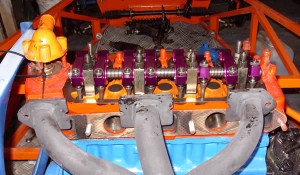
19th February 2008 For the last few days I have been painting and prepping bits for the rear suspension set up. I also fitted the engine to the subframe with the help of my little sis. The bell housing end of the engine was a simple procedure getting the mount in but the timing chain end was a real pig and took over an hour of swear and throwing things but its in. As you will notice from the pictures below I have actually fitted the engine to … [Read more...]
Danny’s Re-Build Diary Page 6
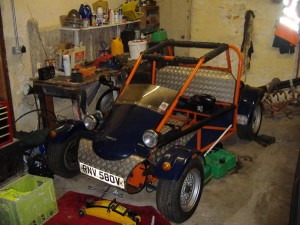
10th March 2008 So I ordered my tyres from MiniSport at a cost of £192 delivered I went for the Yoko 175/50/R13 I went off to see my unle at MK MOT to fit the tyres to the rims, I decided that I was not going to fit these myself as I did not want to scratch the rims too much so my uncle had the pleasure of that job. I had the pleasure of balencing them which turned out ok and found it to be quite an easy job. With my tyres fitted I was … [Read more...]
Danny’s Re-Build Diary
Hello and welcome to my re build diary, In september I was meant to be heading down to somerset for 5 days then up to New Quay (wales) in my Freestyle buggy. But on the M4 motorway my buggy over heated so i pulled over on to the hard shoulder and slowed down to 50mph the oil light started to flicker so I turn off the ignition and rolled to a stand still. After inspection by myself I found copious amount of oil over the engine bay and thought … [Read more...]